 Welcome to our guide on protecting your haven from potential intruders! Home burglaries are an unfortunate reality, but with the right precautions, you can significantly reduce the risk and keep your loved ones and belongings safe. In this comprehensive checklist, we'll walk you through essential steps every homeowner should take to fortify their property against break-ins. Let's dive in and make your home a fortress of security and peace of mind!
- Highlighting the importance of proactive measures
- Encouraging readers to take action to protect their homes and families
- Introducing the purpose of the checklist: to provide actionable steps for burglary prevention
- Inviting readers to embark on the journey of securing their sanctuary with a positive and empowering tone
II. Assessing Home Vulnerabilities: Shedding Light on Your Home's Security
 Let's embark on a journey to illuminate potential vulnerabilities in your home's security, all while keeping the vibe light and positive. By shedding light on these areas, you'll be better equipped to fortify your sanctuary against unwanted intrusions. Here's how to get started:
-
Take a Detective Stroll: Put on your detective hat and take a leisurely stroll around your property. Look for any areas that seem accessible or hidden from view, as these could be potential entry points for intruders.
-
Inspect Entry Points: Give your doors, windows, and other entryways a thorough once-over. Look for signs of wear and tear, loose hinges, or outdated locks that could compromise your home's security.
-
Evaluate Existing Measures: Take stock of your current security setup, including alarms, locks, and lighting. Are they up to the task of keeping your home safe, or could they benefit from a little extra TLC?
By shining a light on these potential vulnerabilities, you're taking proactive steps to protect your home and loved ones. Remember, a well-secured home is a happy home!
III. Strengthening Doors and Windows: Locking in Security with a Bright Outlook
Let's brighten up our home's security by focusing on the frontline defenses: doors and windows. With a positive vibe and a few strategic upgrades, you can lock in peace of mind and keep your sanctuary safe from intruders. Here's how to strengthen your home's doors and windows:
-
Lock it Up: Invest in high-quality deadbolt locks for all exterior doors and reinforce them with sturdy strike plates. This simple upgrade can significantly boost your home's security.
-
Window Wise: Install window locks or security bars to prevent intruders from gaining easy access through vulnerable windows. Consider upgrading to shatterproof glass or applying window film for added protection.
-
Light the Way: Illuminate your home's exterior with motion-activated lights to deter burglars and brighten up dark corners. A well-lit home not only enhances security but also adds a welcoming ambiance.
With these bright ideas, you'll be well on your way to fortifying your home against potential intruders. Remember, a little extra security goes a long way in keeping your home safe and sound!
IV. Illuminating Outdoor Security: Brightening Your Home's Defenses with a Sunny Disposition
 Let's step into the sunshine and turn our attention to outdoor security enhancements. By infusing your home's exterior with light and positivity, you'll create a welcoming environment while simultaneously deterring potential intruders. Here are some ways to enhance your outdoor security with a sunny disposition:
-
Let There Be Light: Illuminate your home's exterior with motion-activated lights to keep burglars at bay and create a warm, inviting atmosphere. Brightening up dark corners and pathways adds an extra layer of security and charm.
-
Tidy Up with a Smile: Keep your outdoor spaces neat and tidy by trimming shrubbery and trees. Not only does this enhance your home's curb appeal, but it also eliminates potential hiding spots for unwanted guests.
-
Gatekeeper of Happiness: Consider installing fencing or gates to define your property boundaries and control access. Not only does this provide additional security, but it also adds a touch of elegance to your outdoor space.
By embracing these outdoor security enhancements with a sunny disposition, you're not just protecting your home – you're creating a welcoming oasis for you and your loved ones to enjoy.
V. Investing in Home Alarm Systems and Surveillance: A Bright Approach to Home Security
 Now, let's shine a light on alarm systems and surveillance – two powerful tools that can help safeguard your home with ease and peace of mind. By taking a positive and proactive approach, you'll not only enhance your home's security but also create a brighter outlook for your family's safety. Here's how to invest in alarm systems and surveillance with a sunny disposition:
-
Alarm Systems: Your Guardian Angel: Consider installing a monitored alarm system equipped with sensors on doors and windows. These systems provide round-the-clock protection and can alert you and authorities to any potential threats.
-
Surveillance Cameras: Eyes Everywhere: Embrace the power of surveillance cameras to keep a watchful eye on your property, both inside and out. Modern cameras offer high-definition video, remote monitoring, and even two-way communication for added convenience and peace of mind.
-
Display Your Defense: Don't forget to prominently display signs and stickers indicating the presence of a security system. These visible deterrents can discourage would-be intruders and give your home an added layer of protection.
By investing in alarm systems and surveillance with a bright approach, you're taking proactive steps to protect what matters most – your home and loved ones.
VI. Implementing Smart Home Technology: Brightening Your Home's Security with Modern Solutions
 Let's bring a touch of modernity and brightness to your home's security with the implementation of smart home technology. With these innovative solutions, you can enhance your home's defenses while enjoying added convenience and peace of mind. Here's how to brighten your security outlook with smart home technology:
-
Smart Doorbell Cameras: Your Digital Door Guardian: Install smart doorbell cameras to keep an eye on your home's entrance, even when you're away. With features like remote monitoring and two-way communication, you can greet visitors and deter intruders with ease.
-
Smart Locks: Keyless Convenience with Added Security: Upgrade to smart locks equipped with remote access and customizable entry codes. Say goodbye to misplaced keys and hello to enhanced security and convenience for you and your family.
-
Integration with Smart Home Hubs: Centralized Control, Brighter Security: Integrate your home security systems with smart home hubs for centralized control and monitoring. With a single interface, you can manage your security cameras, alarms, and more from anywhere, anytime.
By embracing smart home technology with a bright outlook, you're not just upgrading your home's security – you're ushering in a new era of convenience and peace of mind.
VII. Securing Valuables: Safeguarding Your Treasures with a Bright Outlook
Let's brighten up the security of your most prized possessions by implementing strategies to safeguard them effectively. With a positive vibe and proactive measures, you can ensure that your valuables are protected against potential threats. Here's how to secure your treasures with a bright outlook:
-
Invest in a Secure Safe or Lockbox: Keep your valuables, important documents, and sentimental items safe and sound by storing them in a secure safe or lockbox. Choose one that is fireproof and tamper-resistant for added peace of mind.
-
Protect Important Documents: Keep important documents such as passports, birth certificates, and property deeds in a waterproof and fireproof container. This ensures that they remain intact and accessible in case of emergencies.
-
Catalog and Photograph Valuables: Create a detailed inventory of your valuables, including descriptions, serial numbers, and photographs. This information can be invaluable for insurance purposes in the event of theft or damage.
By securing your valuables with a bright outlook, you're taking proactive steps to protect what matters most to you and your family.
VIII. Developing Home Security Habits: Brightening Your Routine for a Safer Home
Now, let's infuse some positivity into your daily routine by developing home security habits that will keep your home safe and secure. By adopting these bright practices, you'll create a welcoming environment while maintaining a vigilant eye on potential threats. Here's how to brighten your security habits:
-
Lock Up with a Smile: Make it a habit to lock all doors and windows whenever you leave the house or retire for the night. A simple smile as you lock up can reinforce the importance of security while adding a positive touch to your routine.
-
Share Sunshine, Not Secrets: Before going on vacation or leaving your home unattended for an extended period, inform trusted neighbors or friends. Sharing your plans with a smile can foster a sense of community and ensure that someone keeps an eye on your property.
-
Social Media Savvy: Be mindful of what you share on social media, especially when it comes to your whereabouts or extended absences from home. By sharing sunshine-filled moments responsibly, you can protect your home from potential burglars.
By developing bright home security habits, you're not just protecting your home – you're fostering a sense of safety and positivity that radiates throughout your neighborhood.
IX. Community Engagement and Awareness: Spreading Sunshine for a Safer Neighborhood
Let's spread some sunshine beyond the walls of our homes and into our communities by engaging with our neighbors and raising awareness about home security. By fostering a sense of camaraderie and vigilance, we can create a brighter and safer neighborhood for everyone. Here's how to shine a light on community engagement and awareness:
-
Join Forces with Neighbors: Get involved in neighborhood watch programs or community safety initiatives. By working together with your neighbors, you can keep a watchful eye on each other's homes and deter potential intruders with a smile.
-
Share Bright Ideas: Share home security tips and resources with your neighbors through community forums or social media groups. By spreading sunshine-filled knowledge, you empower others to take proactive steps towards a safer home environment.
-
Report Brightly: Stay vigilant and report any suspicious activity to local law enforcement authorities promptly. By shining a light on potential threats, you contribute to a brighter and safer community for everyone.
By engaging with our neighbors and raising awareness about home security, we can create a brighter and safer neighborhood where everyone can thrive.
X. Embracing Bright Security Solutions for a Sunnier Tomorrow
As we wrap up our journey to brighten home security, let's bask in the glow of our accomplishments and look forward to a sunnier tomorrow filled with safety and peace of mind. By embracing bright security solutions and positive habits, we've taken proactive steps to protect our homes, our families, and our communities. Here's a final ray of sunshine to guide us on our way:
-
Stay Bright, Stay Safe: Remember, home security is not just about locks and alarms – it's about cultivating a mindset of safety and vigilance that radiates throughout our lives. By staying bright and proactive, we can create a safer and more secure environment for ourselves and those around us.
-
Spread Sunshine, Spread Security: Share the knowledge and insights you've gained on your journey with others. By spreading sunshine-filled wisdom, you empower others to take control of their home security and brighten their lives in the process.
-
Keep Shining Bright: As we move forward, let's continue to embrace bright security solutions and positive habits that keep our homes and communities safe. With a smile on our faces and a twinkle in our eyes, we can create a brighter and safer tomorrow for all.
Thank you for joining us on this journey to brighten home security. Together, we can shine a light on safety and create a world where everyone feels secure and protected.
]]> Are you ready to unlock the hidden potential of your basement and transform it into a functional oasis? Welcome to "The Ultimate Basement Transformation: DIY Hacks for a Functional Oasis!" In this comprehensive guide, we'll explore the exciting world of basement renovations and provide you with the tips, tricks, and inspiration you need to turn your underground space into a stylish and practical living area.
For many homeowners, the basement is often an overlooked and underutilized area of the home. But with a little creativity and elbow grease, it has the potential to become a valuable extension of your living space, offering endless possibilities for relaxation, entertainment, and productivity.
Whether you dream of creating a cozy family room, a home office, a fitness studio, or a guest suite, this article is your roadmap to success. We'll cover everything from assessing the condition of your basement to planning the perfect layout, choosing budget-friendly
flooring solutions and incorporating personal style into the design.
Get ready to embark on a journey of transformation as we dive into the world of basement renovations. With our DIY hacks and expert tips, you'll be well-equipped to tackle your own basement makeover and create a functional oasis that you'll love spending time in for years to come. So, roll up your sleeves and let's get started on creating the ultimate basement transformation!
Assessing Your Basement
Before diving into the renovation process, it's essential to assess the current state of your basement to identify any potential issues and plan accordingly. Here are some key steps to help you assess your basement effectively:
- Check for Moisture and Water Damage:
Start by inspecting the walls, floors, and ceilings for any signs of moisture or water damage, such as damp spots, mold growth, or musty odors.
Look for cracks in the foundation or gaps around windows and doors where water could seep in.
Address any moisture issues promptly to prevent further damage and ensure a dry and healthy environment for your renovation.
- Evaluate Structural Integrity:
Assess the structural integrity of the basement, paying attention to the condition of support beams, columns, and walls.
Look for signs of sagging, bowing, or cracks in the foundation, which could indicate structural problems that need to be addressed before proceeding with renovations.
Consider consulting a professional contractor or structural engineer for a thorough assessment if you have concerns about the stability of your basement.
- Test for Radon Gas:
Radon gas is a colorless, odorless gas that can seep into basements through cracks in the foundation and pose health risks to occupants.
Consider conducting a radon test to determine if levels are elevated in your basement. Radon test kits are readily available at hardware stores and online, or you can hire a professional to conduct the test for you.
If elevated radon levels are detected, take steps to mitigate the problem before proceeding with renovations to ensure a safe and healthy living environment.
- Assess Accessibility and Utilities:
Evaluate the accessibility of your basement, considering factors such as stairway access, ceiling height, and natural light.
Take note of existing utility connections, including electrical outlets, plumbing, and HVAC systems, and plan your renovation layout accordingly.
Consider any upgrades or modifications needed to improve accessibility and maximize the functionality of the space.
- Consider Building Codes and Permits:
Familiarize yourself with local building codes and permit requirements for basement renovations in your area.
Determine if any permits are needed for your renovation project and ensure compliance with relevant regulations to avoid potential issues down the line.
By carefully assessing your basement before starting the renovation process, you can identify any potential challenges or issues upfront and plan accordingly. Taking the time to address moisture, structural, and safety concerns will set the stage for a successful and stress-free renovation that transforms your basement into a functional oasis.
Planning Your Layout
Creating a well-thought-out layout is crucial for maximizing the functionality and enjoyment of your basement renovation. Here are some key steps to help you plan your layout effectively:
- Define Your Purpose:
Start by identifying the primary purpose of your basement renovation. Do you envision it as a family room, home office, guest suite, entertainment space, or something else entirely? Clarifying your goals will help guide your layout decisions.
- Consider Zoning:
Divide your basement into distinct zones based on the activities you plan to accommodate. Common zones may include a seating area, work zone, entertainment area, storage space, and any other specific functional areas you require.
- Assess Space Constraints:
Take accurate measurements of your basement space, including ceiling height, wall lengths, and any obstacles such as support columns or utility connections.
Consider any space constraints or architectural features that may impact your layout, such as alcoves, egress windows, or exposed pipes.
- Prioritize Functionality:
Prioritize functionality when planning your layout to ensure that each zone serves its intended purpose efficiently.
Allocate sufficient space for key activities and furnishings, such as seating arrangements, work surfaces, storage solutions, and entertainment amenities.
- Optimize Traffic Flow:
Pay attention to traffic flow patterns within the basement space and ensure that pathways are clear and unobstructed.
Arrange furniture and fixtures in a way that promotes easy movement between different zones and avoids congestion or bottlenecks.
- Maximize Natural Light:
If your basement has limited natural light, consider strategic placement of windows, skylights, or light wells to introduce more daylight into the space.
Opt for light-colored finishes and reflective surfaces to help brighten the basement and create a more open and inviting atmosphere.
- Create Flexibility:
Design your layout with flexibility in mind to accommodate changing needs and preferences over time.
Incorporate multipurpose furniture, modular storage solutions, and adaptable layouts that can easily be reconfigured as needed.
- Seek Inspiration:
Draw inspiration from design magazines, websites, and social media platforms to explore layout ideas and design trends.
Create mood boards or vision boards to visualize your ideal layout and gather ideas for colors, textures, and finishes that resonate with your personal style.
By carefully planning your layout before embarking on your basement renovation, you can create a space that not only meets your needs but also reflects your unique personality and lifestyle. Take the time to consider your goals, assess your space, and prioritize functionality to ensure a successful and satisfying outcome.
 Budget-Friendly Flooring Solutions
When renovating your basement on a budget, choosing the right flooring is key to achieving both style and durability without breaking the bank. Here are some budget-friendly flooring options to consider for your basement renovation:
- Laminate Flooring:
Laminate flooring offers an affordable alternative to hardwood or tile and comes in a wide range of styles and finishes, including wood, stone, and tile effects.
It's easy to install, requiring minimal tools and expertise, making it a popular choice for DIY enthusiasts.
Laminate flooring is also durable, scratch-resistant, and easy to clean, making it ideal for high-traffic areas like basements.
- Vinyl Plank Flooring:
Vinyl plank flooring mimics the look and texture of real wood but is much more budget-friendly and resistant to moisture, making it an excellent choice for basement environments.
It's available in a variety of colors, patterns, and textures, allowing you to achieve the look of hardwood without the hefty price tag.
Vinyl plank flooring is easy to install and maintain, making it a cost-effective and practical option for basement renovations.
- Carpet Tiles:
Carpet tiles are an affordable and versatile flooring option that allows for easy customization and replacement.
They come in a variety of colors, patterns, and textures, allowing you to create a unique look that suits your style and budget.
Carpet tiles are easy to install and can be laid directly over existing flooring, saving time and money on installation costs.
- Engineered Wood Flooring:
Engineered wood flooring offers the beauty of real wood at a fraction of the cost and is more resistant to moisture and humidity than solid hardwood.
It consists of a thin veneer of hardwood layered over plywood or composite material, making it more affordable and environmentally friendly.
Engineered wood flooring is available in a wide range of wood species, finishes, and plank sizes, allowing you to achieve the look of hardwood without the high price tag.
- Ceramic Tile:
Ceramic tile is a durable and budget-friendly flooring option that is ideal for basement spaces prone to moisture and humidity.
It comes in a variety of colors, patterns, and sizes, allowing for endless design possibilities.
Ceramic tile is easy to clean and maintain, making it a practical and long-lasting choice for basement renovations.
- Painted Concrete:
If you're working with a tight budget, painting the concrete floor in your basement is a cost-effective way to refresh the space.
Choose a high-quality concrete paint or epoxy coating designed specifically for basement floors for best results.
Consider adding decorative stencils or patterns to create visual interest and disguise imperfections in the concrete.
When selecting flooring for your basement renovation, consider factors such as durability, moisture resistance, ease of installation, and overall cost. With these budget-friendly flooring options, you can achieve the look and feel of your dream basement without breaking the bank.
Brightening Up the Space
Brightening a basement space is essential for creating a welcoming and inviting atmosphere. While basements may lack natural light, there are several strategies you can use to maximize brightness and enhance the overall ambiance. Here are some effective ways to brighten up your basement:
- Light Paint Colors:
Choose light, neutral paint colors for the walls and ceiling to reflect as much light as possible and make the space feel larger and brighter.
Opt for shades of white, cream, beige, or light gray to create a fresh and airy backdrop for your basement renovation.
- Strategic Lighting Placement:
Incorporate a combination of overhead lighting, task lighting, and accent lighting to illuminate different areas of the basement.
Install recessed lights or track lighting in the ceiling to provide general ambient lighting throughout the space.
Add table lamps, floor lamps, or wall sconces to provide focused task lighting for reading, working, or other activities.
- Mirrors and Reflective Surfaces:
Hang mirrors strategically on the walls to reflect natural and artificial light and create the illusion of more space.
Incorporate reflective surfaces such as glass, metal, or mirrored furniture to bounce light around the room and brighten dark corners.
- Light-Colored Flooring:
Choose light-colored flooring materials such as light wood, laminate, vinyl plank, or light-colored carpet to help reflect light and make the space feel brighter.
Avoid dark or heavily patterned flooring options, as they can absorb light and make the space feel darker and smaller.
- Maximize Natural Light:
Maximize natural light in your basement by keeping windows clean and unobstructed.
Trim back any foliage or landscaping outside the windows that may be blocking light from entering the space.
Consider installing window wells or enlarging existing windows to allow more natural light to filter into the basement.
- Light Window Treatments:
Choose light-colored or sheer window treatments such as curtains or blinds to allow natural light to filter into the space while still providing privacy and control over light levels.
Avoid heavy or dark-colored window treatments that can block light and make the space feel darker.
- Strategic Furniture Placement:
Arrange furniture in the basement to maximize light flow and minimize shadows.
Place larger pieces of furniture away from windows to allow light to penetrate deeper into the space.
Opt for open or lightweight furniture designs that won't block light or make the room feel crowded.
By implementing these brightening strategies, you can transform your basement into a light-filled and inviting space that feels warm, welcoming, and comfortable for you and your family to enjoy. Whether you're using the basement as a family room, home office, or entertainment area, maximizing brightness is key to creating a functional and enjoyable living environment.
 Creating Functional Zones
Transforming your basement into a functional living space involves careful planning to maximize its usability and appeal. Here's how you can create distinct functional zones to accommodate various activities and needs within your basement renovation:
- Assess Your Needs:
Start by identifying the activities and functions you want to accommodate in your basement. Common zones may include a seating area, entertainment zone, workspace, storage area, and any other specific needs you have.
- Divide the Space:
Divide your basement into distinct zones based on your identified needs and the layout of the space. Consider factors such as natural flow, accessibility, and privacy when determining the placement of each zone.
- Seating Area:
Create a cozy seating area where family and guests can relax and unwind. Consider comfortable seating options such as sofas, armchairs, and bean bags, arranged around a central focal point such as a coffee table or fireplace.
- Entertainment Zone:
Designate a separate area for entertainment activities such as watching TV, playing games, or listening to music. Install a media console or wall-mounted TV, and consider adding comfortable seating and storage for media equipment and accessories.
- Workspace:
If you need a dedicated workspace for remote work or hobbies, set up a functional workstation with a desk, chair, and adequate lighting. Consider incorporating storage solutions such as shelves, drawers, or cabinets to keep supplies organized and within reach.
- Storage Area:
Allocate space for storage to keep clutter at bay and maximize organization in your basement. Consider built-in shelving, cabinets, or storage units to store items such as seasonal decorations, sports equipment, and household supplies.
- Kids' Play Area:
If you have children, create a designated play area where they can engage in activities and games. Incorporate kid-friendly furnishings such as toy storage bins, play mats, and child-sized tables and chairs, and consider adding educational and interactive elements to encourage creativity and learning.
- Fitness Zone:
Dedicate a portion of your basement to fitness and exercise activities. Install gym equipment such as a treadmill, exercise bike, or weights, and consider adding a mirror, yoga mat, and storage for workout gear to create a functional and motivating fitness zone.
- Multipurpose Zones:
Maximize the versatility of your basement by creating multipurpose zones that can adapt to various activities and needs. Consider flexible furnishings such as convertible sofas, folding tables, and modular storage solutions that can easily be reconfigured as needed.
- Traffic Flow and Accessibility:
Ensure that each functional zone is easily accessible and well-integrated into the overall layout of the basement. Pay attention to traffic flow patterns and ensure clear pathways between different zones to facilitate movement and navigation within the space .
By creating distinct functional zones within your basement renovation, you can maximize its usability and appeal, catering to the diverse needs and activities of your household. Whether you're seeking relaxation, entertainment, productivity, or storage, thoughtful zoning will help you make the most of your basement living space.
 Storage Solutions
Effective storage solutions are essential for keeping your basement renovation organized and clutter-free. Here are some innovative storage ideas to maximize space and functionality:
- Built-in Shelving and Cabinets:
Utilize vertical space by installing built-in shelving and cabinets along walls or under staircases.
Custom-built shelving and cabinets can be tailored to fit your specific storage needs and can accommodate items of various sizes, from books and collectibles to household supplies and seasonal decorations.
- Multipurpose Furniture:
Choose furniture pieces that double as storage solutions, such as ottomans with hidden compartments, coffee tables with built-in drawers or shelves, and beds with storage drawers underneath.
Look for modular furniture systems that can be reconfigured to adapt to changing storage needs over time.
- Wall-mounted Storage Systems:
Install wall-mounted storage systems, such as pegboards, grid panels, or slatwall, to keep tools, sports equipment, and other items organized and easily accessible.
Use hooks, baskets, and bins to maximize vertical storage space and keep items off the floor.
- Under-Stair Storage:
Transform the space under your staircase into functional storage areas, such as closets, cabinets, or built-in drawers.
Consider customizing the design to include pull-out shelves, shoe racks, or wine storage to make the most of this often underutilized space.
- Overhead Storage Solutions:
Install overhead storage racks or shelves to take advantage of the vertical space above your head.
Use overhead storage for items that are used less frequently, such as seasonal decorations, camping gear, or luggage, to free up floor space for everyday essentials.
- Floating Shelves and Display Racks:
Install floating shelves or display racks to showcase decorative items, books, or collectibles while keeping them organized and accessible.
Floating shelves are ideal for displaying artwork, photos, or plants and can be customized to fit any space and style.
- Closet Organizers:
Customize closet spaces with adjustable shelving, hanging rods, and storage bins to maximize storage capacity and keep clothing, shoes, and accessories neatly organized .
Consider adding built-in lighting or mirrors to enhance functionality and visibility within the closet space.
- Rolling Storage Carts and Bins:
Use rolling storage carts or bins to store toys, craft supplies, or cleaning supplies that can be easily moved around as needed.
Opt for clear bins or labeled containers to keep items organized and visible, making it easy to find what you need when you need it.
By incorporating these storage solutions into your basement renovation, you can create a well-organized and clutter-free space that maximizes functionality and enhances the overall enjoyment of your home. Whether you're storing household essentials, seasonal items, or hobby supplies, these innovative storage ideas will help you make the most of your basement space.
 Enhancing Comfort and Atmosphere
Creating a comfortable and inviting atmosphere in your basement renovation is essential for making the space feel like an extension of your home. Here are some tips for enhancing comfort and atmosphere:
- Invest in Quality Seating:
Choose comfortable seating options such as plush sofas, cozy armchairs, or oversized bean bags to encourage relaxation and lounging.
Consider adding throw pillows, blankets, and cushions in soft fabrics and textures to enhance comfort and coziness.
- Layer Lighting:
Incorporate multiple layers of lighting, including overhead fixtures, task lighting, and accent lighting, to create a warm and inviting ambiance.
Use dimmer switches to adjust the intensity of the lighting and create different moods for various activities and occasions.
- Add Soft Textures:
Introduce soft textures such as area rugs, curtains, and upholstery to add warmth and tactile appeal to the space.
Choose fabrics in cozy materials like wool, fleece, or velvet to create a comfortable and inviting environment.
- Create a Cozy Nook:
Designate a cozy nook or reading corner with a comfortable chair or chaise lounge, a side table for books and beverages, and soft lighting for reading or relaxing.
Personalize the space with decorative elements such as framed artwork, potted plants, or scented candles to create a tranquil retreat within your basement.
- Opt for Warm Colors:
Choose warm and inviting color palettes such as earth tones, neutrals, and soft pastels to create a welcoming atmosphere.
Use accent colors in rich hues like burgundy, navy, or forest green to add depth and visual interest to the space.
- Incorporate Nature Elements:
Bring the outdoors in by incorporating natural elements such as wood, stone, and plants into your basement design.
Use reclaimed wood accents, stone veneer walls, or indoor plants to add warmth, texture, and life to the space.
- Install a Fireplace or Hearth:
If space and budget allow, consider adding a fireplace or hearth to create a focal point and provide warmth and ambiance to your basement.
Choose from options such as gas, electric, or ethanol fireplaces to suit your needs and preferences.
- Personalize with Decor:
Add personal touches and decorative accents that reflect your interests, hobbies, and personality.
Display artwork, photographs, or memorabilia that evoke happy memories and create a sense of connection and belonging in the space.
By incorporating these comfort-enhancing elements into your basement renovation, you can create a cozy and inviting atmosphere that encourages relaxation, entertainment, and quality time with family and friends. Whether you're watching movies, playing games, or simply unwinding after a long day, these tips will help you make the most of your basement oasis.
Incorporating Personal Style
Incorporating personal style into your basement renovation is the key to creating a space that feels uniquely yours and reflects your individuality. Start by identifying your design preferences, whether it's modern and minimalist, cozy and traditional, or eclectic and bohemian. Choose furniture, fabrics, and finishes that resonate with your taste and personality, and don't be afraid to mix and match different styles to create a look that's all your own. Add personal touches such as artwork, photographs, and decorative objects that hold special meaning to you, showcasing your interests, hobbies, and experiences. Consider incorporating DIY projects or upcycled furniture pieces to add a custom touch and infuse your space with personality. By infusing your personal style into your basement renovation, you'll create a space that not only looks great but also feels like home.
In conclusion, transforming your basement into a functional and stylish living space is a rewarding endeavor that requires careful planning, creativity, and attention to detail. By following the tips and ideas outlined in this guide, you can make the most of your basement renovation project and create a space that meets your needs, reflects your personal style, and enhances the overall enjoyment of your home.
From assessing the condition of your basement to planning the layout, choosing budget-friendly flooring solutions, and incorporating storage solutions and personal touches, every step of the renovation process plays a crucial role in achieving success. By maximizing space, enhancing comfort and atmosphere, and infusing your personal style into the design, you can create a basement oasis that is as functional as it is inviting.
Remember to take your time, stay organized, and enlist the help of professionals if needed to ensure a smooth and successful renovation process. With dedication, creativity, and a little bit of elbow grease, you can transform your basement into a space that you'll love spending time in for years to come.
So, roll up your sleeves, unleash your creativity, and get ready to turn your basement into the ultimate living space that you and your family will enjoy for years to come. Happy renovating!
 As the vibrant colors of spring begin to bloom outside, it's the perfect time to bring some of that freshness and renewal into your kitchen. You don't need to break the bank to give your kitchen a stylish makeover for the season. With a little creativity and resourcefulness, you can upgrade your kitchen décor and breathe new life into the heart of your home. In this article, we'll explore 10 stunning ideas for transforming your kitchen for spring without spending a fortune.
Freshen Up with Paint One of the most budget-friendly ways to update your kitchen's look is with a fresh coat of paint. Choose light, airy colors like pastel greens, soft blues, or sunny yellows to evoke the feeling of springtime. Paint an accent wall or give your cabinets a makeover for a dramatic yet affordable change.
Add Greenery Bring the beauty of nature indoors by incorporating plants and fresh herbs into your kitchen décor. Place potted plants on windowsills, countertops, or open shelves to add a pop of greenery and freshen up the space. Not only do plants enhance the aesthetics of your kitchen, but they also help improve air quality.
Swap Out Cabinet Hardware Give your kitchen cabinets an instant facelift by replacing outdated hardware with sleek, modern handles and knobs. This simple upgrade can make a big difference in the overall look and feel of your kitchen without costing a fortune.
Hang Statement Artwork: Add personality and visual interest to your kitchen walls by hanging eye-catching artwork or prints. Choose pieces that reflect the colors and themes of spring, such as floral paintings or nature-inspired photography. Statement artwork can serve as a focal point and elevate the style of your kitchen décor.
 Update Lighting Fixtures
Upgrade your kitchen lighting fixtures to create a brighter, more inviting atmosphere. Replace old fluorescent lights with energy-efficient LED bulbs and install pendant lights or chandeliers above the island or dining area for added elegance. Lighting plays a crucial role in setting the mood and ambiance of your kitchen.
Display Colorful Dishware Showcase your collection of colorful dishware and glassware to add a pop of color to your kitchen shelves or cabinets. Mix and match patterns and textures for an eclectic, bohemian look, or stick to a cohesive color scheme for a more cohesive aesthetic. Don't be afraid to let your personality shine through with your choice of dishes and accessories.
Incorporate Textiles Introduce soft textiles like curtains, rugs, and dish towels to add warmth and texture to your kitchen space. Choose fabrics in light, breathable materials like cotton or linen in spring-inspired colors and patterns. Textiles can soften hard surfaces and add comfort to your kitchen while enhancing its visual appeal.
Create a Seasonal Centerpiece Transform your kitchen table or island into a focal point by creating a stunning seasonal centerpiece. Use fresh flowers, branches, or seasonal fruits and vegetables arranged in a decorative bowl or vase. A beautiful centerpiece instantly adds a touch of springtime charm to your kitchen and makes it feel more inviting.
 Organize with Style
Declutter and organize your kitchen with stylish storage solutions that are both functional and decorative. Invest in clear glass jars or containers to store pantry staples like pasta, rice, and spices, and label them with handwritten tags for a personalized touch. Organizational tools can help streamline your kitchen space while adding visual interest.
DIY Décor Projects Get creative and unleash your inner DIY enthusiast by tackling fun and budget-friendly projects to personalize your kitchen décor. Try your hand at crafting handmade artwork, repurposing old furniture, or creating custom accessories like decorative trays or planters. DIY projects allow you to put your own stamp on your kitchen and make it truly unique.
With these 10 stunning ideas, you can upgrade your kitchen décor for spring without breaking the bank. From simple paint updates to DIY projects and stylish accents, there are plenty of affordable ways to refresh your kitchen and infuse it with the spirit of the season. Embrace the beauty of springtime and create a kitchen that's as fresh and inviting as the blooming flowers outside.
]]> Are you tired of scrolling through Pinterest, dreaming of beautiful home interiors, only to be discouraged by the hefty price tags? Well, fret no more! We've curated a list of 10 budget-friendly DIY projects that will turn your home into a Pinterest-worthy paradise without breaking the bank.
Peel-and-Stick Wallpaper Magic: Say goodbye to dull walls and hello to stylish patterns with peel-and-stick wallpaper. It's affordable, easy to apply, and comes in a variety of designs to suit any aesthetic. Transform your space in minutes with this budget-friendly solution.
Thrift Store Treasures: One person's trash is another's treasure! Hit up your local thrift stores and flea markets to find unique pieces that can be easily upcycled or repurposed. From vintage chairs to quirky knick-knacks, you'll be amazed at what you can find for a fraction of the cost.
DIY Artwork: Who says you need to splurge on expensive artwork to decorate your walls? Get creative and make your own! Whether it's abstract paintings, framed prints, or embroidered hoops, DIY artwork adds a personal touch to your space without breaking the bank.
Repaint Furniture
 Give old furniture a new lease on life with a fresh coat of paint. Whether it's a tired dresser, worn-out nightstand, or outdated coffee table, a simple paint job can completely transform the look of any piece. Choose a bold color for a statement piece or stick to neutrals for a timeless appeal.
Floating Shelves
 Maximize vertical space and add visual interest to your walls with floating shelves. These easy-to-install shelves are perfect for displaying books, plants, and decorative objects, adding both style and functionality to any room.
DIY Planters: Bring the outdoors in with DIY planters made from inexpensive materials like mason jars, tin cans, or wooden crates. Get creative with paint, stencils, and decorative accents to personalize your planters and add a pop of greenery to your space.
Accent Wall: Make a statement with an accent wall using paint, wallpaper, or even stencils. Whether you opt for a bold color or a subtle pattern, an accent wall adds depth and visual interest to any room without the need for expensive renovations.
Lighting Upgrades
 Swap out outdated light fixtures for modern, budget-friendly alternatives. From pendant lights to wall sconces, updating your lighting can instantly elevate the look of your space without breaking the bank.
DIY Headboard: Create a focal point in your bedroom with a DIY headboard. Whether it's made from reclaimed wood, fabric, or even a painted mural, a custom headboard adds personality and charm to your space without the hefty price tag.
Budget-Friendly Textiles: Refresh your space with budget-friendly textiles like throw pillows, rugs, and curtains. Look for sales, clearance items, or even thrifted finds to score stylish textiles at a fraction of the cost.
With these 10 budget-friendly DIY projects, you can finally achieve the Pinterest-worthy interiors of your dreams without breaking the bank. So roll up your sleeves, get creative, and transform your space into a stylish sanctuary that's as unique as you are.
]]> As the temperature starts to rise and the days get longer, it's time to start thinking about how to keep your home cool and comfortable during the spring months. While cranking up the air conditioning may seem like the only solution, there are actually many energy-efficient upgrades you can make to beat the heat and save money on your utility bills. From simple fixes to more substantial investments, here are some energy-efficient home upgrades to consider this spring.
-
Install a Programmable Thermostat: A programmable thermostat allows you to set your heating and cooling systems to automatically adjust based on your schedule. By programming your thermostat to raise the temperature when you're away from home or asleep, you can significantly reduce your energy usage and save money on your monthly bills.
-
Seal Air Leaks and Insulate: Air leaks around doors, windows, and ductwork can let cool air escape from your home, forcing your air conditioner to work harder to maintain a comfortable temperature. Seal any gaps or cracks with caulk or weatherstripping to prevent air leaks and improve energy efficiency. Additionally, adding insulation to your attic, walls, and floors can further reduce heat transfer and improve comfort.
-
Upgrade to Energy-Efficient Windows: Old, single-pane windows can be a major source of heat gain in the summer and heat loss in the winter. Consider upgrading to energy-efficient windows with double or triple-pane glass, low-emissivity coatings, and insulated frames. These windows can help block out heat from the sun and keep your home comfortable year-round.
-
Install Ceiling Fans: Ceiling fans are an energy-efficient way to circulate air and maintain a comfortable temperature in your home. In the spring and summer, set your ceiling fans to spin counterclockwise to create a cooling breeze. Using ceiling fans in conjunction with your air conditioner can allow you to raise the thermostat setting by a few degrees without sacrificing comfort.
-
Upgrade to Energy-Efficient Appliances: If your appliances are outdated, they may be wasting energy and driving up your utility bills. Consider upgrading to ENERGY STAR certified appliances, which are designed to use less energy while still delivering top performance. Look for energy-efficient refrigerators, dishwashers, washing machines, and air conditioners to maximize savings.
-
Plant Shade Trees and Install Awnings: Strategic landscaping can help reduce solar heat gain and lower your cooling costs. Planting shade trees near windows and outdoor air conditioning units can provide natural shade and help keep your home cooler. Installing awnings over windows and doors can also block out the sun's rays and prevent heat from entering your home.
By making these energy-efficient home upgrades, you can beat the spring heat, stay comfortable, and save money on your energy bills. Whether you're sealing air leaks, upgrading to energy-efficient windows, or installing ceiling fans, investing in energy efficiency will pay off in the long run with lower utility costs and a more comfortable living environment.
]]>
Building a bedroom addition can be a great way to add extra space and value to your home. However, it can also be a significant expense, especially if you're not careful. Fortunately, there are several ways to save money on building a bedroom addition without sacrificing quality or style. In this step-by-step guide, we'll share our top tips for cutting costs and making the most of your budget. From planning and preparation to construction and finishing touches, we'll walk you through the entire process of building a bedroom addition on a budget. Whether you're a seasoned DIYer or a first-time homeowner, this guide will help you save money and create the bedroom addition of your dreams.
II. Planning and Preparation
A. Create a budget
- Determine how much you can afford to spend
- Research the costs of materials and labor
- Factor in unexpected expenses and contingencies
B. Research materials and contractors
- Look for deals and discounts on materials
- Consider using recycled or salvaged materials
- Get quotes from multiple contractors
- Check references and reviews before hiring a contractor
C. Consider doing it yourself
- Determine if you have the necessary skills and experience
- Consider taking a DIY class or consulting with a professional
- Weigh the pros and cons of DIY vs. hiring a contractor
- Consider hiring a contractor for only parts of the project
D. Obtain necessary permits and inspections
- Research local building codes and regulations
- Obtain necessary permits and inspections
- Consider using a permit expediting service to save time and money
E. Set a timeline
- Determine a realistic timeline for the project
- Account for delays and unexpected setbacks
- Consider doing the project in stages to spread out costs
By carefully planning and preparing for your bedroom addition project, you can save money and avoid costly mistakes. Take the time to create a budget, research materials and contractors, obtain necessary permits and inspections, and set a realistic timeline for the project. These steps will help you stay on track and within budget as you move forward with your bedroom addition project.
III. DIY vs. Hiring a Contractor
 A. Consider the scope of the project
- Determine if the project is within your skill level and experience
- Consider the size and complexity of the project
- Evaluate the risks and potential problems associated with a DIY project
B. Weigh the pros and cons of DIY vs. hiring a contractor
- Pros of DIY: a. Potential cost savings b. Control over the project c. Personal satisfaction
- Cons of DIY: a. Potential for mistakes and errors b. Lack of experience and knowledge c. Time and effort required
- Pros of hiring a contractor: a. Professional expertise and experience b. Reduced risk of mistakes and errors c. Time savings
- Cons of hiring a contractor: a. Higher costs b. Less control over the project c. Potential for miscommunication or misunderstandings
C. Consider a hybrid approach
- Hire a contractor for the more complex aspects of the project
- Do the simpler tasks yourself
- Combine DIY and professional services to save money and ensure quality
D. Choose the right contractor
- Research and interview multiple contractors
- Check references and reviews
- Obtain a detailed contract and estimate
- Communicate clearly and regularly with your contractor
By weighing the pros and cons of DIY vs. hiring a contractor, you can make an informed decision about how to proceed with your bedroom addition project. Consider the scope of the project, the potential risks and benefits, and your own skills and experience. If you decide to hire a contractor, choose one carefully and communicate clearly to ensure a successful and cost-effective project.
IV. Materials and Supplies
A. Research materials and prices
- Determine the materials needed for the project
- Research different brands and types of materials
- Compare prices from multiple suppliers and stores
B. Consider using recycled or salvaged materials
- Look for local sources of recycled or salvaged materials
- Consider using reclaimed wood or other materials
- Consult with a professional to ensure quality and safety
C. Look for deals and discounts
- Check for sales and promotions at local suppliers and stores
- Look for clearance or closeout deals on materials
- Consider buying materials in bulk to save money
D. Don't overspend on unnecessary extras
- Stick to your budget and avoid unnecessary upgrades or additions
- Consider DIY options for smaller items or finishing touches
- Get creative with decor and furnishings to save money
E. Invest in quality where it matters
- Choose durable and long-lasting materials for important structural elements
- Invest in energy-efficient options for windows, doors, and insulation
- Consider the long-term cost savings of quality materials and products
By researching materials and suppliers, looking for deals and discounts, and making smart choices about what to invest in, you can save money on your bedroom addition project without sacrificing quality or safety. Consider using recycled or salvaged materials and avoiding overspending on unnecessary extras. Invest in quality where it matters most, and consult with a professional if needed to ensure the best outcome for your project.
 V. Permits and Inspections
A. Determine the necessary permits
- Research the local building codes and regulations
- Determine which permits are needed for your project
- Obtain the necessary permits before beginning the project
B. Do your own research
- Understand the requirements and regulations for building in your area
- Consult with local authorities and building inspectors
- Review the necessary paperwork and applications
C. Hire a professional to handle the permitting process
- Consider hiring a contractor or architect to handle the permit process
- Be sure to obtain a detailed estimate and contract for these services
- Make sure the contractor is familiar with local building codes and regulations
D. Schedule inspections
- Schedule inspections at the necessary points in the project
- Be sure to obtain the necessary approvals and permits before continuing with the project
- Be present during inspections to answer any questions and address any concerns
E. Don't skip inspections
- Skipping inspections can result in safety hazards and costly mistakes
- Inspections ensure that the project is up to code and meets safety standards
- Failure to obtain necessary permits and inspections can result in fines and legal issues
By understanding the permitting process and requirements in your area, you can ensure a successful and cost-effective bedroom addition project. Consider hiring a professional to handle the permitting process if you're unsure or inexperienced. Don't skip inspections, as they are crucial for ensuring safety and compliance with local building codes and regulations. By following these guidelines, you can save money while still ensuring a high-quality and safe project.
VI. Construction
A. Prepare the site
- Clear the area of any debris or obstacles
- Make sure the site is level and stable
- Consider renting equipment to help with site preparation
B. Do as much work as you can yourself
- Consider taking on some of the simpler tasks, such as painting or demolition
- Consult with professionals or experienced DIYers before attempting more complex tasks
- Be realistic about your abilities and limitations
C. Hire the right contractor
- Interview multiple contractors and get detailed estimates and contracts
- Consider their experience, reputation, and references
- Choose a contractor who is licensed, insured, and experienced in bedroom addition construction
D. Use energy-efficient materials and techniques
- Choose energy-efficient windows, doors, and insulation
- Use techniques like passive solar design to save on heating and cooling costs
- Consider renewable energy options like solar panels or geothermal systems
E. Avoid overbuilding
- Don't build more space than you need
- Consider the long-term cost implications of a larger addition
- Stick to your budget and avoid overspending on unnecessary features or finishes
F. Maintain a clean and organized site
- Keep the site clean and organized to prevent accidents and improve efficiency
- Rent a dumpster or make arrangements for debris removal
- Encourage workers to maintain a safe and clean work area
By taking on some of the simpler tasks yourself and hiring the right contractor for the job, you can save money on construction costs without sacrificing quality or safety. Use energy-efficient materials and techniques to save on long-term heating and cooling costs. Avoid overbuilding and stick to your budget to keep costs under control. Finally, keep the site clean and organized to prevent accidents and improve efficiency. By following these guidelines, you can ensure a successful and cost-effective bedroom addition project.
VII. Finishing Touches
A. Paint and finish work
- Consider doing some of the finishing work yourself, such as painting or installing trim
- Choose paint and finishes that are durable and easy to clean
- Shop around for the best prices on materials
B. Flooring and lighting
- Choose flooring and lighting options that fit your budget and design goals
- Consider using energy-efficient lighting fixtures to save on electricity costs
- Shop around for deals and discounts on flooring and lighting materials
C. Furniture and decor
- Take advantage of sales and discounts when shopping for furniture and decor
- Consider buying used or refurbished furniture to save money
- Choose decor that fits your style and budget
D. Landscaping and outdoor features
- Consider adding landscaping or outdoor features to enhance the look and functionality of your addition
- Do some of the landscaping work yourself, such as planting shrubs or flowers
- Shop around for the best prices on landscaping materials and outdoor furniture
By taking a thoughtful and strategic approach to finishing touches, you can save money on your bedroom addition without sacrificing style or comfort. Consider doing some of the finishing work yourself, and shop around for the best prices on materials. Choose flooring and lighting options that fit your budget and design goals, and take advantage of sales and discounts when shopping for furniture and decor. Finally, consider adding landscaping or outdoor features to enhance the look and functionality of your addition, and do some of the work yourself to save on labor costs. By following these guidelines, you can create a beautiful and functional bedroom addition that fits your budget.
VIII. Maintenance and Upkeep
A. Regular cleaning and maintenance
- Create a cleaning and maintenance schedule to keep your addition in good condition
- Regularly inspect the addition for signs of wear and tear, and address any issues promptly
- Keep the addition free of clutter and debris to prevent damage
B. Energy efficiency
- Invest in energy-efficient appliances and fixtures to save money on utilities
- Seal windows and doors to prevent drafts and energy loss
- Consider adding insulation to the walls and ceiling to improve energy efficiency
C. Repairs and renovations
- Plan ahead for repairs and renovations that may be necessary in the future
- Set aside a budget for these expenses to avoid financial surprises
- Consider doing some repairs and renovations yourself to save on labor costs
D. Seasonal upkeep
- Prepare your addition for seasonal changes, such as winter weather or extreme heat
- Take steps to prevent damage from weather-related events, such as flooding or wind damage
- Inspect the addition regularly for signs of seasonal wear and tear, and address any issues promptly
By maintaining your addition regularly and investing in energy-efficient appliances and fixtures, you can save money on utilities and prevent costly repairs down the line. Plan ahead for future repairs and renovations, and set aside a budget for these expenses to avoid financial surprises. Finally, take steps to prepare your addition for seasonal changes and prevent weather-related damage. By following these guidelines, you can keep your bedroom addition in excellent condition for years to come.
IX. Conclusion
Building a bedroom addition can be a significant investment, but with careful planning and attention to detail, it is possible to save money without sacrificing quality or safety. By following the steps outlined in this guide, you can save money on materials, labor, and ongoing upkeep while still creating a beautiful and functional space for your home.
Remember to plan and prepare thoroughly, consider your options for DIY vs. hiring a contractor, choose materials and supplies wisely, obtain the necessary permits and inspections, and invest in regular maintenance and energy-efficient features. With these strategies in mind, you can build a bedroom addition that meets your needs and fits your budget.
By taking a methodical and thoughtful approach to building your addition, you can ensure that it is a valuable and enjoyable addition to your home for years to come.
We live in the suburbs of central Connecticut and honestly, it’s a pretty descent place to live. Recently we began having problems with one feisty squirrel that we nicknamed Jerry. A better name for him would have been Krammer, or even Newman, but Jerry has a nice ring to it.

Anyways, our problems with Jerry started when he learned he could scale our clothesline to get to the bird feeder we hang on it.
The clothesline is connected to the exterior wall of our dining room, so when Jerry jumps from the deck onto the clothesline we hear a sound as if someone is trying to break into our house. It’s a springy tugging sound.
The story with the clothesline is that it is original to our home, which is about 60 years old now. The kitchen window faces the backyard, so my wife put a bird feeder on the clothesline since we are not using anyway. This way she could enjoy watching Woodpeckers, Blue Jays, Humming Birds and now Jerry the squirrel directly from the kitchen window.
Sure there was birdwatching but also bear watching as well. One day late last fall we heard a very loud sound coming from our backyard. A large black bear was standing on his two legs with his front legs / arms reaching for the bird feeder which he snagged off the line while making a huge ruckus.
I remember that night clearly because we had a bear eating from our bird feeder which was now on the ground underneath one of his paws while he was trying to pry it open using his jaw and claws.
As this was happening, my wife who is only 5’ tall has our bedroom window open, while she bangs on the aluminum siding while yelling shoo noises. I’m an analytical type of person, so when I see a 400lb bear, I’m thinking if you’re 1 /4 the size of the animal, maybe you shouldn’t be trying to lure his attention your way.
LOL, yes I know some people claim you should make loud noises to frighten bears away, but this bear ran from the bird feeder once when we opened the window, and then shortly after he ran towards the bird feeder again while announcing his insistent bravado by growling and snarling as he ran back to his honey pot.
It is actually when he ran back after growling that my wife began the racquet with the beating of the aluminum siding.
Well, as you can see our clothesline coupled with a bird feeder has brought us endless entertainment, some of it funny, while some of it makes me think twice if I'm taking out the garbage at night.
Mind you a 400lb bear could easily break down your front or back door. That’s what I’m thinking when my petite wife dripping with Napoleon syndrome at the moment could be placing us in danger, especially if the bear had rabies. I personally seen bears at our property at least 10 times, there are YouTube videos of bears at my house on my channel. I’m well aware that black bears typically do not pose any danger, but why try to tempt a 400lbs. wild animal over a $20 bird feeder? The math just didn’t make sense to me. So I'm in my bedroom plotting an escape plan just incase by the rare chance this bear decided to break into our house. To most people that may sound silly, but that's just how my mind works. I rather be prepared for possible outcomes then caught in a situation with only seconds to make a decision.
Speaking of black bears and YouTube, you should check out this video of my wife and I working on cutting off a broken 40’ branch with a rope saw when a bear ran onto our property. The entire moment was captured on our security cameras. And as you can see in the video, we didn’t abandoned ship on the YouTube video. The main reason is because the bear ventured to the back of our yard which is adjoined to my neighbors farm . The area looks very interesting in certain lighting conditions and we just started calling it Narnia. So far we’ve had a bobcat, raccoons, coyotes, screaming foxes, bears, deer, hawks, and once the farmers cow showed up at the entrance to our Narnia.
I remember when we first moved into the house after spending months remodeling it back in 2014, we saw a family of 5 raccoons standing next to each other right in front of the Narnia entrance. It was one of the coolest wildlife sights we’ve seen here.
I think the primary reason we get so much wildlife is because we’re in the valley near 3 mountain tops. Also they probably sense what amazing energy I have so they want to get closer to hangout LOL.
Okay enough about Narnia and back to Jerry the squirrel. Every year we grow a vegetable garden. I love tomato sandwiches, but only with tomatoes you grow on your own. To this day I have never tasted a good tomato out of any grocery store. They all look perfect and red, but the taste when compared to my tomatoes doesn’t even come close. It’s no wonder that a lot of people decline tomatoes on their burgers, if they ever tasted a real tomato their mind will be blown.
Obviously I live in the United States so our produce and food quality is far behind that of what you can find in Europe and other areas of the world. Here chemicals are king as well as corporate profits, health and nutrition when it comes to food production is barely a consideration.
So Jerry can smell our delicious tomatoes probably back in his comfy bed somewhere in Narnia. But what Jerry did this year was go beyond being an ass, yes, Jerry broke into our garden, stole our very first red delicious tomato, then he had the nerve to bring it to our deck and eait it in our face. Mind you, I CAUGHT ALL THIS ON CAMERA! Yes folks, I caught this furry little creature not only stealing from our garden but mocking us by eating it right in front of our dining room window. Simply amazing!
If you like this post, give it a like on my facebook page so I know. That way, I’ll feel compelled to share more short stories with you.
]]>Did you ever find yourself in a situation where you wish you could move Apps or Games to another hard drive without going through the hassle of reinstalling the software?
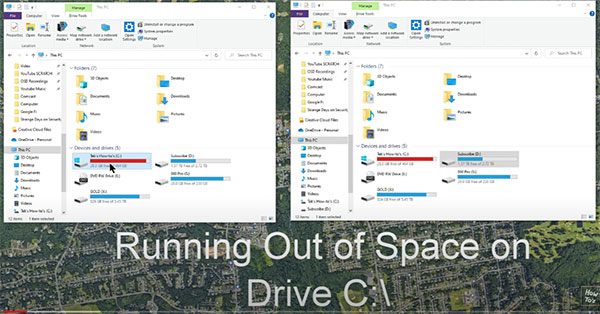
It's not as simple as cutting and pasting a folder, but that is one of the steps to complete the process of moving the installation folder to another folder or hard drive.
Today I’ll walk you through the process of moving a large game (Grand Theft Auto 5) folder then telling Windows 10 or 11 where it should look for the game after the move has been completed.
Most people will take advantage of this tutorial to make more room on their system drive. And of course this is exactly what I need to do to free up space on my C drive.
You can follow along with my with my YouTube video:
{loadposition movegame}
So the first thing you need to do is figure out where the software is currently installed.
The easiest way to do this is to right click on the icon for the app or game and then click properties.
Now look at the Start in: path
For GTA 5 I installed the game on my C:\ drive in the Rockstar folder.
I want to move the 102 GB installation folder for Grand Theft Auto to a folder on my D:\ drive called “MOVED”
So I right click on the folder I want to move and select cut.
Now I go to my other explorer window where I’m already on the D:\ drive in the MOVED folder.
Now I simply right click and select paste.
This process will transfer the physical files from its original path to its new path. However for the game or application to work again, we now have to tell windows 10 or 11 where it can look for the game directory.
To accomplish this process, we must launch a command prompt with administrator privileges.
First click on the magnify glass icon next to the window icon in the lower left corner of the screen.
This will launch the windows search, in the search box type CMD and press enter.
In the results window right click on Command Prompt and select Run as administrator.
On a pop up message that asks, Do you want this app to make changes to this device select yes to continue.
Now I will use the following command to create what is called a symbolic link to link the original location and the new location of the Rockstar folder.
Okay the symbolic link is created, you can see it popped up here in the C drive.
Now let’s launch grand theft auto which used to be on the c drive, but now it lives on the d drive. Let’s ensure that it works properly.
There we go folks. Hopefully I made this process nice and simple.
Remember to use Quotes when providing URLS / folder names that include spaces.
Become a Subscriber of my YouTube Channel Tek's How-to's
]]>- At 7:42am SPY hit a high in the premarket of $450.47.
- At 8:01am SPY hit a high of $450.405. (Some brokerages begin at 8am causing a few minutes of price spikes).
- At 10:00am SPY hit the morning low of $445.94
You will only need to know the premarket high and morning low to create a Fibonacci Retracement day trade. For this trade subtract the morning low from the premarket high to calculate the range of a 100% Fibonacci Retracement move. $450.47 - $445.94 = $4.53.
Setting up Fibonacci Retracement Levels for a SPY Day Trade

Today we are going to analyze entry and exit points for a day trade on the SPY ETF.
The first thing we do is mark the pre-market high as $450.47 as the top of the Fibonacci chart graph. The second thing we will do is map the bottom of the Fibonacci chart to the mornings low at 10am which was $445.94.
Setting Entry and Exit Price Targets Using Fibonacci for Day Trading SPY

So how do you make money trading the S&P 500 ETF called SPY? One way will be to play a bounce play using Fibonacci Retracement Levels.
In the chart above we identified the Entry Price Target of 38.2% Fibonacci with a risk tolerance of 50 cents. The goal would be to get in at the 38.2% Fibonacci chart level and hold the position as long as it doesn’t drop below 50 cents from the Fibonacci line.
Next we will setup 3 more price targets to pay ourselves. Price Target 1 will be the 50% Fibonacci retracement level. This is a good area to take some profit incase the bounce fails.
Price Target 2 for another payout will be at the 61.8% Fibonacci level. If the bounce is strong, it will surpass this level, otherwise this might be a possible failure point.
The final Price Target 3 we will set at the 100% Fibonacci level. This is where you would want to take out most of your position. You can leave a little on the table for a 138.2% Fibonacci retracement level.
The Purpose of this Day Trading Guide
The purpose of this day trading guide for the SPY is to give people who have access to their smartphone or computer during regular market hours to participate in day trading the S&P 500 ETF.
You will only need the pre-market highs and lows as well as the days morning low or high to plot out the Fibonacci Day Trade.
What Was SPY Daily Chart Doing on This Day?

Today the SPY was holding above the 200 Day Moving Average. This chart indicates that SPY might be prepped for another leg upward.
You can also say that the SPY just peaked above the 200 day moving average and now will fail underneath it.
When the 200 day moving average and 50 day moving average cross due to continued straight in the SPY, this should be a indicative of more bullish SPY movements. However, do to ongoing uncertainty in the world, headlines and greatly affect the near future of the market.
]]> If you are like me, you are looking for great stocks to invest into for 2022 and beyond to grow your money.
I’ve been a fulltime stock trader for over 3 years, where I became fully immersed in the equities market. Before I became a fulltime stock trader, I had very good luck with my previous investments. On Facebook alone I closed my position at 500% gain since my IPO purchase.
I only invest into companies I truly believe in and use. I’m not interested in stocks that no one knows about. My goal is to ride the A.I., Metaverse, and Transportation as a Service waves. Come take a gander at my notes and maybe gain a little more knowledge about companies you are already well aware of.
When it comes to investing, I only put my money into companies I know and trust. Then I look for the best possible areas to pickup some shares. Here are some signals I use.
Buying and Selling Signals to Look for on a Daily Chart

How I Approach Investing After Being a Fulltime Stock Trader
 When it comes to my investing, I’m primarily interested in growth stocks I believe in. Currently I’m holding $F Ford, $AAPL Apple, $MSFT Microsoft, $X United States Steel, and $SPY S&P 500 ETF.
Why I Invested into Ford Motor Company $F
I bought $F Ford because the F-Series pickup trucks sell 534,000 + units per year making it the bestselling car/truck in the world. Ford has entered the EV game in a big way by making the Ford Mach-E Mustang and the new Ford F-150 electric Lightning.
Another exciting vehicle that people were looking forward to buying instead of the highly popular Ford Mustang or F-150 is the all-new Ford Bronco.
Ford does have a loyal cult following and is the only American car company that didn’t require a bailout from the 2008 market crash. The main reason it didn’t need a bailout is because it just sold Jaguar and Land Rover for $2.3 billion in June of 2008; so, they had cash on hand.
Why I Bought Shares of Microsoft $MSFT as an Investment
When it comes to Operating System market share worldwide, Microsoft Windows own a 37% share of the overall market, while Apple’s OS X is about 6%, and Linux is not even 1% of the total market share in a 5-year period from January 2016 to November 2021.
I myself have been a loyal Microsoft user since MS DOS 3.1. I believe in Microsoft and am amazed by its growth since I bought some shares.
Should You Invest into Apple $AAPL or Is It Too Late?
 If you have ever watched Jim Cramer from Mad Money on CNBC, you already know how much he loves the stock and often tells people to own it and not trade it. I agree with Jim. Apple has a diehard cult following and they have a knack for exploring the pockets of its loyal customer base.
I will be invested into $AAPL for the long-term and looking for support areas to add on to my position. The $150 price target looks like a great support area to acquire some Apple shares. Currently as of this post Apple is trading at $176 per share.
Why I Bought United States Steel Corporation $X
President Biden’s infrastructure bill will most likely cause steel prices to rise. I bought some $X recently because I believe the $2 trillion+ deal will make a major positive price impact to United States Steel Corporation.
Repairing roads, bridges, railroads and ports seem like steel intensive projects. I have a small position currently and want to double my position soon. If $X doesn’t hold $20 support for some reason, I might have to exit the position.
Why Buying $SPY the S&P 500 ETF Isn’t a Bad Idea
 After watching the market like a hawk for many years, I realized a few things.
- This stock market wants to go up, no matter what happens. Bad news gets digested and the market continues its upward trajectory.
- No matter when you invest, be prepared to hear constant warnings about the stock market crashing from market bears. Many have been railroaded by these new market conditions, take Ray Dalio's Bridgewater Associates for example, it lost $12.1 billion in 2020.
During the 2020 Pandemic I expected a tremendous stock market crash world-wide, because of all businesses shutting down across the planet. What I didn't expect was the extraordinary recovery that followed immediately in March of 2020.
Overall The Stock Market Has Been a Very Good Investment if You Have Time on Your Hands
Take a look at this long-term snapshot of the S&P 500 ETF $SPY

Notice that there are factors that do tank the market.
You have the Dot-com Bubble Crash and the 2007-2008 Financial Crisis Crash; which did take us into a bear market. Many experts expected something similar from the 2020+ Pandemic. However, many professional investors did not expect the market to bounce back so quickly in 2020 and some went out of business all together.
The bottom line is that if you plan to invest or trade stocks, you need to connect yourself to people in the know; otherwise, you'll have no idea what your trade or investment is getting into.
The Rules Changed, but The Game Never Stops!
It’s hard to be an investor these days because the pandemic has changed the rules of the game drastically. Seasoned stock traders and investors have never seen what we are seeing these days. Websites like Reddit and Twitter routinely pump stock prices way beyond any figure that a reputable bank would give as a price target.
There are many examples to look into, but if you really want to see how irrational the stock market has been lately, look into what happened with $AMC and $GME in 2021. Today's investor has to look at a lot more factors than earnings reports and valuation. Social media has woven itself into the investment world and nothing will be the same again.
With all that being said, I will continue to build my position in the S&P 500 $SPY because in the long run, you cannot argue with the performance of this ETF. $SPY (S&P500 ETF) might be a Great Investment for 2022 based on historical performance, many money mangers wish they can match or beat the S&P 500 annual performance.
Companies that I eventually must invest into that I don’t have yet are Nvidia and Boeing
Nvidia I want because they are involved in all the sectors that will see tremendous growth. Of course, the best time to buy companies you love is after the market had a major scare or pullback.
As of this post Nvidia is trading at $296.84, that is a 14.32% pullback from its all time high of $346.47. NVDA Nvidia is in a sharp uptrend. $270 support dip buy area. $300 area is resistance. An RSI of 45 seems to be in a great spot to buy Nvidia on a dip.
Nvidia is involved deeply with A.I., Self-Driving Cars, TAAS, Cloud Computing, Crypto Currency Mining, Video Games, and the Metaverse.
Boeing The Only Other Game in Town for Airliners
 Boeing and Airbus are the major two players in the airline industry. Boeings all time high was $444.50 in March of 2019. Currently Boeing is hovering around the $200 area. A good dip buy on $BA would be in the $185 range for a swing. Currently it looks like $BA is still in a down-trend.
Boeing has two airliner crashes of its newly developed 737 Max airplanes which caused a world-wide order cancellation. The 737 Max has been recertified and Boeing is fulfilling orders once again.
The pandemic has also caused a major disruption to Boeing’s business. Airlines all over the world have shutdown, while others have cancelled orders while their own country is in a lockdown.
A price target dip buy of $150 would be a great area to invest into $BA for a swing or long-term investment hold.
Well that's what I got for this post. I'm currently researching Transportation a Service stocks (TaaS). I hope to see you follow my posts.
Best Wishes,
]]>
 Are you looking for great new ways to renovate your home? You should also be looking at ways to raise the resale value of your property. One of the very best things you can do in this regard will be to learn how to paint kitchen cabinets. This is a move that will add style as well as a good deal of value to your home.
How Much Will Repainting Kitchen Cabinets Cost You?
The first thing you will need to be aware of is the amount of money that painting kitchen cabinets will cost you. There is no need to fear a nightmare scenario that will end with your finances drained. If you play your cards right, you can have stylishly painted kitchen cabinets for a price that you can afford.
It is true that renovating your kitchen area is one of the most cost intensive projects that you can undertake. Replacing or painting cabinets will tend to account for roughly 40 percent of the total cost. There are a number of factors to consider when you are considering this project and cost is definitely one.
The cost of cabinets for a standard 10 to 12 foot kitchen may rise to a total price of $5,000. To make things worse, the new cabinets that you install may actually be lesser in quality than the ones you have removed. This is due to the quality of the wood itself and how long it has been a staple part of the house,
However, once you have done so, it is also true that a new coat of paint can raise the value of your cabinets by a very considerable margin. The total cost of kitchen cabinet paint will normally be no more than about $200. This, plus the amount of time you spend on the job, can be considered a good investment.
Do You Need to Paint Kitchen Cabinets in Your Home?
The first thing you will need to do is come to a decision as to whether or not you will need to paint cabinets in your home. Even the act of learning how to paint cabinets, although useful in itself, can be wasted effort if the cabinets themselves are in poor shape. Examine them carefully to ascertain their state.
If the veneers are peeling or the particleboard is cracked and coming off, it may be time to replace your cabinets entirely. They may have been neglected for too long by the previous owner. In many cases, time may simply have taken its toll. If this is the case, you should first replace, then paint, your cabinets.
What Kind of Paint for Kitchen Cabinets Do You Need?
When it comes to cabinet painting, you will need a specific type of kitchen cabinets paint. However, you should also note that the best way to paint kitchen cabinets depends on the type of cabinets you have. It will also depend on the age and condition of your cabinets. Here are some of the best paints to use.
Should You Use Oil or Latex Paint?
Latex paints have become very popular in recent years. This is because they clean up fast with water and also dry quickly. The best type of latex paint to use will be 100 percent acrylic formulation. This is a type of latex that offers more durability and a higher scale of adhesion than most vinyl acrylic paints.
However, it should also be noted that many experts and home owners still prefer to use oil paints. This is due to the fact that oil paints will give you a harder, longer lasting paint film as well as a more smoothly finished surface. It is also true that oil paint dries a great deal faster than most latex paints.
Should You Use Brush or Spray Paint?
The next question to consider when learning how to repaint cabinets will be whether you use a brush to apply your paint or speed up the job using modern spray paint. This is another question whose answer will depend primarily on the age and general condition of your kitchen cabinets. A learning curve does apply.
To use spray paint, you will first need to rent the equipment. This will add to the total cost of the job. You will then need to tape off all of the areas that you don't want to get sprayed through accidental contact. This is a process that, while completely necessary, will also consume lots of time and energy.
In the end, it may be better to use an old fashioned paint brush to do the job. It will ultimately take longer to finish but will be more cost effective. It's not expensive to buy a paint brush. You also won't have to worry about spraying down a bunch of stuff by accident. If you are on a budget, it's best to brush.
The best brush to use will be a 3 to 4 inch wide square brush. This will work well on large and flat panels. However, you also need to invest in a 2 1/2 to 3 inch angled brush. This will be the best brush to use when painting the angles and corners of doors. The two of these brushes together will complete the job.
Should You Strip Cabinets or Paint Over Them?
When it comes to painting wood cabinets, should you strip them first or simply paint over them? Likewise, when you are redoing this area, is painting stained cabinets an absolute necessity? These are questions that you will need to answer on a case by case basis. The age and condition of the cabinets will be relevant.
If your current finish is clear coat, your course of action will likewise be clear. Strip it all the down to the bare wood before you start to paint. This will take care of all of the issues regarding adhesion between the old finish and your new coat of paint. Get rid of it entirely and then start from scratch.
Stripping is ideal in most situations. However, it isn't always needed. On some occasions, it may be better to give the area a complete top to bottom cleaning. Follow it up with a light sanding. If the finish gives way easily, this should be all that you need to get the surface ready for a brand new coat of paint.
Should You Use a Regular or Faux Finish?
One of the crucial steps in learning how to repaint kitchen cabinets will be making the call to use either a regular or modern faux finish. This will be the move that determines the ultimate style of your cabinets. Do you want them to be ultra modern, classic traditional, or somewhere in between? The choice is yours.
You can use crackling glaze to give your cabinets a classic distressed look. There are many different styles of brushing that you can use to give your cabinets all kinds of different finish styles. A bit of research on the world wide web will reveal a whole range of possibilities that you can easily pursue.
On the other hand, a regular finish is probably the easiest and least time and energy consuming path to pursue. This can be achieved simply by using the tried and true conventional brush painting technique. Once you finish, let it dry in a few hours. Your cabinets will now be fully updated and ready to add home value.
What Are the Materials You Will Need?
The task of kitchen cabinet painting will require a special set of brushes and other tools. These will include the following:
Paint
Look for enamel paint. The higher the sheen that is listed on the label, the longer lasting the finish will be. In most cases, high gloss enamel will hold up over time much better than satin finish.
Paint Roller
You can make use of a 4 or 6 inch standard foam roller. This will usually be enough to fully cover the sides of cabinets as well as their frames.
Square Paint Brush
Use the straight end of a 3 to 4 inch wide brush makes on all of the square and flat panels of your cabinets.
Angled Paint Brush
You can make use of a 2 1/2 inch to 3 inch angled brush in order to safely paint the corners of doors as well as door frames.
HVLP Spray Unit
If you prefer to use a sprayer, an HVLP model is your best bet. This will give you a smooth factory finish. You can also use the sprayer you have invested in on your fence or exterior house panels.
How Do You Get the Room Ready?
The answer to the question of how do you paint kitchen cabinets in the correct manner is to first get the room ready for the job. The best way to do so will be to follow a series of quick and handy steps. These can be listed below as follows:
- Empty all of the cabinets
- Clear off all of the counters
- Remove all portable appliances to another part of the house
- Take out all of the tables and other bits of furniture
- Tape rosin paper over the counter tops and flooring
- Tape plastic sheeting over the backsplash, windows, fixed appliances, and interior doorways.
- Tape mask the walls around the cabinets
- Set up a work table to help you paint the drawers, doors, and shelves
How Can You Set Up a DIY Paint Station?
One of the best things you can do in this situation to make the job easier will be to set up a special paint station. You can do so by following these steps:
- Set up a pair of 2 x 4 planks at a completely level distance between two ladders
- Screw a pair of eye hooks into one end of a 2 x 4 where the doors will be painted
- At the other end, screw eye hooks into both 2 x 4's where the freshly painted doors will be hung from
- Add extra hooks to the top edges of cabinet doors
- Do the same to the bottoms of lower drawers and doors. Make sure to do so in places where the holes you leave can't be seen
Remove All of Your Drawers, Doors, and Shelves
 The process of painting kitchen cabinets should begin in earnest once you have removed all of the drawers, doors, and shelves from the area. Once this is done, you can get started. The process for doing so can be outlined as follows:
- Take out the hinge screws from the cabinet frame
- Remove the doors
- Label each one with a numbered piece of tape. The process should go from left to right, top to bottom
- You should also be sure to number the bottoms of each drawer and the edges of each cabinet shelf
- Put all of your shelf hanging hardware to one side
- Remove all the pulls and hinges
- Set them aside at your work table and sort through them to save the ones that will be reused
- Transfer the number from each tape on the doors to the exposed wood under one hinge
- Cover it up with a fresh layer of tape
Make Sure to Clean Up All of the Surfaces
Your next step should be to make sure all of the surface areas are clean. You can do so by following these easy steps:
- Use conventional cleaners to get the dirt off of your face frames, doors, drawer fronts, and shelving
- If these do not suffice, you can use a heavier strength cleaner such astrisodium phosphate (TSP)
- Once you get the cabinets clean, rinse them off with water and let them dry
Prepare Your Boxes for Repainting
The next step in learning how to paint kitchen cabinets will be to prepare your boxes for the new coat of paint. This can be done by following these easy steps:
- Put on the appropriate safety gear to help you avoid breathing paint fumes
- Make sure all of your windows are open to ensure the proper level of ventilation
- Scrub down all of the surfaces using an abrasive pad that has been dipped in a liquid deglosser
- Keep a rag handy underneath the surface in order to catch up any excess dripping
- Before the deglosser evaporates, wipe up the residue with a clean rag that is also dipped in deglosser
- If you decide to relocate your hardware, you should start by filling the existing holes for screws with 2 part polyester wood or autobody filler
- The mix will set in about 5 minutes. It will shrink slightly, so overfill it by a small amount
- After the mix sets, smooth it with a sharp paint scraper. If it's too hard, you may need to lightly sand it
- Vacuum your cabinets inside and out to remove all dust that can ruin your finish
- Afterward, rub them down with a tamping cloth to make extra sure no dust is left
Properly Prime All of Your Cabinet Boxes
Your next move for painting cabinets will be to prime all of your cabinet boxes in the correct fashion. If the cabinets are already heavily stained, you can use a stain blocking primer. Once applied, it will dry very quickly. Its purpose will be to seal up knot holes and smooth over over defects that damage the top.
Start at the very top of the cabinet. Spread the primer across the grain and then pass it lightly over the wet finish. This should be done in the exact direction the grain is going in, never against it. Use a motion that involves making one stroke from the left to the right side. This will smooth it over.
Follow the structure of the cabinet and door with your brush. In places where a rail runs into a stile, you should paint the rail first. Use a motion that overlaps into the stile. You can then paint the stile itself before the overlap dries. This will ensure a smooth drying transition from one area to the next.
Sand, Caulk, and Fill Up the Surfaces
The next steps of the process can be outlined as follows:
- Let the primer dry, then sand the surface with 220 grit sandpaper
- If any surfaces seem to be profiled, sand them down with a medium grit sanding sponge. The result should be a glassy smooth surface
- If any seams are open, be sure to squeeze a thin bead of latex caulk into them.
- Make sure that the hole in your caulk tube's tip is no bigger than the point of a sharpened pencil
- As you go, pull the tip. Use a dampened finger to smooth out the caulk
- Fill up all of the various dents and dings with a smattering of vinyl spackle
- Smooth the spackle flat using a putty knife
- Allow an hour for the spackle to dry
- Sand over the surface again with 220 grit sandpaper
- Vacuum the surface and wipe it down with a tamping cloth
- Touch up the spackle using a spray can of oil-based primer. This should dry very quickly
- After an hour has passed, sand it down with 280 grit sandpaper
- Vacuum the surfaces once again and wipe them down with a tack cloth
It's Finally Time for Cabinet Painting
The time for your kitchen cabinet paint project has finally arrived. The first thing you will need to determine for repainting kitchen cabinets is whether or not you want to use more or less the same shade as the existing paint. If this is the case, you'll most likely need to make use of only 1 or 2 coats of paint.
If you want to paint over a darker finish with a lighter one, this will involve using probably 3 coats of paint. You should use a new brush for each new coat of paint. This is all the more true when painting stained cabinets since you have to be sure that a lighter shade of paint will totally cover the old darker one.
Start by working from top to bottom. The idea here will be to apply the paint to the exterior of each cabinet. Make sure to tip it off in a motion that is consistent with the direction of the grain, never against it.
From there, you will want to apply a cost of paint to the interior of the cabinet. Do so by using a mini roller with a smooth surface. This will leave a texture that is a bit like an orange peel with a few noticeable bumps.
Lightly sand the surface between applications of each coat. This will help to clean up any debris that may be left behind.
Prime and Paint Your Drawers, Doors, and Shelves
The next stage of learning how to paint cabinets will involve prepping, priming, and painting each door, drawer, and shelf. By this point, you will find yourself on the home stretch. You should do all of this on your work table in order to reduce the instance of dripping and spilling.
The process should be conducted in the following steps:
- Start with the area around the panel of the door
- Paint the main area of the panel
- Finish by painting the stiles and edge rails
- Wipe up all of the paint that falls on dry surfaces
If you want to speed up the drying time for the doors, drill some holes in an inconspicuous part of the edge. Then twist a pair of screw hooks into the holes. Paint the outside of the face of the door. Let it rest completely flat. It will take about an hour to dry out completely.
Once the door has dried, tilt it up onto the hooks. Put a drywall screw into one of the existing holes. Keep it tilted as you hold it up by the screw. This will allow you to paint the back side of the door.
After you are done painting, pick the door back up by the screw and one hook. You can then hang both of the hooks on a clothes hanger. You can then suspend the door from a shower curtain or strong clothes rod until it dries off.
Put Everything Back in its Proper Place
The last thing you will need to do after painting wood cabinets will be to make sure everything gets put back in its place. You can take care of this by following these quick and easy steps:
- After the final coat of paint has dried, put back all of the shelves
- Remove the tape over the number of each door
- Reinstall the various hinges and knobs
- Hang the hinges and knobs back in their original places
- Replace the drawer pulls or add new ones
- Put all of your drawers back in their proper place
What Tools Will You Need for the Job?
The very best way to paint kitchen cabinet is to make sure that you have all of the tools that you will need for the job. These will generally include the following:
- Putty knife
- Drill
- Flat paint brush
- Angled paint brush
- Paint sprayer
- Screwdriver
Ever since I saw my first Lexus RCF drive by me, I've been hooked. Recently I had the opportunity to rent one, and boy did I have some fun!
{loadposition LexusRCF}
It cost me $1,073.75 to rent a 2015 Lexus RCF for 7 days and because I’m a car nut, it was well worth it!
 The first time I seen a Lexus RCF it
was a dark silver one with an after market exhaust that made the already raspy v8 sound even louder. I ended up following that guy from a few miles near my home, just so that I could hear that engine. To me the Lexus RCF sounds like a Japanese Porsche.
The first time I seen a Lexus RCF it
was a dark silver one with an after market exhaust that made the already raspy v8 sound even louder. I ended up following that guy from a few miles near my home, just so that I could hear that engine. To me the Lexus RCF sounds like a Japanese Porsche.
In my video you can hear the engine revving and the awesome blip on downshifts after a wife alarm. What’s a wife alarm? That’s when your wife tells you to stop doing something. In my case the first wife alarm Kawshi wanted me to put my phone down that I was using to record an acceleration test.
Anyways, the Lexus RCF hasn’t changed much from the 2015 model to the 2021 model, so if you’re in the market for basically a two seater luxury sports car, you don’t have to get the latest model year to enjoy the car.
Of course the newer models are sculpted a little sexier, but the overall experience will be very similar to the 2015 original Lexus RCF.
What I Love About The Lexus RCF
 The 467 horsepower engine! This trusty
Toyota v8 in Lexus form can put a smile on your face the second you smash the go pedal to the floor. Tesla’s are amazing, but I’m still hooked on the sound of a gas burning power plant.
The 467 horsepower engine! This trusty
Toyota v8 in Lexus form can put a smile on your face the second you smash the go pedal to the floor. Tesla’s are amazing, but I’m still hooked on the sound of a gas burning power plant.
It’s a Lexus. I currently own a 2006 Lexus that I bought in 2006 for only $30,000 with 6,000 miles on the odometer! How did I manage to get a $54,000 car for $24,000 off? Well I’m friendly with an autobody shop owner here in Connecticut.
Buying a Luxury Car on Copart Experience
Back in 2006 I won the auction for a White Mercedes S-Class on Ebay. When it came down for paying for the car, the owner of the car refused to take a photo of the Capital One check with his signature and backed out of the deal.
A week later I was at my mechanics shop and told him about the story. He asked why do I want to buy a Mercedes, I should buy a Lexus instead. So he fired up his computer and launched the Copart website. She showed me some cars and I gave him a budget of $30,000 out the door price with all costs included.
A few weeks go by and he calls me to his shop, he found a black Lexus GS300 all wheel drive with navigation (so he thought]. I showed up and saw that the car had front bumper damage but the radiator was intact so the damage wasn’t that bad. I agreed to the purchase and repair that day.
About 2 months go by and my body shop guy handed me the key to my 1st Lexus. It's been a long love affair ever since and although many European cars catch my eye, I don't have time or the patience to deal with a car that's very needy and always breaking down in some fashion. I just want my cars to work and require regular maintenance. I much rather invest money into the stock market!
Follow my facebook page for updates on my stock trading & investing journey. Right now I'm LONG Ford, Apple, Microsoft, and a few Retail ETF's.
It’s a Lexus, That’s Why You Should Buy It!
 So after owning a Lexus for 15 years almost I can tell you all the nitty gritty stories and gripes of Lexus ownership.
I love European car styling, I love Audi’s and Mercedes the most. Through YouTube and the honesty of many YouTube mechanics, I have learned that the European brands tend to be very needy cars to operate. I personally wouldn’t buy any of those cars used, but if you have a business and can lease one and write it off, that’s the best way to have fun with them and not loose your shirt in the process. The other way is to fix it yourself.
Anyways, my Lexus did have problems, but after putting 210,000 miles on my GS300 I can safely say that this car is cheaper to run than probably many American cars as well. A Lexus and Toyota is engineered very well. And when you have all that thought put into the car, the end result is a car that tends to break less and last longer while staying in good running condition for a long time.
Why Are Toyotas & Lexus so Reliable?
Matt Farah from Youtube is famous for owning the Million Mile Lexus. You can put a million miles on any car if you’re willing to deal with the upkeep. Some Euro cars can put you in the poor house just with the required maintenance alone. However, as a car lover, I can totally envision doing the same for a car I love, but I'd put some money aside for realistic cost of ownership expenses. I recommend looking up forums on your car, I am a member of ClubLexus myself. I knew my car had issues with brakes and a dashboard rattle before I even bought it, but those are minor issues for me.
Here are the YouTube Video Timecodes to Highlights from My Lexus RCF Rental Video
1st Run 111mph
0:17 Wife Cop Alarm
0:25 Yours truly with the little monster Lexus, actually not so little it weighs 3,958 pounds.
0:27 Run 2 rolling start from 70mph – 119mph. Finished at 0:37 so it took 10 seconds from 70 to roughly 120mph. The car was only in Sport mode here.
0:44 Run 3 rolling start run from 72mph to 130mph at the 1:00 marker. Taking 16 seconds to increase the speed by 58 mph before the wife alarm at the 1 minute marker.
Hit .8 G’s on braking during that Wife Alarm #2. The screenshot can be seen on https://www.simplyadditions.com/Blogs
1:05 Run 4 Onramp Merging Power Test from 0mph in Sport + mode. 0mph to 92mph based on the GPS app from Google Maps took 15 seconds ending at 1:20. . The Google Maps speed however is on a slight delay but the speedometer from this run could not be seen.
Really nice blip on the downshift from this run. The Lexus RCF sounds amazing inside the car in real life when you have a little fun with it.
1:29 Run 5 And one of the best runs but the Speedo cannot be fully seen. Technically there are 3 speedometers to look at. There’s the digital one, the analog gages on the right of the digital gage, and the Google Maps GPS indicated speed.
At 1:48 The RCF achieved 142mph on a completely clear stretch of road from a GPS starting speed of 75mph. So it took 19 seconds to double the speed being traveled.
2:03 Another highway passing test. Run6.
2:10 Good driver etiquette person moves out of the fast lane to let me by.
2:16 Run 7 from 72mph to 135mph at 2:28. A total of 63mph increase in 12 seconds.
2:38 Car trip computer reflecting 29.5mpg after driving for awhile over 85mph. This Lexus with the v8 can easily do 25mpg on the highway with it’s 8 speed automatic.
2:57 Run 8 from 78mph to 145mph ending at 3:13 totaling 16 seconds. Added 67mph in a flash. This car is easy to fall in love with.
3:17 Wife tries to be cute and captures my sunburned face in the mirror.
3:45 Run 9 from 78mph in Sport + mode. At 4:05 the RCF hit my top speed for the trip at 152mph in only 20 seconds. That’s a total of 74mph added.
4:20 Gorgeous photo of the Pearl White Lexus RCF in Miami Florida.
In this how-to guide I walk you through the process of figuring out how to replace your leaky outdoor faucet, sometimes called a hose spigot or outside hose bibb. In my situation my faucet was soldered on, so I decided to use easy Sharkbite Push-to-Connect fittings for my outside faucet replacement project. Watch what I did right, and most importantly what I did wrong. Watching this will hopefully give you all the instructions you need to accomplish your outside hose faucet replacement. Good Luck, it's not impossible, but it can challenge you depending on your know how and preparation.
{loadposition leakyfaucet2}
Talked about LINKS
½” X 10’ PEX pipe https://www.homedepot.com/p/SharkBite-1-2-in-x-10-ft-White-PEX-Pipe-U860W10/202033036
½” Sharkbite coupler https://amzn.to/33ZKpYM
½” Sharkbite 90-degree elbow https://amzn.to/3f44i7r
½” Sharkbite Hose Bibb https://amzn.to/3yr6X2E
½” Copper Pipe https://amzn.to/3ovdqFb
Large pipe cutter https://amzn.to/3bAmkvR
Small pipe cutter https://amzn.to/3bAmkvR
Pliers https://amzn.to/3bAmkvR
Pipe Deburring tool https://amzn.to/3wiA7iv
Wire pipe cleaner inside & outside multi tool https://amzn.to/3wiA7iv
]]>
As a former home addition builder, I’ve seen many people convert their starter homes into their actual dream home. There are 2 home addition projects that come to mind where my customers have truly transformed their small little starter house into a spacious forever home.
Here’s my recommendation on what you can do and look into incase you have been thinking about either buying a starter home now or converting your current house into your dream house.
Make a Realistic Plan Based on Your Current Lot Size & Dream Home Requirements
Step One in converting to a dream house is accounting for the space you’ll actually need. Most home additions that I have built included at least 1 additional bedroom. The most lavish home addition I’ve built included 3 additional bedrooms, a large spacious kitchen, a master bathroom, living room and a new laundry room.
What Do You Want That You Don’t Have Right Now?
Do you need a larger home office, another bedroom, a larger kitchen, maybe even a home gym?
Write down every single room or amenity you really think that you need to accomplish your dream home renovation project from your starter home. With construction you’re only limited by your budget and whatever your local building codes will allow you to build. Essentially the sky is the limit as well as the only way to upgrade if you have a small lot but still need a lot more space.
You can’t build your home and fill up your entire property with it, because of building codes referred to as setback limits. There’s also other building codes that won’t allow you to build a skyscraper for instance in a regular residential neighborhood. You have to be realistic when it comes to planning your dream home renovation.
In this how-to guide, I’ll walk you through what’s possible and if it’s not possible, what you should probably do instead. There are simple things you can do in as little as an hour that will answer your particular questions as to how far you can go with your renovation on your current property.
Some people think that just because they own their property and land they can do whatever they want with it, and sadly that’s not always the case. If you own a small 1,500 square foot Cape Cod style house with a tiny yard, you will be very limited as to what can be done. Essentially in that scenario I would recommend demolition of the second floor with it’s irregular ceilings and opt for a conversion into a colonial by making a full second story addition on top of the first floor. This will require the tear down of your current roof and everything on the second floor. These projects are not cheap, because disassembling a house safely and preparing the original structure to hold the entire weight of the new second floor along with the new roof will need to be engineered and approved by your local building department. You cannot simply hire Joe Schmoe who tells you he can handle it and bypass the permitting process.
We actually did an estimate for a person who literally did just that. They hired a handyman who said they will save them thousands on building permits by not dealing with the town at all. Long story short the handyman built the second story addition, didn’t know what the hell they were doing, didn’t understand any of the structural engineering, made the ceiling heights of the new second story not approval able by the local building department and in the end the contractor took the customers money and ran.
The Danger In Hiring a Cheap Home Remodeling Contractor for a Major Renovation
 The client was out over $100,000 that they paid the handyman, and sadly a building inspector drove by the project once it was 90% completely, deemed it unsafe and the client had to move out of the house because it was not safe to live in anymore. Let that be a lesson for you that you don’t have to personally experience. I don’t know what happened to that homeowner because our estimate was around $120,000 to tear down what the shady handyman did and start over with proper engineering and construction. That’s a case where a few thousand dollars upfront for permits could have saved this person over $100,000 in being scammed. Ultimately that house would not be sellable to live in, so who knows what really happened. It could have been a complete nightmare.
Now that you know a little bit about what not to do, let’s discuss a few thing you can actually do.
Planning for Your Dream House with Software or The Simple Way
 Awhile ago I came up with an simple way anyone can plan their dream house, dream kitchen build at home using only a printer and some scissors. Interested?
Do-it-yourself Home Addition Plans
Or alternatively you can go to Amazon and buy one of their Home Renovation Software meant for homeowners who want to try designing their floorplans themselves. All I can do is steer you into the direction that suits you most.
Some people are good with technology while others rather tear out their eyeballs then try to figure out how to use home designing software to plan their dream house renovation.
Actually even if you are handy with technology I still highly recommend you use my low-key approach to designing your new spaces. After that plugging the dimensions into your home renovation software will be much easier anyway.
]]> There’s nothing more annoying than the constant dripping from a leaky bathroom faucet. In this how-to tutorial, I will walk you through all the steps needed to finally repair that old leaky faucet, whether it’s in your bathroom or even your kitchen.
In this guide you’ll learn what tools you’ll need as well as where you can buy faucet replacement seals or cartridges.
In my Faucet Repair I’ll be working on a Moen Darcy 4 in. Centerset 2-HandleBathroom Faucet Model #84550SRN.
Step 1 Identifying If the Drip is coming from the Hot or Cold Side
This is a simply process, if your faucet is dripping steadily like mine, you can simply put your hand underneath the faucet nozzle and feel the temperature of the drip.
Alternatively, you can shut off the Hot water supply line and see if the drip has stopped. If the drip has not stopped, next shut off your cold supply line. Shutting off one supply line at a time will help you identify which side of the faucet you will need rubber seals or replacement cartridges for.
Step 2 Finding out the Model # of your Faucet in order to identify replacement parts
 As seen in my How-to Video below, I already have the model # for my exact Moen Bathroom Faucet. But, let me tell you how you can figure out what faucet you have in case you don’t know what model # your faucet is.
There are a few options to identifying the model # of your dripping faucet.
You can do a Google Image Search using a good description of the faucet in question.
For my particular Moen faucet I did a Google Image Search using “Chrome Moen 2 Handle Faucet”.
This method requires you to look through several photos of similar faucets until you identify an image that exactly or closely resembles your installed faucet.
After you find the image that matches your exact faucet, you then click on the image to find the model #. Hopefully you’ll find Amazon, Lowes, or Home Depot links which will make it very easy to get your faucet model #.
Alternatively, you can proceed with he disassembly of your faucet to visually identify the actual faucet replacement parts you’ll need to buy.
Let’s move on to how I took my faucet apart.
Step 3 Taking Your Leaky Faucet Apart
 First we have to shut off the Hot & Cold Supply Lines to the faucet. Open your bathroom cabinet and locate the hot and cold supply lines. Shut off both sides, then verify that water no longer pours out of the faucet.
Now we have to take the actual faucet apart.
Most of these faucets have an allen screw on each handle body that has to be unfastened in order for you to lift the handle off.
Make sure you use the correct allen wrench or screwdriver to release the set screw, You don’t want to risk stripping the screw and make the situation worse. I bought myself a folding metric and standard allen wrench tool like this one.
https://amzn.to/3k3rjY5
By the way if your faucet handle is neither an allen wrench, Philips or flathead screw, you might be dealing with a Torx screw, but no worries, you can still buy a folding multi-tool to do the job.
Step 4 Remove Brass Ring Holding Faucet Cartridge in Place
 Once you remove the faucet handle you will be looking at a brass ring that will have to be unfastened using vise grips. Once you remove that brass ring, use pliers to pull upwards gently on the faucet cartridge.
If your faucet does not use replacement cartridges because it’s a much older faucet design, you will have to continue disassembly until you find worn out rubber seals. At that point you will have measure and find replacement seals at your local hardware store like Home Depot or Lowes. You can also most likely find replacement rubber seals on Amazon by typing in the search field the rubber seal dimensions.
If you didn’t find the model # of your faucet but you did reveal a cartridge which will be either plastic or brass. Remove the cartridge and go to your local hardware store to find a replacement. Alternatively you can do an Amazon search for the replacement cartridge by providing as much relevant details about it as possible.
For my faucet I would type in Moen 2 handle bathroom faucet replacement cartridge. Then I would look through all the amazon results until I find the exact match for my part. If Amazon does not carry that cartridge you can do the same search on Google Images, Lowes, or Home Depot websites.
Step 5 Finishing Your Dripping Faucet Repair Job
Replacing the faucet cartridge on a modern faucet is not that hard of a job. Before you begin, look through these instructions once more and watch my How-to video below. With the right tools and the replacement parts in hand, you should be able to fix your dripping faucet in less than 20 minutes. This was my first time repairing a faucet. I've installed plenty of kitchen and bathroom faucets when I ran my remodeling company and at my own house during my remodel. Fixing a leaky faucet is actually much easier than installing a new faucet. If you were thinking of doing that instead, I highly suggest you only do it if you really hate the current faucet you have or you cannot find replacement parts to fix the drip.
{loadposition leakyfaucet}
]]>
 I get a call from my dad the other day, he says he can’t turn on his computer. I walk him through a few procedures and realize that I have to make my first trip during the pandemic to my parents house.
At first I thought that my dad forgot to tell me that his 12 year old APC Back-UPS XS 1500 was giving him the battery replacement beep. Strangely the uninterrupted power supply didn’t allow me to bypass the battery to power on my dads computer.
Our APC Backup Power Supply Has The Building Wiring Fault LED On!
I pulled the unit out from underneath his desk and saw that there was a little red light on the back of the unit indicating“Building Wiring Fault” . I wasn't even aware that this APC Back-UPS 1500 XS units had an indicator light to warn you about improper house wiring conditions. When the Building Wiring Fault LED illuminates, the manual says that there are problems detected with your building wiring which could result in a shock hazard!
{loadposition banner}
 I cannot fathom why my dads APC Backup power supply didn’t have a grounding plug anymore. It looked as if someone yanked it out. My dad was unaware of it and that’s how this How-to tutorial and Youtube video got started this time folks.
Preparation and Tools Needed for The Grounding Plug Replacement Job
Replacement Grounding Plug (Amazon, Home Depot, Lowes)
Wire Cutters and Wire Stripper Tool
 I like the Klein Tools Wire Cutter & Stripper, it is nice and rigid, not like the cheap crap at Walmart that is made poorly. I bought those they are flimsy and do a poor job cutting wires.
As a do-it-yourselfer or homeowner, invest in the tools you’ll be using many times in your lifetime. You don’t want all those future moments to be spent swearing and being aggravated. I’ve had at least 4 cheapo wire cutters that bent or broke on me, but the good ones just last.
Coffee or Tea, your choice. I’m drinking Starbucks Pike Place Roast, it's what came through the Amazon ???? this month.
Utility Knife with DeWalt Carbide Razor Blades!
 Okay whatever you have will work, BUT, get yourself a pack of the DeWalt cartbide blades. They last a really long time. I really liked this video called Which Utility Knife Blades is Best. Project Farm goes through all the top brands, but I can save you the trouble and tell you once again just get the DeWalt Carbide blades linked above LOL. You’ll thank me later. BTW: you can reach me on Facebook!
Electrical Tape
I recommend a good quality electrical tape. The cheap ones will simply slide off and put sticky goo all over your wiring. Scotch 700 Electrical Tape has the best ratings on Amazon.
{loadposition banner}
Philips Head Screwdriver
 I’m sure you already have one in your house, but let me tell you why you should get yourself a descent set of screw drivers. When you’re using tools do you like to enjoy the experience or do you want to struggle. There is a difference between a quality tool that you can buy from Home Depot or Amazon, and the cheapo stuff. Good screwdrivers don’t skip out of the screws you’re trying to fasten. They dig into the screw head and engage in a very positive and very satisfying motion
I recommend a 10 Piece Husky Screwdriver Set with Lifetime warranty at Home Depot. They go for only $10.
By the way I’m sure there already is a Home Depot and Lowes rivalry just like the Chevy and Ford guys. Home Depot is literally less than 1.5 miles from my house. End of story, but I like both stores. I had to replace my old leaky hose really that I bought from Home Depot and ended up getting a nice aluminum hose reel for $100 from Lowes. Home Depot in this case didn’t have anything on their shelves comparable to the aluminum Lowes model.
]]>Do you want to hear the story of the time I replaced my old leaky water heater with a hybrid electric water heater?

This post is in story format but you can use the table of contents to jump around to other sections. I cover all the various plumbing possibilities as well as how to overcome obstacles you're not very sure about conquering yourself. This is basically a How-to Guide that I converted into a more enjoyable format.
I will be updating this post with new photos from my actual water heater replacement and everything that went wrong in the process of doing it.
Congratulation on finding a how-to guide that doesn't bore you to death.
I originally wanted to name this the How-to Install a Hybrid Electric Water Heater and Not Freak Out Guide! But, I thought that would be a little too extra for people. Enjoy!
Choosing a Hybrid Electric Water Heater Over a Conventional Electric Water Heater
I just made the switch to an A.O. Smith Signature Premier 50-Gallon Hybrid Water Heater
- 10-year Limited warranty
- Energy Star
- About 1/5th the cost of operation of a regular electric water heater
- 4500-Watt Double Element
- Electric Water Heater with Hybrid Heat Pump
{loadposition banner}
 So why did I make the switch to a hybrid electric water heater? I recently replaced the heating elements in my 11 year old water heater. After the replacement, my water heater began dripping very slowly and eventually rusting around the ports of the water heater elements. I didn't notice because I used a water heater blanket during the winter which is when I replaced the heating element.
Congratulations on even considering replacing your old and most likely leaky electric water heater. I recently found out that most water heaters only last 7 years before springing a leak. I found a leak on my 10 year old water heater during the installation of my new system.
Comparing Annual Running Costs of a Standard Electric Water Heater vs Hybrid Electric Water Heater
My old GE standard water heater had an estimated yearly operating cost of $508 or $42 per month accord to that EnergyGuide sticker. The new water heater is an A.O. Smith Model #HP10-50H45DV 50 gallon water heater which I bought from Lowes. It's EnergyGuide sticker states a slim $114 estimated yearly operating costs or $9.50 per month! That difference alone is enough to take this upgrade seriously.

When Should You Buy Your Water Heater?
I bought the water heater during the winter when these models tend to go on sale. Look for rebates at Lowes and Home Depot when you browse them on their website. I bought mine from Lowes and didn't get around to installing it until 1 year later!
I'll tell you why I held off for so long in this guide. And if you also have the same situation which prevented me from installing this unit quickly, you'll be glad you found my post.
{loadposition banner}
PEX Piping vs Copper Pipes, What's Best?
When doing your own water heater replacement, you might have to rearrange your plumbing like I did. Some of you will get away with a a threaded flex hose connection to your old water pipes while people like me had to improvise and decide what type of water pipes we should use. For my particular case I went with plastic PEX piping. I already own the crimp tool from when I upgraded my bathroom pluming from 1/2" to 3/4".
BTW: I recommend PEX pipping for do-it-yourselfers.
Huge Benefit to Installing a Hybrid Water Heater is a Dry Basement
 Imagine your basement didn't smell like a dank dungeon. Sure you can install a dehumidifier but that just wastes energy, while a hybrid water heater with a heat-pump is essentially an air conditioner for your basement. Within 5 minutes of turning on my A.O. Smith water heater the laundry room was cool and dry.
Now as I'm writing this it has been 1 and a half weeks since the install in mid June. My basement has never smelled better. Infact, we have now begun plans to finish the basement; something that wasn't on our short list before.
Living In a Flip House Like Us?
Our house is essentially a flip that we choose to live in for awhile. We'll see how this pandemic pans out for the real-estate market. We already invested well over $40,000 total into our renovations. Like many others who have bought a house that they were going to remodel and flip, we kind of fell in love with the house and our neighborhood.
How Much Will a Hybrid Electric Water Heater Cool Your Basement?
 If you are on the fence on whether or not you should invest into a hybrid water heater over a standard electric water heater, ask yourself if you would like your basement to have central ac?
Look at this photo, I used my trusty Black & Decker Thermal Leak Detector to show you the temperature difference on a hot summer day where my outside thermometer was reading 90 Fahrenheit.
The small laundry room shown in the Chief Architect floor plan above is where my water heater is installed. That little room sits around 69 - 70 degrees Fahrenheit. The large area labeled as storage is the rest of our basement that once was finished, but now is essentially a storage area. This room sits at 70.5 degrees Fahrenheit after the installation of the hybrid electric water heater does it's job on a 90 degree summer day in Connecticut.
The 2 car garage is on the other side of the wall of the laundry room. It sits around 80 degrees Fahrenheit which is about 10 degrees cooler than the outside temperature.
I only recommend a few products on here and my YouTube channel that impressed me so much, I had to tell people about it.
This hybrid electric water heater is one of them. My basement had the typical musty smell you find in areas where humidity reaches uncomfortable levels. I can't believe how long I waited to install the unit. My entire house smells better after installing the water heater, because we live in a raised ranch where the staircase splits between the basement entry and the upper level right off the landing.
Since we didn't temperature control the basement, it was always on the stinky side once Connecticut reaches that ripe sweaty condition we call spring and summer. This addition to our house made a noticeable difference from day one!
]]>

Stop! If you are not interested in seeing how snow blowers compare in price, total customer reviews, and average customer rating, this comparison guide is not for you.
If you simply want to see where you can go right now to pick up the best snow blower possible, you came to the right spot.
I don’t know about you, but these days I like to buy products that are well reviewed in terms of a product having an ample amount of total reviews and an average rating over 4 stars if possible.
These parameters meet my base criteria for entering this comparison guide for this seasons snow blower or snow thrower.
In the past when we all had more time, we would sift through product reviews, one by one. These days, we may look through a few reviews and take our chances as long as the brand name is known to be okay, and the consumer review score makes me feel warm and fuzzy enough to plunk down my hard earned cash.
Many of these stores sell the same exact snow blower / snow thrower / electric snow shovels. You’ll be able to do an apples to apples comparison by comparing the model # of your snow blower. We included the same exact snow blowers in multiple stores so you can see how the price, total customer reviews, and overall rating compare from store to store.
Who Writes Reviews?
Typically someone who is really happy about their product, or somebody that wants to complain about their misfortune. It’s hard to find products with a perfect rating these days. We have to deal with fake reviews, paid off reviews, and just silly people.
I recommend that you read at least 3 positive and 3 negative reviews on each snow blower your interested in. And if you’re one of those poele that just needs more information, go ahead and read as many reviews on your future snow throwing machine.
The bottom line is that all the snow throwers and blowers on this page have all the important numbers in your favor. If you were betting against these or the competition with an average rating of 3 stars, there is no comparison. It’s all about the #’s in the end, you have to go with what makes sense.
Due Diligence
As I mentioned above, these days we have to deal with fake reviews, and there’s no way to determine what’s what without actually reading a bunch of reviews. Most fake reviews don’t make sense and are written with very poor English. Yes their English writing skills are worse than mine! LOL!!!
But seriously folks, we did all the leg work for you, all you have to do is figure out if you’re driving to Lowes, Home Depot, or simply having Amazon deliver your snow blower. Good Luck and Follow me on Twitter and Facebook!
Best Wishes,
Voitek

If you live in the United States and are interested in expanding your home's space to include a sunroom, it is vital to be prepared. Knowing the specifics in regards to costs, timetables, and materials can make a tremendous different, especially for first time homeowners. The final price for a sunroom addition may vary widely, depending on the size of the room itself to the specific materials used in the deck and foundation of the room. Like with any other such major renovation planning, it is vital to budget carefully and be prepared to work with the professionals to get the best possible outcome.
General Pricing Expectations
As a general pricing guideline, individuals should be expects to pay between $18,975 and $94,875 for their sunroom addition. Further costs may be divided between the type of room itself and what primary materials you need for the space. The consideration for the type of sunroom you have will also depend on your region. If it is naturally warmer where you live, you may just opt for a three-season installation, otherwise a four-season installation may work best for you. Things such as prefabrications can also end up affecting the price, especially if you are interested in cutting down on the price where it is possible.
{loadposition responsiveads}
Four-Season Room
 With a four-season room, individuals should expect to spend a higher budget, as this is one of the pricier options available. These rooms will cost between $18,975 and $94,875 for the total installation. The high price of these installations is largely due to the insulation and material costs. You need to make sure that the materials can keep up with all of the seasonal changes in order to establish a comfortable environment as often as possible. The windows, doors, roofing and exterior walls to the construction all need to have relatively high insulation levels in order to help retain cool air and heat in the sunroom during the seasonal changes. Despite the high cost, however, this is the most complete addition to your house. With this type of sunroom, you will truly feel as though the area is a natural extension of the home.
Three-Season Room
This type of sunroom can be much more affordable. These may cost between $8,855 and $44,275, depending on the materials. As a patio-style enclosure, it is much less insulated tha nits four-season counterpart. The deck additions may also be more seamless to integrate, as there is no insulation to the divisions that need to be constructed. It works and looks like a four-season space, but it much better suited for moderate temperatures. Expect it to get get hotter during the summers and colder during the winters, however, if installed somewhere with more extreme weather changes.
Glass Solarium
 As the name suggests, this is a largely glass construction that is designed to stand as the thinnest possible divide between the outside of your property and the inside. The attractive interior can be customized like any room of the home, while the glass majority construction allows you to enjoy the outside space. This is a particularly scenic sunroom option for those who want to relax in the presence of their outside environment. Because of the materials for the sunroom foundation, however, it may be more costly, ranging from $31,625 to as much as $75,900.
Conservatory
The conservatory can be the perfect option for those who want to have a view of their indoor and outdoor plants. The conservatory is designed to work like a greenhouse, though individuals can move as much furniture into the section as they need to enjoy what it has to offer. These systems are extremely varied in their presentation. They can cost between $8,855 and $88,550, depending on how dedicated the homeowners are to their plants. Complex temperature and humidity regulation systems can end up making costs higher, though few other systems can provide individuals with the same degree of immersion in their greenery.
Roofed Sunroom
This is perhaps one of the most affordable installation available, as it focuses on providing individuals with a simple roof configuration to their sunroom setup. It may cost between $6,325 and $37,950 (£5,000 and £30,000 U.K equivalent), and its arrangement may vary largely depending on what the homeowner wants for their property. Typically, these rooms are attached to walls that already exist, with full walls built around and a simple glass roof standing out as a way to let light in. This natural influx of light makes it a particularly desirable sunroom choice for both people and plants.
Regardless of what type of sunroom installation you are planning for your property, it is strongly recommended for you to begin budgeting as soon as your plans are concrete. Knowing exactly what to expect and how you want to divide costs for your sunroom can be one of the best ways for you to make your addition a reality.
]]> You’re not going to believe how delicious this fried chicken wings recipe is!
We used a Ninja Airfryer, and honestly we weren’t even sure that we were going to keep it. It sat in our house for a week before we tried it for the first time.
First Time Frying Chicken Wings Using Ninja Airfryer
I love fried chicken wings, but the nationally famous restaurant that I used to get my chicken wings from must have changed their recipe. So I have been dying to try some good chicken wings and I have to be 100% honest, I had no idea an Airfryer can produce such amazing results! Seriously if you follow this fried chicken wing recipe you’re going to love end result.
Dry Rub Ingredients for Chicken Wings
- Paprika
- Chili Powder
- Salt
{loadposition responsiveads}
Preparation
 If you’re not use to using these ingredients go lightly with the dry rub mixture. The goal is to make the wings resemble ours in this picture.
How-to Alter the Spice Level of Your Chicken Wings
We like spicy chicken wings, but you can alter the flavor profile to your personal tastes, that’s why I didn’t list how much of the ingredients you should put in. If it’s your first time, do a pinch of salt, pinch of paprika, and pinch of chili powder.
Once the wings have fried in your airfryer, taste the wings and see if you like the flavor profile and spice level. Next time make adjustments to bring your chicken wings to the ultimate level.
Top of Your Wings with Tasty BBQ Sauce
Even if you didn’t put enough spices, I wouldn’t worry. A great barbecue sauce on your crispy chicken wings will elevate the tastiness to level 10. My favorite barbecue sauce at the moment is Kinder’s Exxxtra Hot BBQ Sauce. I am not sponsored by them, but dam… That BBQ sauce is the best I have tasted. The only restaurant that had something this tasty was Famous Daves.
How-to Fry Crispy Chicken Wings Video
{loadposition airfryer}
]]>
If you’re anything like me, you found the seductive art of trading stocks and you desperately want to acquire the right knowledge, so you can kiss your old life goodbye and say hello to the Goodlife!
This is where I keep my personal list of the best books, videos, and movies I believe have helped me grow into the direction a successful trader needs to grow. From my research and that’s a very extensive list by the way, I can safely say that all these resources below are worth your time.
You Can’t Handle The Truth?
In future posts I’ll describe my journey further as a barometer for other traders. I’m sure some people get into this game because they think they can just do it. Well just imagine showing up to a Lakers game the way you look right now at this very moment. You think you’re about to make some moves on that court with the professional athletes you see next to you? OF COURSE NOT, you’ll get your butt kicked and laughed at in the first few seconds of the game! THAT’S TRADING FOLKS in a Nutshell.
Once I watched some videos and buy some I’m talking about hours and hours of videos, I thought I knew quite a bit about trading. Well, I knew more than the guy or gal who couldn’t even bother with all those videos. But what about the guys and gals who are 10 years down the road in this game, you think you have enough skill, wisdom, and technology to beat them?
I’m not trying to scare you, but I’ve seen people blow up their account because they made some good trades before, so they thought they knew what they were doing. The fact is, trading is a professional level occupation, if you want to be good or even great at it, you’re going to have to GO PRO!
Okay now that the ugly truth is out, let me tell you how easy getting your trading education work done can be! The only traders that I know to be successful are the ones who become obsessed with their performance. Well when you get to that level of interest in trading, the problem you might face is figuring out how to make time for your other businesses, career, & family time. Sorry but trading can take over your life, and for me personally I’m still struggling with figuring out how to work all my businesses and the rest.
So if trading becomes an obsession, plan your workload out for all your required activities because trading becomes a disruptor of your daily life.
After that stage, you’ll start to figure out how to rebalance your life. And if you’re realy lucky, trading might be the only thing you do in the future. However, a lot ofus have existing businesses that would be foolish to let go of, so we simply rework our schedules and eliminate things that waste time like watching tv, commercials and all.
What did I say you might have to stop watching tv? Um, yeah! You really think you’re going to be pushing a Lambo or Mercedes this year and still watch 3 hours of TV a day! NOPE! Luckily when trading stocks becomes an obsession, you’ll be watch screens, but they will most likely be youtube videos or movies about trading that will help you reach your financial goals. Afterall, why should you waste time watching somebody else make money on a tv show, when you could be watching a “show” where you learn new information that will make you better, faster, and a stronger trader.
Well if I haven’t scared you off yet, well I guess you are showing signs that you might have what it takes at least in this single moment.
The Trick To This Trading Game, Think Limitless
Want to know a trick that makes all this easier for me? Have you ever read any books on successful people and what they do? If you have then the rest will make perfect sense, if you haven’t well, as long as you’re open minded enough it will work for you too.
I program myself.
What, what the hell is this guy even talking about? Lol, had to include a reference to the inner voice comedian Jim Gaffigan points out so well. It’s really simple folks, write a list of goals and read them every day. Driven people are learning how to hack their brains, their consciousness, and their emotional state. The fact is becoming a successful stock trader is more of a metamorphosis, unless the person already was incredibly driven in other pursuits.
Also you might want to bookmark this website, because my obsession with trading is not going to stop anytime soon, so this article and a bunch of new articles will be continually streaming from my consciousness onto the blog section of this site.
Do You Have What it Takes To Become A Successful Day Trader?
Well, I happen to be one of those people who for years owned businesses and thought I had passion for them, until I really got into day trading. Turns out, I didn’t even know what passion really was until I became a day trader.
What Does A Successful Day Trader Do?
If you don’t like the idea of dedicating yourself to the craft of trading, you’re better off pursuing something else to make money. Trading stocks for profit on a daily basis always sounds easy to the uninitiated. Once you observe on a real platform like Etrade Pro or Think or Swim the amount of money you can make in seconds, minutes, or hours, you might just catch the ultimate fever like I did.
Yes it’s true, to become good at day trading, you have to work your ass off. However, if you become obsessed with figuring out how to do it correctly, working all those extra hours doesn’t even seem like work. Trading is the only occupation I’ve had in my life, that not only makes me work harder, better, and longer, but it’s actually easy to do since you can’t help yourself in your pursuit of winning “The Game of Trading”, over and over again.
I got into the stock trading fever late 2017. Don’t get me wrong, I’ve made investments and swing trades before that worked out well. However I never seriously thought about day trading until somewhere around late fall in 2017.
The REAL Wolf of Wall Street Uncensored
https://www.youtube.com/watch?v=iKMpLFCbLz4
Million Dollar Traders - Part 1 | British reality TV Series created by Lex van Dam
https://www.youtube.com/watch?v=oXno18pOHgo
Million Dollar Traders - Part 2 | British reality TV Series created by Lex van Dam
https://www.youtube.com/watch?v=Qo03EF3okz4
Million Dollar Traders – Part 3 | British reality TV Series created by Lex van Dam
https://www.youtube.com/watch?v=Y--PjLk1A1Y
Anton Kreil Annihilates Retail Brokers and "Trading Educators"
Top Books Every Stock Trader Needs To Listen To or Read
Dark Pools: The Rise of the Machine Traders and the Rigging of the U.S. Stock Market
An American Hedge Fund: How I made $2 Million as a Stock Operator & Created a Hedge Fund
Market Wizards: Interviews with Top Traders
Trading in the Zone: Master the Market with Confidence, Discipline and a Winning Attitude
Paid Content for New Day Traders
Trading Tickers by Tim Grittani
https://profit.ly/store/info/270
To me there's nothing better than watching people live trade. Tim made a great video, but you can find a lot of great live trading videos on youtube as well. Some of the strategies described in the video are outdated. I put this on the list because it helped me learn level 2 amongst other things.
During Premarket What Should You Watch?
You can watch Benzinga Premarket Prep it live streams on youtube at 8am on the Benzinga Channel
https://www.youtube.com/user/BenzingaTV/featured
Thanks for visiting. If you found mistakes in this post, please hit me up onTwitter. Thank you!
Best Wishes,
Lex
]]> Trading a SuperNova stock is an exhilarating experience filled with data points and signals you can hopefully put to use trading the next supernova stock just around the corner. I used to stay away from supernovas because they are wild and known for making $.50 to $1.00 moves in a single second.
Let’s say you bought 1000 shares of $BPTH on March 6 2018 when the news hit at 8am at $5.20 a share in just 5 minutes your 1000 shares would have netted you $1,560 in profit! Not bad for 5 minutes work, right? What’s even nuttier is if you start getting comfortable with larger share amounts for instance 2000 shares would have netted you $3,000 in that first 5 minute run of BPTH!
It’s All About Being Ready for PreMarket Runners
I’m going to analyze hot stocks on SimplyAddiotions.com in this blog section from now on. Spreading some of my tips, observations and trading lessons that could benefit you in the future. I post about my progress on Twitter if you want to follow my P&L since I started in 2018.
Now lets examine what happened with $BPTH: Bio Path Holdings Inc.. Below is a snippet from Benzinga Pro which includes the powerful & very bullish headline. Please read and extract all the keywords that you feel make this stock news snippet worthy of a 200% intraday move from a pre-market 8am press release.
At 8am sharp, Benzinga posted the following news alert:
Bio-Path Announces Clinical Update to Interim Analysis of Phase 2 Prexigebersen Trial in Acute Myeloid Leukemia
Here’s the 8:02am news snippet from Benzinga Pro, this was the exciting one:
Bio-Path Offers Update To Interim Analysis Of Phase 2 Prexigebersen Trial In Acute Myeloid Leukemia: Showed 'Meaningful Clinical Improvement with Excellent Patient Safety Profile'
Did you notice what words were missing in the first press release? Take a closer look, because it’s those exact words that made all the difference. But Benzinga Pro is not the only news streamer in town, however it is pretty good at putting news in front of your face that actually matters, instead of a flood of news from TOS or Etrade Pro that’s not all that useful because it isn’t filtered.
Actually I haven’t played around with the TOS news too much, since I already pay for Benzinga Pro, comment on my Facebook or Twitter if you have some TOS news tricks that I’m not aware of.
Snapshot of BTPH in PreMarket
In the morning stocks run the minute/second they report compelling news. Usually 7am, 7:30, and 8am press release cycles get the most attention. At those specific times you will notice a flood of news hitting the newsfeeds. It’s your job to spot money making press releases and within seconds analyze the charts and the press releases to make a final judgement on whether you chould hop on the train that’s most likely already started taking off.
Sometimes stocks spike so quickly, you feel scared to jump in because it already moved so much. After 1 year of trading every single day, I’ve learned about a few news releases that can really rocket a stock to SuperNova status. The caveat is that sometimes crappie companies repost old news which tricks newer traders and the stock takes a quick pop and dump once experienced traders spotted that the news was rehashed.
Analyzing Entry and Exit Points for Trading a PreMarket SuperNova Like BPTH
Okay so when it comes to premarket you essentially have to analyze a trde in seconds and make a decision. After the day was over today, I printed out charts of BPTH and red markered the hell out of them.
Etrade Makes Pre-Market and After-Hours Trading Clunky
I’m not a big fan of playing in Pre-market or After-hours because Etrade still hasn’t figured out what day traders need. I actually submitted some emails about my ideas, and if they’re smart, they should implement them, simply no brainers IMO. Anyways I used Etrade Pro and it is good for some stuff, but hotkeys and a useful trading ladder like the one found in Think or Swim is not their strong suit.
First let me tell you that if I had to depend on Etrade Pro hotkeys (speedkeys), I would probably never trade unless it was a really slow moving stock. I don’t know if Etrade Pro works well with other software, because the hotkeys have been very inconsistent and when seconds matter, that can be down right scary. So since I started trading in January 2018, I have not had the ability to use awesome hotkeys, instead I enter hot stocks using market orders and for stocks under $15, I generally get filled in okay spots. But of course if I had hotkeys, I can get filled at the current spot +$.05 if that’s the macro I programmed. These are awesome trading tools that SHOUILD BE WORKING in Etrade Pro, not sure what the problem is, unless it’s a software conflict.
Since I trade in Etrade Pro, I don’t really have reliable hotkeys, which they call speedkeys. For some reason I can’t get consistent performance out of them, probably because I’m running Trade Ideas, Benzinga, chatroom, a OBS Studio screen recorder, and a bunch of Google Chrome browser windows which somehow screw up Etrade Pro hotkeys. Anyways I got used to doing market orders on fast moving stocks. Works okay with stocks under $15, but I did notice that when I trade bigger stocks like TSLA or MSFT I would get horrible fills. So I definitely don’t recommend Etrade Pro market orders on big cap stocks.
Word from Me:
Guys I am a perfectionist, but nowadays I have to choose my battles because day trading has taken over my life. I hope you enjoyed this post, I tried to make it useful and information packed, but I admit I don’t have a lot of time for editing, so if y ou catch a mistake, please reach me on Facebook or Twitter so I can correct it. My plan is to post these blogs more often and not worry as much on thorough editing. My goal is to share my trading insights in an informal way and who knows, maybe one day we’ll be trading together somewhere, you never know.
See you on the next one!
]]> The other day I made over $3,600 in less than 7 minutes day trading breaking news on the California electric company blamed for wildfires in 2017 & 2018. Yes I’m talking about ticker $PCG otherwise known to people as PG&E Corp. This was one of the most exhilarating trades of my short career as a full-time day trader. Steven Dux made a name for himself making multi-thousand to hundred thousand dollar trades and for us new traders, I can’t think of anything better than to dissect his entry and exit points from his https://profit.ly/user/dux page.
How I Made $3,600+ Dollars in 7 minutes Day Trading PCG Stock
At the end of this article I’ll embed a video of how fast the profit was flying into my Etrade Pro account once I locked in a position on $PCG with 1000 shares. But the main purpose of this post is to look at a short trade by Mr. Dux and extrapolate his entry and exit points based solely on the intraday and daily charts.
Examining How Steven Dux Short Traded TNXP
Let’s take a close look at how Dux traded $TNXP on 12-7-2018 in this chart. I marked the price points within Think or Swim to give us an idea of what most likely Steven was thinking about here, since I’m not in Tim Sykes Millionaire Challenge Chatroom, although I was in Pennystocking Silver for several months when I first started. Who hasn’t, right?
TNXP Head and Shoulders Pattern Short Trade
On these TOS (Think or Swim) charts below, we have the 1 min intraday chart on top (chart 1) and the 10 day 30 min chart (chart 2) below it.

From Profitly we only have the following data for this trade:
Short Entry: $6.37
Cover Price / Exit: $3.19
Shares: 37,000
Profit: $117,247
Percentage Gain: 49.92%
If you look at chart 1 the most probable short entry would have occurred on the 1st red candle forming the second shoulder of the Head and Shoulders pattern. This was at 9:44am.
Now let’s look at chart 2 from the 10 day chart and see if we notice any support or resistance areas close to our $6.36 price line. You can clearly see that the $6.36 area on Friday from November 30th 2018 was a major chart resistance area. Well folks Steve’s entry for TNXP is a no brainer. He looked at previous chart resistance, possibly drawn lines like Madaz likes to do, or simply just observed the daily and intraday charts while trading like I do.
Dux saw that $7 was major resistance in pre-market so if $7 wasn’t broken and held that level or above with consolidation, he knew that the stock would most likely have a strong pullback.
Right out of the open TNXP dumps $.75 cents in the 1st minute, then immediately recovers and continues spiking. I don’t trade the open personally because I don’t have an edge, so it’s too gamble for me.
Let’s look at how quickly TNXP jumps to $7.24, then immediately looses the $.24 and goes back to $7 resistance area. The 3rd candle of the day actually closed at $7.01. This would tell me that either the stock is going to try to maintain the sevens or it’s about to go back down. Well as we can both see on the chart below, the stock couldn’t get past $7.01 again on the next candle which was red with a long wick below it. Once the stock began dropping you can clearly see that this chart could be drawing a Head and Shoulders pattern. TNXP cracks to the $5.84 area and only has a small bounce of $.36 cents then it drops again and makes a new low of $5.76. from their it tries to recover by bouncing higher than before only to top out right around the $6.36 major resistance area. So there you have it, the stock in the past 14 minutes of trading had several large red candles on the 1 minute chart and there was a strong possibility that $6.36 would hold. I personally would have put a $.12 stop loss on my short in case it tried ripping or even worse short squeezing me.
Finding the Perfect Entry for a Head and Shoulders Short Trade
 So this entry point seems very logical and almost a no brainer once we look at it over after the fact. The stock formed a head and shoulders pattern at previous chart resistance and it showed signs of weakness in it’s ability to hold a high. The best entry for a Head and Shoulders short is what you think would be the top of the second shoulder. I probably would have waited till 9:47am for the 5th candle on the second should for my entry since I’m still new to shorting and I would want confirmation that this is the second shoulder and that TNXP is weakening.
How Did Steven Dux Pick His Short Cover Exit on TNXP
Can you guess where Dux decided he wanted to cover at? Well as someone that’s constantly watching and listening to professional traders, I can tell you that most of the time, they will cover their short at a support level.
Let’s look at TNXP, the stock closed at $3.16 on the day before which was Thursday the 6th. So looks like we figured out that on this particular short trade by Mr. Dux, he shorted at resistance on a very popular short pattern, which I’m assuming he uses often (we’ll look into this in future blog posts). And then he covered after a major crack to the down side close to the previous days close which was a nice flat support level. Mystery Solved.
About My Day Trading Journey
As many of the day traders I’ve met in chatrooms, I came into the world of day trading by looking into Timothy Sykes. Naturally I learned about Steven Dux and Tim Gritanni, both who have inspired me to work my ass off to make it into the top 10% of traders who actually make it.
As we all know 2018 was a strange year because for the first time in 9 years the stock market had a pretty big correction. That correction came at a time when I was geared up to make a killing off of Supernova stocks. Honesty that’s the area I’m currently best at, but in 2019 I started the next chapter in my trading career by doing the things only the most profitable traders do. That means daily notes, spreadsheet tracking, and analyzing the trades of very successful day traders like Steven Dux and Tim Gritanni.
Bookmark my Simply Additions site as my goal is to help other traders make additions into their bank account. I’ll analyze and extrapolate the answers me and you both want as to what do the top traders actually do in certain situations. Take Care and I’ll see you on the next one.
 P.S. I will be embedding the video or link into this article as soon as I create a YouTube video for my AMAZING $PCG trade. I made over $3,682 on breaking news and recorded the trade from start to finish. The only problem is I use OBS Studio to record my 43” 4k Sony TV and I have to edit the video into 1080p. Trust me, that video is coming soon and I’ll post an update on my Twitter Page when it happens.
]]>
Hi and welcome to my website, you might be wondering why a website called Simply Additions is posting about day trading, well that’s because:
- I’m the owner and I fell in love with trading stocks.
- This website is already award winning for my Home Addition and Home Improvement Advice content, but now I’m after helping people make some additions to their bank account by learning from my posts and from the resource links I point out to you.
 Don’t worry this article is about buying a Bull Flag and making profit, but I also want to establish a few things for my visitors who are maybe not used to the idea of trading stocks for profit.
I started trading stocks fulltime in January of 2018, so that’s only 10 months ago! It took me about 7 months to really understand the day trading game enough to make proper trades, but I do believe that if I didn’t get lost in the sales jargon of a famous day trader and his chatroom, I could have learned the game a lot faster.
Anyways, Bull Flags are one of the best long biased trading patterns you can profit from. The pattern looks similarly to the picture shown on this page. You have either 1 line (candle) or maybe 2 or 3 lines (candles) that represent the vertical flag pole, then you have a series of candles that make the entire set of candles look like a flag pole.
In the beginning of your day trading or swing trading education you learn about bull flags and you get excited about them. But if you’re anything like me and the countless other people out there, you pretty much just stare at them and watch them work 80% of the time and always hesitate and second guess yourself as to why you shouldn’t get into the play. Well I’m going to tell you how I conquered my fear of buying bull flags and making money from them instead of just seeing their bull run to the top without me.
Why 90% of New Traders Hesitate to Buy a Stock Presenting a Bull Flag?
- The most common reason is because they have seen this pattern and other famous stock patterns like the Cup and Handle pattern fail.
- It’s true, every time you see a Bull Flag or a Cup and Handle Pattern the stock is not going to run. But 80% of the time as long as the stock has the attention of the day trading mob, or day trading chatrooms, the stock will run.
{loadposition responsiveads}
Oh sure, but what about the 20% of the time when the bull run doesn’t happen? Well the answer is simple, you get out of the trade ASAP at your stop loss or even before your stop loss if you loose faith in the bull flag.
Most day traders don’t become profitable because they cannot execute getting into or out of a trade on time. The reason is because they are scared of taking a potential loss, or scared of realizing the loss that they are actively staring at in their real-time P&L statement from their broker.
What the Trick To Getting Over Day Trading Hesitation?
You have to realize that 1 stock trade is not going to make you rich and hopefully 1 stock trade is not going to make you poor. The trick to becoming part of the 10% of day traders who actually make money is to do what they do.
What Do The Top 10% Day Traders Do To Be Profitable?
1. They set a mental stop loss before getting into a trade. I normally set mine at $50, or .10 cents per share. I’m okay with taking a $50 loss, I’m not okay with taking a $200 loss, so I keep my finger on the trigger whenever I’m in a trade and if I see the time and sales tape display my stop loss price, I pull the trigger and live to trade another day.
Today a trader in the chatroom I’m in blew up their account on ticker $SAEX and lost $10,000 in cash! The trader didn’t say if their new to the game, but they were signed on as a guest and most good traders who stuck it out to learn all the rules wouldn’t blow up their account in the first place.
2. Seasoned day traders don’t hesitate because they trade like a robot, if the stock price hits their mental stop loss, they get out and that’s it. I personally had problems with taking small losses for many months, I did the tried and true hold and hope the stock price would bounce back up, sometimes it worked and other times I lost a few hundred dollars!
I had a mental block about losing my commissions, but I rather lose $10 in commissions and $50 then loose $250 plus the commissions which did happen to me.
Trading is not about being right, it’s about knowing what to do, and taking your emotions out of the equation. Our emotions will make us trade irrationally. Just because a pattern like the Bull Flag is supposed to work 80% of the time, it doesn’t mean it’s going to work 100% of the time. So if you happen to enter a trade and it’s not working GET OUT, it’s that simple.
In the beginning you have to force yourself to stop out of your trades when they’re not working, just remember even though you took a loss, you still made a good trade. Why is that? It’s because professional traders who MAKE money day trading do exactly that, they exit the trade when it’s not working, only newbies hold and hope. And like I said before, people who don’t treat this like a business with set rules, they blow up their account, lose all their trading money, and never trade again.
{loadposition responsiveads}
You can get lucky a few times and make a lot of money, but if you don’t know how to play the game properly, it won’t be long before you lose all your money.
So I think that’s where I’ll end this today, because I want you to watch my live trading video of me playing the Bull Flag Pattern and exiting the trade in profit. I could have made more if I got in sooner, and if I got out at its peak, but as I explained in the video I thought that ticker $IGC would at least try going for $8.50, which it didn’t at this time. However, later on that same day, that stock went bananas!
You can make a ton of money day trading stocks, but FIRST learn all the rules the pros use, otherwise you’re not going to get very far.
BTW: I plan on posting all my lessons learned right here on SimplyAdditions.com, so if you like my straight talk and you think you can endure more of it to learn the game, I suggest you save this website and check back. Also I post links to my new blog posts as well as my trades on Twitter, so be sure to follow me there too.
Here’s the video, let me know in the YouTube comments about your trading journey!
{loadposition bullflag}
A Book I Highly Recommend for Day Trading Stocks
 I cannot tell you how many great traders love what Mark Douglass teaches in Trading in the Zone. I bought the audio book on Amazon and absolutely loved it. That book has allowed me to finally realize that I'm being kind of silly for holding a trade when it's not working and since the week I have read it, I became a better day trader. You can say it's a How-to book for mastering the mind and the underlying reason traders lack consistency. Mark will help you overcome the mental habits that cost you money, plain and simple. I highly recommend it!
I hope you cash in big this week, see you on the next post!
]]> Did you ever buy somebody a gift and it ends up blowing up in your face? Well that’s what happened when I bought a Honda HRR216VKA self-propelled lawn mower for my dad as a Fathers Day Gift.
I personally recommend the HRR216VKA mower in my self-propelled lawn mower buying guide, so I feel a little silly that I didn’t know about the legitimate problem people are having with pulling the lawn mower backwards. What happens is that there is some heavy resistance that almost feels like as if the mower had brakes that prevent it from going backwards with ease.
My dad told me about the problem over the weekend and my co-investor (brother-in-law) found some videos on YouTube showing how you can make some alterations to the drive system to make it better. But my dad want’s no part in taking apart a 3 month old lawn mower when it has warranty. And after listening to my dad I have to agree, why should we take apart our brand new lawn mower when it shouldn’t even have this problem to begin with.
{loadposition responsiveads}
Calling The Honda Authorized Dealer for Lawn Mower Problems
Well I called a local Honda authorized dealer here by my house and told them about the problem. They were well aware of the issue and asked me to come down with my dad and try the Honda mowers in their showroom. So I picked up my dad and took him to Farmington Valley Equipment and sure enough 3 out of the 4 Honda mowers they had on display also had the same resistance. I have to admit, the resistance does not feel right at all. You can test push and pull any lawn mower from all the popular brands and you will not get any resistance, in my personal opinion something was just not right here.
My dad seemed satisfied in knowing that at the very least all recent Hondas have that problem, but when I came home I did some further digging online, because this heavy resistance when pulling the lawn mower backwards just doesn’t seem right.
Well on the Home Depot website I started to pour through the question and answers section and sure enough I found a Honda Representative commenting on the problem and specifically stating that there was a problem in manufacturing of the Honda HRR216VKA Lawn Mower and probably other models. Apparently Honda used the wrong diameter bushings and that is what is causing this unnecessary friction. If this was a minor issues I would have left it alone, but since my dad is having the issue and it bothers him enough to complain to me, I knew I had to do something about it. Also I know I have personally influenced probably a few hundred or more people through my website to buy this lawn mower. That’s why I decided to put my private business in a blog post and post verbatim the exact letter I wrote to Honda a few minutes ago.
Did You Also Buy the Honda HRR216VKA Mower?
Now I’m only posting a copy of the Honda Case letter for reference to all my website visitors who have purchased the Honda mower. I 100% agree with everyone who thinks there is something wrong with the amount of resistance felt when pulling the mower backwards. Hopefully Honda does the right thing here and fixes my dads mower and all of your mowers free of charge. Everyone who bought a Honda mower bought it for ease of use and reliability, I think this strange issue was a shocker to anyone who just bought one.
When I get replies from Honda, I will update this blog post. If you have any questions, reach me on Facebook or Twitter.
{loadposition responsiveads}
My Official Complaint Letter to Honda
I purchased this lawn mower as a Fathers Day gift for my dad on 6/15/2018 , he was a proud owner of a Honda Accord and has been talking about getting a Honda mower for several years. Long story short, I bought this mower for him for Fathers Day.
When I purchased the lawn mower from Bristol CT Home Depot, they did not have a display model and I was not aware of the heavy resistance these mowers have when pulling them backwards. My dad is convinced something is wrong with his 3 month old mower. I contacted Farmington Valley Equipment (authorized Honda Dealer) and told them about the problem. They asked me to come to the showroom and try their mowers. We did and 3 out of 4 Honda mowers exhibited heavy resistance on pullback.
When I came home I wanted to figure out what other people are saying about this problem, that’s when I came across a post from a Honda Representative on the Home Depot site for my mower.
https://www.homedepot.com/p/Honda-21-in-3-in-1-Variable-Speed-Gas-Walk-Behind-Self-Propelled-Lawn-Mower-with-Auto-Choke-HRR216VKA/203709643
Honda Representative Explanation of the Problem with Honda HRR216VKA Lawn Mowers
This post can be found in the Q&A section:
December 4, 2017
About a year ago, a limited number of mowers were built with undersized bushings, which would cause some extra effort to pull backwards. A Service Bulletin was issued, and models under warranty were repaired at no charge. More recent production (since spring of 2017) have been built with the correctly sized bushings. You can expect to find these for sale from this site, or you local Home Depot. -Robert@Honda>
The resistance seems to be an issue especially since my dad is older. Can you get his mower fixed with the new bushings or whatever it needs to alleviate this problem. It is a lot harder to maneuver backwards than all competitor models. He’s a major Honda fan, but noticeably unhappy about this particular problem, especially since his 25 year Craftsman never had this issue, which he likes to point out.
Lastly, he asked me if there’s anything that can be done to silence the muffler a little bit, I’m not aware of anything but if you know of a product please let me know as well. Thanks.
Sincerely,
Voitek Klimczyk
Official Response from HONDA
Hello,
Thank you for your email. These mowers are designed to have resistance when pulling them backwards. If you feel like this resistance is excessive, then Honda would recommend taking the mower in for inspection. A Honda power equipment dealer can inspect the unit and assist you with this issue. The mower has a 3 year warranty for the repair of a defect. Honda only makes one mower muffler for your mower. Please click the link below to select a dealer near you.
http://powerequipment.honda.
Thanks,
Wesley
Honda Power Equipment
770-497-6400

ref:_00Do0JBy0._5001JctLAS:ref
 Several years ago my wife convinced me to get the Bose Companion 20 computer speakers I was ogling at BestBuy. I wanted them but they were $200 more than the average $50 computer speakers. However after listening to the amazing clarity and bass response of these Bose speakers, I just had to get them.
A few weeks ago I began hearing a popping sound every once in awhile coming from my right speaker. At first I didn’t think anything of it, but eventually more popping and crackling sounds emitted from the right speaker. At first glance after taking off the speaker grill I could not spot any imperfections with the rubber surround or speaker cone. I was expecting to find a rip or tear somewhere which would explain the distortion I was beginning to hear more and more often.
Well for the next 2 weeks my cousins came over from Sri Lanka so I had no time to really play with the speakers. The only thing I would play out of them for a few hours every morning is some audio commentary from the stock trading room I joined, as well as some audible stock alerts from Trade Ideas and Etrade Pro scanners. Talking and quick beeps here and there did not cause any distortion, it was only from listening to music or really bass heavy YouTube videos that caused the right speaker channel to pop and crackle.
I have to be honest, I was a little sad that my awesome Bose speakers were having problems. The thought of replacing them sucked, because I knew I still had 1 good speaker. So once again I pried off the metal speaker grill and grabbed a flash light. Yup, sure enough I found the source of the problem. The right channel had a ¾” tear in the rubber speaker surround. That’s the little rubber ring that flexes on bass heavy sounds.
It’s at this point that I got really happy because I knew I could fix the problem. My first thought was to use Super Glue, but I was afraid that when the glue dried it would cause the rubber to stiffen and change the sound quality of the speakers which I grew to love over the years. Yes I know some audiophiles think Bose doesn’t compare to higher brands and when it comes to car audio I really have to agree. I’ve had several cars with Bose stereo systems and I was not impressed, my 1995 Acura Legend L and 1995 Mazda Millenia S both had Bose systems and neither of them blew my socks off. However when it comes to home theater and computer speakers, Bose does sound really nice in my opinion. My brother-in-law would not agree with me because he’s knee deep into audiophile land, but I think most people would really like the sound of Bose at home.
Anyways, wow I got off track, sorry. When I realized that the rip in the speaker surround can be glued, I immediately got my camera tripod for my Samsung Galaxy 9+ and began recording the video you see below.
Turns out I still had 5 million gallons of Flex Seal left over from when I had to do an emergency repair on my central ac drain pan that my gutter guy broke. Well Flex Seal is liquid rubber and honestly I cannot think of anything better you can use to fix a speaker with, even if the speaker surround is made out of paper or some type of plastic. In my particular case as seen in the video the rubber was torn on the surround which made Flex Seal a no brainer.
Now it’s been a few days of constant use of my Bose Speakers and I can happily report that the repair is holding up 100%. I cannot detect any sound distortion, popping sounds, or crackling anymore.
Oh yeah, there’s 1 important thing I forgot to mention incase you don’t watch the How-to Guide below, if you rubber sound is ripped like mine was I highly recommend using some type of small paint brush and painting on the Flex Seal liquid rubber on the inside of the rip as well as on the surface of the rip. If you can please watch the tutorial, you’ll also get to hear the speaker before and after the repair. Let me know in the comments on YouTube if you can hear any distortion after the repair was made.
In the video I used a hair drier to speed up the drying time of the rubber glue but it didn’t seem to work that well because it was still tacky to the touch, most likely because that’s what happens when you heat rubber.
An Explosion of Sound
When I plugged all the wires back into the speaker system my computer was playing music at what seemed like full volume. I got freaked out because I thought I ruined my repair, I rushed for the Bose control dial and clicked the power button. No I didn’t leave the speakers on before I plugged all the wires in, but what did happen was that when you do plug the wires in the speaker system just turns on. I happened to have some music playing from the scene in the video where I was demonstrating the distortion on bass notes. Anyway, the explosion of sound scared me, but immediately I realized that I didn’t hear any distortion anymore! I WAS SHOCKED, that quick Flex Seal repair already made such a difference to my used to be broken speaker that even at high volume I couldn’t hear any distoriiton or popping sounds.
Please check out my YouTube video and let me know in the comments what you’re going to try this repair on. Take Care and mark this site in your favorites because I will be posting lots of awesome blogs and how-to guides every month.
P.S. If you’re interested in making some money in the stock market, be sure to bookmark this site and subscribe to my YouTube channel. I just started recording all my day trades because I finally learned how to be profitable after 9 months of studying the stock market every single day.
{loadposition BoseRepair}
]]>Hi and welcome to my first live trading video lesson. Today we’re going to watch and discuss how I traded ticker $TIS (Orchids Paper Prods). This stock trade netted a quick $120 in profit in ONLY 7 minutes!
Lesson Skill Level: Intermediate – Some trading knowledge is required to fully understand this lesson.
Please visit Investopedia.com to brush up on any of the terminology if you’re brand new to trading stocks.
Background: In 2018 I began studying the stock market fulltime after being introduced to day trading and seeing with my own eyes the mind boggling moves a stock can make percentage wise in a single day.
I personally seen a stock quadruple in value in less than 1 hour! That’s a 400% gain on your investment if you got in at the right time. Educating yourself to be a great day trader is all about learning when to get in at the right time.
The Trade:
Ticker: $TIS Orchids Paper Products Company (NYSE)
Date: 08/13/2018
Buy: 1000 Shares of TIS average price of $2.3099 at 3:16pm EST
Sell: 1000 Shares of TIS average price of $2.434 at 3:23pm EST
Calculating Profit & Loss:
1000 shares x $2.3099 = $2,309.90 total opening position
1000 shares x $2.434 = $2,434.00 total closed position
P&L = $124.10 in Profit
Trade Duration = 7 minutes
Trade Catalyst: Q2 Earnings Call to be held on August 13, 2018 at 10:00 AM Eastern Time.
Why I Got Into This Break of Resistance Trade?
On Monday the 13th of August 2018 I thought I was going to take the day off, but once you become a fulltime day trader you soon realize that it’s pretty hard to not watch the market, especially if you have some free time in your day.
Well at 1pm I fired up my whole gauntlet of stock trading software and for me that includes: Etrade Pro, Trade Ideas Pro, Benzinga Pro, and the Dekmar Trades chatroom. For the first 2 hours I followed $TIS but wasn’t 100% confident in it.
At 3pm however, TIS sparked my interest, and the video below explains why.
BTW: This particular trading lesson is in 4k, so I suggest you enable the full-screen option and select the highest quality. In the future I'm going to record the trades in 1080p.
{loadposition TIStrade}
The reason I’m sharing my trading video lessons and tips is simply to help other stock traders out. If you’re new to stock trading you may already know that you have to constantly study and one of the best tools to take advantage of is live trading videos.
]]> Finally my first post on trading stocks! If you follow me on social media or YouTube, you know that I have been hinting about making content to help new day traders figure out how to make money in the stock market.
Disclaimer: Any content I make on trading stocks or investing, is for informational / entertainment purposes. I am not a financial advisor, I’m only sharing my actual experiences in the stock market. Use this information along with your own research to make educated decisions with your finances. I take zero responsibilities for your actions.
Okay now that I got the legal disclaimer out of the way, let me tell you how I got involved with the stock market, as well as some interesting stories about me related to making money trading penny stocks.
In 1999 when I was working as a CMM programmer, my boss told me about this company in Connecticut that makes noise cancelling technology. It was so long ago that I can’t remember why I invested $5,000 of my savings into this penny stock, other than my boss and his stock broker were dead sure this stock was going to double. Well sure enough I threw down 5 grand on $NTSC and within a few weeks if my memory servers me right, I doubled my money and cashed out over $10,000 in cold hard cash. Not bad for a 20 year old!.
I ended up using that money to pay off the remaining portion of a Ford Credit car loan I had on a 1999 red Ford Mustang GT convertible with every possible option. Well that was 19 years ago. And since then other than 1 other time, I really didn’t have any knowledge about the stock market other than “Buy low, sell high”, the famous quote everyone knows.
Is Tim Sykes a Fraudster?
 One day cruising through a moment of boredom on Instagram, I came across Timothy Sykes. Tim is the Donald Trump of penny stock promotion. He is constantly making posts on social media, some of them down right cheesy. At 1st I’m thinking here’s another fraud trying to make money from people who desperately want to get out of the rat race. In situations like this, I do a little background checking and to my surprise, Tim has a track record of actually making money in the stock market, WHOA!
So that’s when it started, I would fill all my free time with day trading YouTube videos from Tim Sykes. Before I knew it, I desperately wanted to get a hold of his paid content, but I didn’t want to fork over $600 or more to get it. Luckily Tim made a very informative video that he chopped up for Youtube called "Trader Checklist Free Study Guide by Tim Sykes".
After watching Trader Checklist I felt I had everything I needed to trade, but honestly it isn't. What you won't learn that much about is patterns, and that's because I believe only his millionaire students program get those in a binder. Tim get's you almost there but you still won't have the whole picture.
Getting Tim Sykes Videos
Having skills in the computer field, I was able to acquire several of Tim Sykes videos. They were good, but I wouldn’t say they were everything you needed to take advantage of the day trading world. A lot of them are pretty old, and since you can’t short stocks under $1 without having tens of thousands in the bank, the information wasn’t 100% useful to me.
However, Tim lit a fire that I knew deep inside would burn for the rest of my life. I mean, I already made well over $15,000 in the stock market when I knew practically nothing, and here comes Tim with examples of what worked for him in his journey to become a stock trading millionaire.
In a future post I'll talk about my experiences with Tim's Profitly Chatroom. There's a lot to unpack there, if you're curious about day trading, bookmark my blogs page and follow me on Twitter. That way you will know right away when I post something new.
Day Trading Reality Check
The stock market is not a static animal, it constantly changes and the only way you can get a grip on cold hard cash, is to study the market as much as possible.
I thought I studied enough by watching most of Tims videos and I also got my hands on Tim Grittani video Trading Tickers as well. All great content, all useful, but the reality is, you’re not going to master anything without constant effort and practice.
After 2 months of at least 10 -16 hours per day studying videos and absorbing trading books, I thought I was ready to jump into the stock market again. And at first it went really well, until the market gave me several wakeup calls.
Day Trading Requires You to Pay Tuition
Unless you find a guru who discusses every nuance of trading, including the way your particular broker works, rest assured, you’re going to pay tuition to the market, one way or another.
In the video at the bottom of this page, I talk about a situation where I was in a winning trade but couldn’t sell it after hours because I didn’t know two things:
- You have to change the routing from Automatic to ARCA on Etrade after 4pm or premarket.
- You have to sign the afterhours agreement on Etrade prior to being able to execute any afterhours or premarket trade.
Those are 2 lessons that have costed me well over $500. Which doesn’t seem like a lot, but it is when you consider that I started with a $3,000 account!
That loss which is my biggest loss to date, also involved another lesson:
3. Be careful what crappy penny stock companies can do, never trust them, never fall in love with them. Just picture the movie Boiler Room to get an idea of the companies you might be trading. It happens more often than not that these companies are complete garbage who within a few years will go down to $0 dollars!
Penny Stocks and Deceptive Press Release Tactics
A few months into the game and with some big profitable trades under my belt, I felt like I already knew what I was doing. This is a stage a lot of noob traders fall into without even knowing. It will take a nice little market ass kicking to whip you back into reality; there’s professionals out here who want your money!
One thing traders do is buy hot news, because most of the time the stock will surge up and the whole key is to get in early and sell into the pop (strength). Well on one particular day a company with the ticker HMNY announced that they just closed a deal with Sam’s Club! Whoa, Sams Club, a Walmart owned company, this news is going to skyrocket this stock, even after hours when regular people can trade it. Those were my thoughts, but as most day traders I only red the headline and not the entire article which included a tiny little sentence at the very bottom of a long press release that stated HMNY only has a 1 week contract with Sams Club.
Well, I bought the stock after it spiked and went for it’s first dip. This is a very common practice, it’s called dib buying. Most stocks will run up on news, sell off a little (dip), then go for a second, third, and even fourth run later on in the day.
Anyways, I bought the dip, the stock slowly crawled up which I thought was really strange because the news was so big. I didn’t get it. Then the stock slowly began turning downwards and my profit and loss went into the negative.
At this time I pulled up the press release and read the whole thing, “Holy Sh!T, I F-ed up!”. Well I’m already in, maybe this thing will go back up at 3pm which is called power hour and it’s known for pushing up stocks from the morning runners list, which HMNY was a part of.
Three o-clock came and HMNY went up slightly, I thought about selling but I was still down $70 and maybe it would bring me to break even once the regular people read the press release and buy the stock after 4pm.
After Hours = Aftermath
A lot of shady companies issue good press releases in the morning and horrible ones in the evening right after the market closes at 4pm. Tim Sykes thought me this lesson, but I never experienced it, until that day. At 4:03pm HMNY releases a press release stating that they are about to run out of money, so they have to do an offering which can be the kiss of death.
So the stock starts plunging, I’m down $100, $125, $200 and by 8pm I was down around negative $250. Oh BTW during the press release and immediate drop I was not able to sell because I didn’t sign the Etrade afterhours agreement.
The next morning I’m thinking this stock will have a morning spike which is highly typical and I will sell into the pop. WRONG, this freakin stock started a panic sale and by the time I got out, I was down $500! That folks was the most valuable lesson I have learned in the day trading world. Hopefully by sharing it, you won’t have to go through the same situation. Always check with your broker about after hours trading terms, as well as keep an eye on any stock your holding overnight. To this day, I will NOT HOLD any penny stock overnight, even though my biggest win was over $700 on an overnight hold.
Back To Reality
Okay folks this is my first stock trading story and I hope you like it. I will most likely put this story into my book one day. Below is my very first day trading video, in the video you will hear more stock trading stories and tips. You will also see first hand what happens when a company like Micron ticker $MU gets stock moving news. I think you will be very surprised how quickly traders react to news and move the stock up and down in sometimes very violent swings. Enjoy and let me know what you think about this post on my Facebook page.
Take Care,
Voitek
The video is in 4k, below the video you will find all the time codes to different sections of the video. Enjoy!
{loadposition daytrader}
Power Hour Trading Recap July 3rd 2018 | $AVXL $MU $AQXP $GBR $FB
Watch what the hottest stocks did in power hour on 07/03/2018. Includes commentary, personal stories and trading insights.
Use TIMESTAMPS below to jump through sections. I recorded this video because I review what the biggest percent gainers do, so I can learn entry and exit points.
Let me know if you like this video, because it will tell me if I should make more day trading videos.
2:15 Introduction and the software I use: Etrade Pro, Benzinga Pro, Trade Ideas Pro.
3:40 How I bought my 1999 Mustang GT by doubling my money with a Penny Stock. Allowed me to do a Saleen conversion.
4:45 $MU Perfect short opportunity on Micron shares dropping on heavy volume
5:10 Playing Bigger Stocks – Just take smaller share size.
Trading Calculator in Excel and Shorting Calculator
7:50 My YouTube Plan for these live trading video recaps
11:00 All the chatrooms I tried. Profity, Warrior Trading, Dekmar Trades. Didn’t try Awesome Calls. New problems when joining chatrooms with live commentary.
18:15 Day Trading vs Ego. The story of good news in the morning and terrible news at night. How to sell a stock afterhours your first time.
22:00 Mark Douglass Trading in The Zone Book
23:00 Cutting Losses Short – Head and Shoulders Pattern
The reality of trading, no one wins 100%. 70% win ratio is really good in the trading profession.
29:55 Shorting Stocks the HTB Hard to Borrow Rate Calculator
32:34 My Introduction to Day Trading was by Timothy Sykes
33:15 How I Got Etrade Pro
34:00 My 3rd Business. Stocks don’t have to do what you want, because traders could be in the bathroom. If it doesn’t work, get the hell out of the trade!
36:00 The truth about Hot News posts like FDA approvals during a Halt.
37:00 Bullflags, Dips, VWAP bounces and my observations.
38:18 Why I didn’t paper trade. Tim Grittani advice.
40:20 $GBR premarket runner takes a gigantic multi-point dump on market open from $13 to $6!!!.
42:45 $AVXL has swing trade potential, and my original call on AVXL in the chatroom. Taking lessons from the Big Boys to stay out on holidays, Fridays, and shortened trading hour days, which are the days before the holidays.
44:40 $FB Facebook getting slaughtered today.
45:30 $MU Micron pops after responding to previous news reports. This is how fast trading news effects the stock market! News in background is from Benzinga Pro Squawk.
46:40 Tips on end of the day trading, including what happens with certain OTC stocks.
SUBSCRIBE if you like my stuff
http://www.youtube.com/user/homeaddition?sub_confirmation=1
BTW Keep up with my shenanigans on Social Media. I mainly use Twitter, but I’m all over, just like everyone else.
Don't forget I'll be posting a review of my experience on various trading chat rooms including Profitly, Dekmar Trades, Trade Ideas Chat room, and Warrior Trading. I've joined them all and have all the details a new trader should know before forking over your cold hard cash.
https://twitter.com/LexSelfMadeLife
https://www.facebook.com/LexSelfMadeLife/
]]> Today I'm going to reveal a few tricks a general contractor would use to hire helpers from Craigslist for odd jobs and maybe even some light construction work. No your eyes are not deceiving you, I did say Craigslist and hiring for construction, curious?
As I write this post, I'm in the middle of remodeling my house and sometimes I run into small projects that I don't want to do myself for whatever reason. That's when I decided to try my luck on Craigslist. As it turns out, you can use Craigslist for something other than a means to get yourself on the Judge Judy show. I've used it several times now successfully for odd jobs around the house and I learned a few important tricks along the way.
Why Use Craigslist?
Craigslist gets eyeballs no matter what, and some of those eyeballs need to find work. Now I'm not going to lie to you and tell you that every single adventure I had through the Classifieds Ad Giant went without a hitch, in fact if it did, I would have no material for this article. But it's the experiences that went wrong that allowed me to adjust my approach and test my hiring theories on the next set of odd jobs.
So one of the biggest lessons I learned was that asking a simple question on Craigslist and simply replying to those who respond is a total no no. That's right, any shmuck with an internet connection can see your ad and write, "I can do that", in response to your classified ad, and that's what brings forth all the undesirable people.
I asked myself how can I filter out the people who are probably going to be too lazy and too unprofessional to do the job? Then I wrote ads that not only described the work to be done in full detail, but I specifically asked for them to submit a description that described the exact procedure they would use to handle my project along with their bid.
Those that couldn't pay attention to detail or were just too lazy to listen to my instructions were immediately written off, because their response lacked the level of detail I was after and sometimes they didn't even include a bid. And there were always several responses from people who provided a proper bid and described how they would do the project.
I also typically included what I'm willing to pay for such a task, because if you don't do this step, you might just get an email box full of people shooting for the moon. Some of the responses I've gotten through Craigslist were ridiculous, but that's the nature of the beast.
Now I know that by asking for them to provide a description of how they will perform the work is going to eliminate the people who can't write, but I'm more comfortable knowing that I eliminated people who can't follow simple instructions. And seriously, if they can't handle simple instructions, why the hell would I hire them, let alone tell them where I live?
The bottom line is that there are good people out there looking for extra cash for whatever reason, maybe they are a college student, an out of work person, or a contractor looking for the next job. If you're going to use Craigslist, I suggest you try my approach or you can try it your way first, then try it my way the second time around.
Here is a list of some of the ads I posted on Craigslist recently and where the project stands:
Remove Carpenter Bee Problem: Someone wrote in the exact procedure they used at their own house that worked, it wasn't even a bid. I was grateful for the information and will be using it in the fall.
Drop Ceiling Installation: I've received several fair bids and will probably chose one of them as soon as I'm ready to start working on my basement.
Paint foundation around house: I received several good bids, I've contacted an actual contractor but they never responded back. I will revisit this post and possibly repost or go through the responses again and make contact.
Roof Cleaning: Again as with the painting of the foundation, I chose a particular bid because it included the detail I was comfortable with, but the contractor never responded to my voicemail.
Remove old water heater: The previous homeowner covered up an old water heater, steel railing, and an old bike under leaves and brush in the wooded part of my property. I paid only $40 to have it all dug up and removed! I was very happy with that deal as I couldn't wait to get rid of it, even though not many people could notice where it was due to all the leaves and branches on top of it.
Tree Stump Removal: I spoke to a respondee that provided great detail, but the guy said his daughter was about to give birth and that he'll try to do it before she does. Well he called one day and said she gave birth, then I never heard from him again. I actually decided to rent a tree stump grinder and do it myself.
Gutter Cleaning: My rear gutter would overflow during rainstorms, I ended up paying a guy $50 to clean my gutter and was very pleased with his work. I chose him because of how he said he would do the work as well as the price.
Haul Away Construction Debris to Dump: I had some plywood, old doors, and various pieces of lumber looking nice and ugly in the back of my house. I could have paid $400 for a small dumpster, since I don't own a pickup truck to drive to the town dump. So instead I paid $75 to have it hauled away for me by someone on Craigslist, which was awesome!
As you can see from some of the odd jobs I posted on Craigslist they had varied degrees of success. Some projects I put on hold, some I will try again later, while others got completed at a very affordable price. But all of these projects followed my outlined Craigslist Recipe for Success in this post.
And now for those who have never used Craigslist in their life, I'm going to show you the exact procedure you should use to post your first ad. Please remember not to post your phone number, or street address in the ad itself. This method only requires your email address which will not be revealed to the respondee, unless you actually reply to their emailed bid. But posting alone will not identify you or your email as far as I know. If you're worried about your privacy or security, read through the Craigslist help section for details.
My advice for Posting Ads on Craigslist for Odd Jobs
I used to hire licensed professional contractors for a living and even they had their limitations, although the job of a general contractor is to supervise that the job gets done right. And now that's a responsibility that you're going to have to undertake, because trusting blindly is a mistake.
First I would describe the job at hand in full detail and also provide enough photos for the person on the other end to truly understand what they're estimating. Then ask them to provide a bid through Craigslist email (don't provide contact info in the initial ad) that includes a detailed description of how they will do the work. You will get many responses, some will be ridiculous, many will fail to pay attention to your terms for a detailed explanation, and a few will provide a fair price and a detailed explanation of how they will handle your project. Those are the guys you schedule estimate appointments with in person, or hire if you agree with their terms.
Just keep in mind that Craigslist can be useful for odd jobs, because you can hire anyone from college kids, to actual contractors, to out of work handy people. By following my proven methods, you will at the very least eliminate many bad apples.
To get started go to Craiglist.org
2. Pick your location
3. Click post to classifieds
4. Choose "gig offered" for short-term small odd jobs
5. Choose "I want to hire someone"
6. Choose "labor gigs"
7. Fill out email address only and ensure CL mail relay is selected, that way your personal email address will not be revealed to anyone who sees the ad.
8. Provide a descriptive title, example "Demolition Work"
9. For specific location you can fill in your city name or county name. Sometimes those seeing your ad can filter you out if they don't want to work in that city.
10. In the posting "body" provide a detailed description along with the request to have them explain how they will perform the work in detail.
11. Select "Pay" and enter in "Based on description of work and experience".
12. Next you'll have to click "edit images" if you don't have a Craigslist account to add relevant photos that will help the person provide a fair estimate without actually seeing the project themselves.
13. Review and click "Publish". You'll get an email confirming your add with a link to the add. It will go live on Craigslist shortly thereafter.
If you do hire someone that's less knowledgeable because you'll be guiding them, just remember this route will require explicit instruction, because their lack of skill and common sense can lead to unhappy results.
Well good luck with your Craigslist Experiment and let me know on the Proven Helper Facebook Page how it goes. I'm always interested in Craigslist Stories.
]]> If you ever wanted to learn what it takes to make your lawn green, lush, and vibrant, you came to the right place! The only way your neighbor can compete with your lawn after following this seasonal guide is if they follow the same exact steps.
Are you ready to finally have the nicest lawn in the neighborhood?
A vibrant and healthy lawn requires months' worth of time, energy, and devotion. You cannot simply work on your lawn for a few months out of the year if you want it to survive and thrive all year long. You must pay careful attention to it regardless of the season. You can get a lawn that you can be proud of every month of the year by knowing what actions to take each season to keep it growing strong.
Early Spring (March and Early April)
Early spring is the ideal time to prepare your lawn for the upcoming summer growing season as well as address any repair issues with it. The supplies you should have on hand for early spring lawn care include:
-
high-quality grass seed (I like Scotts EZ Seed, Pennington Smart Seed, or Kentucky 31 grass seed)
-
weed killer (I use Roundup Weed and Grass Killer Concentrate Plus, Preen Garden Weed Preventer, or Gordon's Speed Zone Lawn Weed Killer)
-
a lawn dethatcher attachment or machine (you can rent either from the Home Depot)
-
a lawn aerator machine or attachment (you can rent a machine or an attachment for your mower from Home Depot)
-
grass fertilizer (I like to use Miracle Gro water soluble fertilizer, Grow More cold water fertilizer, or Vitamin Institute SuperThrive)
-
high-quality mulch (my favorites are made by OldCastle, Scotts, and Preen)
Before you do anything else for your lawn during this season, you should first patch any bare spots by spreading new grass seed. Once you lay new seed, you should remember to water it every day until the grass reaches mowing height, which is no less than two inches.
After you patch the bald spots in your lawn, you should then address problems like crabgrass and weeds. Crabgrass can be a particular challenge to address because of how hearty and resilient it is. This thick, aggressive, and unsightly grass has a knack for invading and overtaking healthy lawns quickly.
Along with crabgrass, you also may find yourself fighting troublesome weeds like bind weed and dandelions. These types of weeds also crawl and spread quickly throughout your lawn. They are difficult to keep at bay without using some type of weed killer on them.
Once you patch bare spots and treat your grass for weeds and crabgrass, it is time to do the first mow of the season. You should set your mower at the highest level possible, ideally between two to four inches. You want the extra height during the first mow to make sure your healthy grass has a chance to set deep roots in the lawn. If you mow too closely, you could kill your lawn and have to reseed it.
You should then aerate and dethatch your lawn to get rid of undergrowth and provide a path for healthy nutrients to soak into the soil. If you do not have an aerator or dethatcher attachment, you can rent one from Home Depot.
Getting your lawn off to the best start for the season requires you to know how much seed, weed killer, and other supplies to buy. You can find out your lawn's square footage by looking up your house on websites like Zillow or Realtor.com. Also make sure to set a calendar reminder for yourself by linking to this article so you do not miss out on these important lawn care tips once the first of March arrives.
Late Spring (Mid-April to Mid-May)
As late spring approaches, you should be ready to put more time and effort into your lawn particularly if you want it to look its best once summer begins. The supplies you will need on hand for late spring lawn care include:
-
an aerator attachment or machine, which can be rented at Home Depot if you do not have either
-
a dethatcher machine or attachment, available at Home Depot for rent or purchase
-
lawn seed for overseeding (my go-to favorites are Scotts Turf Builder Thick'R Lawn, Pennington Smart Seed, or Pinnacle III perennial grass seed)
-
dandelion killer (check out Scotts Spot Weed Control, Compare N Save Grass and Weed killer, or Ortho Weed B-gon)
-
grub killer (I like to use Scotts GrubEx, Pyranha Wipe N Spray, or Country Vet Purge)
Before you begin with your late spring lawn care, you will want to verify how much square footage you are working with this season. Again, check on websites like Realtor or Zillow to find your house and then discover how big your lawn is.
Next, you should inspect your lawn and determine if you need to make it thicker. After the bald patches grow in from your early spring lawn care, you can decide if your lawn is thick enough or if you want to make it even thicker. Use turf builder grass seed to overseed the lawn if you want a thicker and lusher landscape. Make sure to water your lawn once a day until it reaches the ideal mowing height, around two to three inches tall or as tall as the grass that surrounds it.
You also need to go on the attack against dandelions, which thrive during this time of year. Kill dandelions and prevent them from spreading by using a high-quality dandelion killer like Scotts Spot Weed Control or Ortho Weed B-gon. If you allow dandelions to overtake your lawn, you will find it challenging to keep them at bay and to protect the healthy grass that you want to thrive during the summer months.
Dandelions are not your lawn's only enemy during the late spring. Grubs also can destroy all of the hard work you put into your lawn. Grubs are newly hatched beetles that feast on the roots of grass and other vegetation.
Allowed to thrive, these pests will strip your lawn of its lushness and vibrancy. They will leave patches of bald soil in their wake and make your lawn unsightly. You can kill them quickly by using a grub killer during the late spring when grubs hatch.
Finally, as with early spring lawn care, you need to continue to aerate, dethatch, and mow your lawn. Aerating the lawn ensures that plenty of nutrients and vitamins get into the soil and to the roots of your grass. It helps your grass take root and ensures that it grows healthy and strong during the summer months.
Likewise, dethatching prevents weeds and undergrowth from overtaking your lawn. You should dethatch your lawn at least once a week, ideally before or after you mow.
During the late spring, you can start to mow your grass at a shorter length if you prefer. The bald patches should have grown in by now and have healthy enough roots to protect them during mowing.
What Is The Perfect Lawn Mowing Height?
 The ideal height for your mower should be determined by the type of grass you are growing in the lawn. However, most landscaping efforts agree that it should not be shorter than two inches if you want your lawn to continue to do well during the summer.
It is easy to remember the tips for lawn care during the late spring when you set a reminder for yourself. Link your calendar alert to this article so you do not miss out on late spring lawn care starting in mid-April.
Early Summer (Late May to Mid-June)
Early summer lawn care is not quite as intensive or time consuming as the care you gave your lawn during the early and late spring months. Your shopping list for early summer lawn care should include:
-
lawn food (I like Scotts Turf Builder Lawn Food, Vitamin Institute SuperThrive, Miracle Gro Water Soluble lawn food, or Safer Brand Ringer lawn fertilizer)
-
grub killer (I most often use Scotts GrubEx, Pyranha Wipe N Spray, or Country Vet Purge to kill grubs)
-
weed killer (my favorites are Scotts Spot Weed Control, Compare N Save Grass and Weed killer, or Ortho Weed B-gon)
-
a lawn sprinkler system or a high-quality garden hose
The amount of supplies you purchase for your lawn will depend on the size of your property. If you do not know how many square feet of lawn space you have, you can easily find your property on Zillow or Realtor.com to find out for sure.
Before you feed your lawn, you may want to mow it first. Unlike when mowing in late spring, you need to go back to using a relatively tall height on your mower during early summer. This taller height ensures that your lawn's roots remain undamaged as the weather gets warmer. A taller height also allows the grass to naturally shade itself and resist withering and drying out, which can happen quickly if it is mowed down to a shorter height.
Also, you should avoid bagging your lawn clippings but rather allow them to lay wherever they are spread after you mow. They act as a natural mulch for your lawn and can actually help nourish the soil and grass roots.
After you mow the lawn, you can use your favorite lawn food to nourish the grass and introduce nutrients into the soil and roots. You do not necessarily have to aerate the lawn before or after using the lawn food. You can simply spread the food and allow it to soak into the grass on its own.
You still want to be on guard against grubs during this time of year, however. Not only will grubs eat up the lawn food that you spread over your grass. They also will eat away at the grasses' roots if you do not kill them and control their population. Grubs hatch from late spring into the hottest months of summer. You cannot let your guard down against grubs if you want to protect the roots of your grass.
You also need to be on guard against weeds during the early summer. Weeds like bindweed and crabgrass love the warm and humid weather experienced during this time of year. You need to continue using your favorite weed killer all summer long to kill weeds and crabgrass.
Finally, you should finish off your lawn care for early summer by deeply watering your lawn. You ideally want the water to soak at least four to six inches deep into the roots and soil.
This deep watering keeps your grass hydrated sufficiently during a time of year when the weather could dry out the roots and soil. If you do not want to stay outdoors using a garden hose to water your lawn, you should invest in a good sprinkler system that you can move around your lawn as needed to hydrate your grass.
Early summer lawn care should begin no later than the latter part of May. Set your calendar reminder t link to this article so you do not miss out on these simple but important early summer lawn care tips.
Late Summer (Late June to Early September)
As the summer months come to an end, it is important that you do not let your attention be diverted from your lawn's best care. The late summer months are just as important as those in the early spring when it comes to keeping your lawn looking and growing its best.
Your shopping list for late summer lawn care should include:
-
liquid lime (I use CAL FLO liquid lime, The Dirty Gardener Cal Flo liquid lime, and Pennington Fast Acting lime)
-
an aerator attachment or machine, which you can rent from Home Depot if you do not have your own
-
lawn seed (my favorites are Scotts EZ Seed, Pennington Smart Seed, or Kentucky 31 grass seed)
-
lawn fertilizer (I use Miracle Gro water soluble fertilizer, Grow More cold water fertilizer, or Vitamin Institute SuperThrive)
-
weed killer (I like Scotts Spot Weed Control, Compare N Save Grass and Weed killer, or Ortho Weed B-gon)
The first action you should take for your late summer lawn care is to add lime to the soil. During the late summer months, the soil in your lawn can become too acidic. You need to make it more alkaline if you want the grass to continue growing well.
When you add liquid lime to your lawn's soil, you essentially mellow it out and make it more ideal for growing. You also granulate the soil and help it breathe better. The lime improves the soil for growing not only grass but also other vegetation like flowers, trees, and shrubs.
After you add lime to the soil, you should then aerate the lawn again. Aerating the lawn can be particularly crucial if it has experienced a substantial amount of foot traffic throughout the summer. When you aerate the lawn, you loosen compacted soil and ensure that nutrients can get back down to the roots of the grass and vegetation growing there.
When you have finished aerating the lawn, you should look it over and see if there are any bald or sparse patches that need to be reseeded. Elements like the rain and wind as well as foot traffic and even inadvertent neglect can cause patches of your lawn to become sparse and bald.
You can take care of these patches by adding more turf and grass seed to them. Just as in the early spring months, make sure that you water the new seed once a day until it reaches a height for mowing, ideally around two inches.
Along with seeding bald patches in the yard, you should also continue to fertilize the lawn. Fertilizing during the late summer can be important for ensuring your grass's growth into the early and late fall months. You do not want your grass to become dried, withered, and brown prematurely. Fertilizing it will help it remain vibrant and healthy throughout the remainder of the growing season.
The last precaution you should take with your lawn during the late summer months involves keeping it free from weeds. Weeds will assuredly continue to grow late into the summer when other vegetation like annual flowers will be nearing their natural end.
You need to be on the lookout for and ready to kill weeds like bindweed, foxweed, witchgrass, goose grass, foxtail, and sandbur. These weeds thrive in the hot and humid months of late summer and can quickly overtake your yard if you do not kill them with a high-quality weed killer.
The late summer lawn care should begin no later than the latter part of June. You can check on Zillow or Realtor.com to find out how big your yard is and how much of each supply you need to purchase for your lawn's square footage. You also should set your calendar reminder to link to this article so you can be quickly and easily reminded of when it is time to start your late summer yard work.
Early Fall (Mid-September to Mid-October)
Once fall arrives, you might be tempted to stop working in your yard and let the elements overtake it for the season. In fact, there is still plenty that you can do to protect your lawn from the upcoming cold weather. Your early fall lawn care supply list should include:
-
lawn fertilizer ( try out brands like Miracle Gro water soluble fertilizer, Grow More cold water fertilizer, or Vitamin Institute SuperThrive)
-
liquid lime ( CAL FLO liquid lime, The Dirty Gardener Cal Flo liquid lime, and Pennington Fast Acting lime are a few to check out)
-
an aerator machine or attachment that you can rent from Home Depot
-
mulch (consider OldCastle, Scotts, and Preen)
-
a dethatcher attachment or machine that you can rent from Home Depot
Your early fall lawn care should start with heavily fertilizing your lawn. You might wonder why you should save the heaviest fertilizing for the early fall. Why not do the heaviest of fertilizing during the early spring when the growing season is just beginning.
In fact, when you heavily fertilize your lawn in the early fall, you stimulate critical grass growth that should keep your lawn alive throughout the winter. The grass will send out filler and runners into areas of the lawn that are becoming bare. The fertilizer will also help your lawn produce food that will sustain it during the cold winter season.
Along with fertilizing your lawn, you should also improve the soil quality by adding liquid lime to the soil. The lime makes the soil more alkaline and improves the condition of the grass roots. It encourages the roots to go deeper into the soil, which is critical for helping the grass survive the winter. The lime also fosters the production of natural nutrients within the soil itself.
Your next step should be to aerate your lawn once more. Early fall aerating activates biological compounds within the soil. It also provides organic matter that the lawn can live on during the cold winter months.
After you aerate the lawn, you should then add a healthy layer of mulch to it. Heavily mulching the lawn adds a protective layer over the grass and its roots. It keeps the grass warm and fed until early spring arrives.
Dethatching should be your next step after aerating. Dethatching involves not only getting rid of the old grass clippings on top of your lawn. It also removes undergrowth and fosters an equal temperature throughout the entire lawn, which is imperative for keeping a uniform appearance and quality. Dethatching actually prevents your lawn from decaying during the wintertime.
Once you dethatch your lawn, you should look over the lawn once more to see if there are any areas where you need to reseed. You can also add more seed to renovate the overall look and lushness of the lawn. Continue to water the newly seeded areas for at least a week until you can safely mow over them.
You should give your lawn a final mow during the early fall season. The final mow should remain at a relatively tall height so you avoid harming the grass's roots. This tall height also helps the grass build up a reserve of nutrients that it can survive on until the weather turns warm again.
Set your calendar reminder and link it to this article so you can start your early fall lawn work once the middle part of September arrives. These simple measures can get your lawn ready for the upcoming winter season.
Late Fall (Late October to Mid-November)
As the late fall approaches, you still have plenty of time to protect your lawn and keep it healthy and alive. Your shopping list for late fall lawn care can be relatively short. In fact, aside from a good mower and a handy rake, you may only need to buy weed killer to address any lingering pesky weeds in your yard.
If you have not done so already, you should give your lawn a final mow for the season. Again, you should keep the height of the mower rather tall, no shorter than two to three inches. This height not only fosters the production of nutrients in your grass's roots. It also prevents your yard from becoming a haven for field mice and other pests during the wintertime.
After you mow the yard, you should kill off any weeds that you can find. Crabgrass, chickweed, and bindweed are known to grow far into the late fall months. They are resilient and aggressive, always ready to strangle your lawn for the last bits of nutrients they can soak up and use to be ready to grow again in the spring.
Using your favorite weed killer, you can get rid of the lingering growths of weed and ensure that their seeds do not become burrowed in the soil. This late fall weed killing will ensure your lawn is free from threatening vegetation when the early spring months arrive.
Finally, you should continue to rake your lawn and remove leaves for as long as necessary in the late fall months. The fallen leaves might look pretty as they spread out over your yard. In reality, however, they are a threat to the underlying grass and vegetation.
They can quickly suffocate your grass and cause bald patches to develop in the yard. You should rake them up and make them into compost that you can use in your garden next summer.
The late fall may seem like the ideal time to let your lawn work go. However, you still have enough to do to make sure your lawn survives the winter and is ready to grow healthy and strong next spring. Set a calendar reminder to this article so you know exactly when it is time to start your late fall yard work in the latter part of October.
Winter (Late November to Early March)
As the fall turns to winter, you may think that your yearly lawn work is now finished. After all, how much lawn work can you do when the ice and snow are falling? You have done your best to protect your lawn from dying with all of the work you have done during the spring, summer, and fall months, right?
In fact, your yard still needs your attention after winter arrives. It is still alive despite it hibernating and being dormant for the season.
With that, your shopping list for winter lawn care should include:
-
an aerator machine or attachment that you can rent at Home Depot
-
fertilizer
-
dethatching attachment or machine that you can rent from Home Depot
-
lawn-friendly rock salt (I like Scott's ice melt, Safe Step, or Quad Melt)
Before the first snow lands on your yard, you should continue to fertilize your lawn as needed. The fertilizer will act as a protective barrier between your grass and the elements. You should also aerate the lawn before the ground freezes to keep the soil soft and well-nourished. Once the ground freezes, you cannot aerate again until it thaws. You should seize upon this last opportunity to protect and nourish the soil while you can.
Additionally, you should continue to dethatch your lawn and remove undergrowth before the ground freezes. This action removes harmful vegetation that could choke the lawn as it lies dormant, preventing the grass from getting off to a good start in the spring.
Finally, you should take care with your lawn during the wintertime to keep the grass as strong as possible. This precaution means minimizing the foot traffic that goes over it during the wintertime. Even the most minimal of foot traffic during the winter can kill off the healthiest of grass.
Further, you should take care with the type of rock salt you use to melt ice and snow. Rock salt that is not lawn-friendly can poison the grass and cause ugly bare patches that you will need to address once spring has arrived.
You can get your wintertime lawn care off to the best start by setting a calendar reminder to this article. You will know exactly when you should begin your winter lawn measures once late November arrives.
Each season demands its own variety of lawn care. When you want your lawn to look its best and grow healthy and strong, it is critical that you know what tasks to undertake according to the time of year. These measures allow your yard to remain vibrant and alive regardless of the season.

Alright ladies and gentlemen the time finally came for me to do my Rain Man like search for finding the best pressure washers available under the $400 range. This price range captures the majority of the most popular gas and electric powered pressure washers, if you're looking for commercial products look elsewhere.
In this buying guide I'll let you know exactly what I learned about each washer from reading the positive and negative customer reviews on Lowes , Home Depot, Amazon , & Harbor Freight websites. Also I included my personal money & stress saving advice that you won't find anywhere else!
DISCLAIMER:I have to warn you, it's impossible to find a well reviewed pressure washer without reading at least a few disturbing customer experiences. Essentially we are in the same boat, every power washer below scored very high on average, but every one had skeletons in their closet as well. I did the best I could in finding your best bets out there by eliminating model numbers that were complete nightmares, but ultimately you'll have to pull the trigger on the washer you like the most and hope for the best just like I will.
Why Buy A Pressure Washer?
Of course there's tons of uses and excuses for getting a pressure washer, such as power washing the stains from your driveway, sidewalk, and lawn furniture. You can also get attachments to clean your gutters, and blast your car with soap suds using a foam canon, which is the reason I decided to do this research in the 1st place. It all started the day I watched Auto Fanatic detail his Shelby GT350 Mustang.
But of course I told my wife that I need it for washing the aluminum siding where carpenter bees apparently pooped all over my siding. (Yes, carpenter bees are disgusting!). So if your house water pressure is good, but not good enough to blast away grime, mildew, mold, and brake dust, you came to the right website to find your ideal pressure washer. ENJOY!
Pick Your Favorite Store To Find Your Pressure Washer or See The Whole Roundup In Order

|

|

|

|
Also besides the 12 pressure washers that were reviewed, make sure to read the following 2 sections if you never owned one before, these 2 tips can save you a lot of money and stress.
1. The Truth About the Negative Reviews You'll Find on Every Pressure Washer (Eyeopener)
2. The 4 Things You Absolutely Need To Know About Pressure Washers (Don't miss this one)
Home Depot Pressure Washers Under $400
Ryobi RY1422 700 PSI 1.2 GPM Electric Pressure Washer comes
with a turbo nozzle and an on-board tank for extra detergent. I really like this particular Ryobi electric pressure washer because it has a 25-foot non-marring high pressure rubber hose and three separate nozzles that are all designed for cleaning  different surfaces like concrete, vinyl siding, and the exterior of vehicles. The hose is adjustable and comes with a trigger handle. The nozzles are easy to attach and twist onto the end of the hose.
This pressure washer, priced at $149.00, has mostly five-star ratings on The Home Depot's website. People who have reviewed it say that it has a powerful spray and is also easy to use on some of the toughest surfaces to clean. The lower one and two-star ratings mention concerns like oil leaking out of the motor or the nozzles not working. However, they could be attributed to human error and people simply not knowing how to work the pressure washer.
The Home Depot gives some suggestions for how the pressure washer can be used. It indicates that the pressure washer is ideal for cleaning brick masonry, the outside of an RV, fencing, and the surface of a patio. It is easy to carry around and relatively lightweight at 32 pounds. It is performance tested and rated in accordance with PWMA Standard PW 101. It also comes with a three-year warranty against manufacturing defects.
Ryobi RY141900 2000 PSI 1.2 GPM Electric Power Washer comes with a turbo nozzle with
50 percent cleaning power. With a 13 amp motor, 35-foot cord, and 25-foot non-marring adjustable rubber hose, it is performance tested and rated in  accordance with PWMA Standard PW 101. It also has a detergent
tank and three separate nozzles designed to clean a variety of surfaces from concrete driveways to vinyl siding and fencing.
accordance with PWMA Standard PW 101. It also has a detergent
tank and three separate nozzles designed to clean a variety of surfaces from concrete driveways to vinyl siding and fencing.
This particular Ryobi pressure washer is priced at $199. It has its own rugged roll cage frame that protects the motor and keeps the pressure washer upright while it is being used. It also has a hose reel that allows for easy storage and carrying.
Most of the people who have reviewed the Ryobi 2000 PSI 1.2 GPM electric power washer give it four and five-star ratings with a majority being five-star. I like that the people who have used and tested the pressure washer say that it is easy to put together quickly. I also like that they say it is easy to handle even though it gives off a powerful spray of water.
However, it does have a few lower one and two-star ratings. The people who left these comments say that the trigger handle is hard to push in and that the long cord leading to the electric motor gets tangled up easily. These comments reflect more human error than anything wrong with the actual pressure washer.
My Pick Ryobi RY802800 2800-PSI 2.3 GPM Honda Powered Gas Pressure Washer comes
with a power control gauge that lets you easily adjust the pressure while you are using it. I like that this particular Ryobi gas pressure washer has  a 4-cycle vertical engine. I also like that it
has a .25-gallon tank so you can use it for at least 30 minutes without having to refill it with fuel, however a lot of people complained that the gas tank is too small for them.
a 4-cycle vertical engine. I also like that it
has a .25-gallon tank so you can use it for at least 30 minutes without having to refill it with fuel, however a lot of people complained that the gas tank is too small for them.
The RY802800 pressure washer was performance tested and rated in accordance with PWMA and PW 101 standards. It has a 25 foot rubber hose and comes with four adjustable nozzles designed to clean concrete, brick masonry, gutters, siding, fencing, lawn equipment, boats and RVs, and much more. It comes with a three-year warranty through Ryobi and another two-year warranty on the Honda motor. Also Home Depot offers an additional 3 year warranty for $60.
A majority of the reviews for this 2800-PSI Ryobi gas-powered pressure washer are in the five-star range. The people who gave it four and five-star ratings say that it is easy to start and also safe to use on surfaces like car exteriors and vinyl siding that normally need careful handling when cleaning.
Ryobi RY80940B 3100 PSI 2.5 GPM Honda Gas Pressure Washer with Idle Down is designed to be economical and environmentally friendly. Its idle down feature saves on gas and gives you  longer high-powered cleaning without having to refill the fuel tank.
Priced at just under $400 at $399, this particular Ryobi gas pressure washer comes with a 25-foot power flex hose and a five-in-one nozzle for easy spray pattern changes. The hose also flexes like a rope so you can clean difficult to reach places like the corner of a patio or inside of an RV.
It also is gentle enough to use on the exterior of a car as well as vinyl siding and fencing. The pressure washer is performance tested and rated in accordance with PWMA standards. It also has a roll cage that protects the motor as well as a coil for the hose that allows for easy storage and carrying.
What I really like about the Ryobi 3100 PSI 2.5 GPM Honda gas pressure washer with idle down is that it comes with a three-year manufacturer's warranty against defects and damages. I also like that its Honda GCV190 OHC engine operates quietly so you do not disturb the entire neighborhood when you use it.
Most of the ratings for it are in the four and five-star category. The highest reviews say that it is easy to handle even though the spray itself is powerful. The lowest ratings say that it will not stay in a locked position while using. However, this actually could be from user error rather than anything wrong with the pressure washer itself.
Lowe's Pressure Washers Under $400
Troy Bilt 020676 2800 PSI 2.3 GPM Cold Water Gas Pressure Washer is guaranteed
not to choke or sputter when you start it. You do not need to prime it, and it you never have to change the oil in its Briggs & Stratton 190cc ReadyStart manual  pull start engine.
With its 25-foot rubber hose and four individual nozzle tips, this gas pressure washer from Troy Bilt costs $279. It comes with a two-year limited manufacturer's warranty. It weighs 27 pounds, making it easy to carry from place to place.
Most of the reviews for this gas pressure water are in the four to five-star category. People who give it the highest ratings say that it is a solid machine and easy to put together when you first take it out of the box. They also like that it is powerful enough to use on surfaces like concrete driveways or exterior vinyl siding yet gentle enough to spray off floor mats in your car or doormats outside of your front or back door.
The people who give it one and two-star ratings say that it shuts down quickly and that the hose does not hit its target with the water. However, these low reviews could come more from people not knowing how to use a pressure washer correctly or on what surfaces it can be used safely. There are more five-star ratings for the pressure washer than there are lower ratings.
Briggs & Stratton 020569 POWERFlow+ 3000 PSI 5-GPM Cold Water Gas Pressure Washer CARB is
built for dual use and delivers 8.75-ft lbs of torque. Its adjustable nozzles allow you to spray off  small surfaces like a car floor mat or large surfaces
like a concrete driveway or the side of an RV.
small surfaces like a car floor mat or large surfaces
like a concrete driveway or the side of an RV.
What I like about this Briggs & Stratton power washer, which is priced at #379, is that it has a high-pressure mode that lets you dig out tough grease, dirt, and debris that has been embedded in the crevices of a driveway or the corners of a patio. It also has a soft grip on the handle so you do not strain your hand and forearm using it.
It comes with a two-year warranty through the manufacturer to guard against defects and damages. It weighs 72 pounds and has a 30-inch rubber hose. The pro-style nozzle tips are also easy to twist on and take off for each job.
This power washer has more than 100 five-star ratings and close to 100 four-star reviews. The people who give it rave reviews say that its spray can go as far as 30 feet and that the hose does not leak. The relatively few one and two-star ratings say that it is difficult to start and that it does not last long before it needs to be refueled. These reviews could stem from user error, however.
Sun Joe SPX3000 2000-PSI 1.76 GPM Cold Water Electric Pressure Washer comes with five Quick-Connect spray nozzle tips for light, medium, and heavy duty  cleaning. It costs $149 and has a 20-foot hose and a 35-foot electrical cord. It also comes with a dual detergent tank for long-lasting cleaning power.
I really like the Sun Joe 2000 PSI 1.76 GPM cold water electric pressure washer because it has a powerful 14.5 amp 1800-watt motor that generates up to 2030 PSI. It maximizes the cleaning power you get out of each use. I also like that it has an automatic shutoff for when the trigger is not engaged. This feature saves electricity and also extends the life of the pump.
For your peace of mind, it comes with a two-year warranty through the manufacturer that safeguards against defects and damages. The washer is CSA listed.
A vast majority of the reviews for the pressure washer are in the five-star range. Most of the people who have purchased and used the pressure washer say that it is very easy to use and that it also easy to assemble.
They also like that it is lightweight and relatively simple to carry around for jobs outside of the house. It is gentle enough to spray down a vinyl fence or the outside of a car without chipping off the pain. However, it can also clean the tiny nooks and crannies in a concrete driveway.
Greenworks GPW1800 1800-PSI 1.1 GPM Cold Water Electric Pressure Washer comes
with a five separate nozzles that are easy to connect and designed for light, medium, and heavy duty cleaning. It is designed for heavy cleaning jobs  like spraying
down the side of a house or the inside of the gutters. However, it is also gentle enough to spray down car floor mats, vinyl fencing, and the outside of your house's windows.
like spraying
down the side of a house or the inside of the gutters. However, it is also gentle enough to spray down car floor mats, vinyl fencing, and the outside of your house's windows.
This pressure washer has an on-board soap tank that is easy to fill up and helps you get the longest use out of your pressure washer. It also has a 25-foot rubber hose, a 35-foot electrical cord, and a universal motor. Once it is fully assembled, it only weighs 25 pounds, making it easy to carry around from cleaning job to cleaning job.
It has a one-year warranty that protects against damages and defects. Most of the reviews are four and five-star ratings. The people who have used and liked it say that it is easy to maneuver and simple to store. It also has a powerful spray that is still gentle enough to use on delicate surfaces like the outside of windows and the outside of a car.
People who give it low one and two-star ratings say that it is hard to start and that the hose can be difficult to handle. However, these reviews could reflect a misunderstanding of how the pressure washer works.
Amazon Pressure Washers under $400
Simpson Cleaning MSH3 125 S 3200 PSI 2.5 GPM Gas Pressure Washer comes with a Honda powered motor and an OEM Technologies Axial cam pump. It has a 25-foot MorFlex hose that is abrasion and kink-resistant. It also comes with  five different nozzles that are suited for different cleaning jobs inside and outside of your house.
This pressure washer, which sells for $367.67, is gentle enough to spray down the outside of your vehicle as well as clean floor mats, patio furniture, and other surfaces that require a more delicate spray. However, it is also powerful enough to clean off surfaces like the outside of an RV or brick and stone masonry.
I like that this pressure washer from Simpson comes with a five-year warranty on the frame and a two-year warranty on its motor. I also like that the spray gun has a lockout mechanism for safety that prevents users from being injured by an unexpected powerful blast of water.
Sixty one percent of the reviews for the pressure washer give it five stars. People who love it appreciate its cleaning power and ease of use. The 13 percent of users who gave it a one-star review say it leaks water and that the Honda gas motor choke starts. This could reflect user error more than anything, however.
Sun Joe SPX 3001 Pressure Joe 2030 PSI 1.76 GPM Electric Pressure Washer comes with a 14.5 amp/1800 watt motor that maintains a constant water
temperature of 104 degrees Fahrenheit. It  features a TSS or Total Stop System for when the trigger is not engaged that helps save energy and spares
the life of the pump. This pressure washer is priced at $149.
features a TSS or Total Stop System for when the trigger is not engaged that helps save energy and spares
the life of the pump. This pressure washer is priced at $149.
I like that the pressure washer has a sturdy handle for easy transport in and around the house. I also like that it has an onboard reel around which you can wrap its 20-foot non-kink hose. It is CSA-approved and has a two-year manufacturer's warranty on it. It also weighs a little more than 32 pounds.
This pressure washer is designed for both heavy duty and delicate jobs. It is ideal for spraying down lawn and garden furniture or the outside of your home or car's windows. However, it is also powerful enough to spray down stone or brick masonry, concrete sidewalks and driveways, boats, and RVs.
Sixty two percent of the reviews for the pressure washer are in the five-star range. People who have used it say that it gets good fuel economy and does not need a lot of gas to keep it running. The nine percent of people who give it a one-star rating say that it the power switch is difficult to turn on and off. This could reflect a misunderstanding of how to use the washer.
Sun Joe SPX 4000 2030-PSI 1.76 GPM Electric Pressure Washer with Pressure Select Technology sells for $159 and comes with a 14.5 amp 1800 watt engine. It has
two cleaning options, LOW/1450 PSI for everyday cleaning like  spraying off floor mats or your patio, and HIGH/2030 PSI for heavy duty jobs like cleaning an RV or spraying down the outside
screens and windows.
spraying off floor mats or your patio, and HIGH/2030 PSI for heavy duty jobs like cleaning an RV or spraying down the outside
screens and windows.
It comes with a 20-foot hose and an extension wand to help you clean tight spaces like the crevices of a driveway or corner of a patio. It also has GFCI protection, a garden hose adapter, and a needle clean out tool.
I really like this pressure washer because it comes with a full two-year warranty. I also like that you can adjust the spray of the nozzle easily to accommodate the job that is being completed.
Most of the reviews for this pressure washer are in the five-star category. Out of the 74 percent of people who gave it the highest rating, it earned praise for its easy use as well as its ability to be mounted on a wall. People also appreciate the low price in exchange for powerful washing. Six percent of users gave it a one-star rating. They say that it takes awhile for the motor to cool down and that the hose leaks. These may reflect more user error or sloppy use, however.
Generac 2800-PSI 2.4 GPM Gas Pressure Washer Model#6922 sells for $299 and features ergonomic designs for comfortable and long-lasting use.
It has a cushion grip handle and an easy-to-pull trigger  to help you avoid fatigue while using the pressure washer. It also has an integrated on-board detergent tank for easy use.
This pressure washer can handle cleaning both delicate and challenging surfaces. It can be used to clean off lawn equipment, patio furniture, and even the outside of your car. You can also use it to spray down the floor mats in your car and outside of your front or back door. However, it is also powerful enough to clean an RV or a boat as well as a driveway or sidewalk.
I like that this pressure washer has wheels that swivel and can make tight turns without tipping over. I also like that it comes with four easy-to-connect nozzle tips.
This pressure washer earned 61 percent five-star ratings from people who have purchased and used it. They say that it starts easy and lasts a long time on a single tank of gas. They also say it is easy to assemble and store. Thirteen percent of users gave it a one-star review. The comments in these reviews say that the on and off switch is difficult to use and that the motor sputters and coughs when starting. These comments could reflect human error or failure to use the washer properly.
Harbor Freight Pressure Washers Under $400
Predator 2500-PSI 2.4 GPM 4HP Gas Pressure Washer Model# 62201
is designed for heavy duty outdoor cleaning. Priced at $289.99, it has an EPA/CARB certified recoil start engine and uses 86+ high-octane unleaded gas as its source of  fuel. Its motor also a low oil shutoff feature, making it economical and safe to use.
This particular Harbor Freight pressure washer weighs around 70 pounds, making it somewhat awkward and heavy to carry from job to job. However, it comes with its own roll cart as well as a coil around which to wrap the 25-foot rubber hose. The wheels on the pressure washer are 12 inches in diameter, making them compact enough for easy storage.
What I like about this pressure washer is that it comes with five quick-connect nozzle tips, all designed for different jobs like spraying down a driveway or targeting smaller surfaces like a doormat or car floor mat. I also like that its detergent and chemical injector is located right on the hose.
This pressure washer from Predator has garnered mostly five-star reviews from people who have purchased and used it. The highest reviews say that it is easy to assemble and simple to use. Even the smallest amount of gasoline in the engine gives hours of power washing. Some of the lower reviews say that the engine sounds odd when it starts or that it sputters. However, these reviews could be attributed to user error or poor maintenance of the washer.
Predator 3100-PSI 2.8 GPM 6.5 HP Gas Pressure Washer Model# 6220 is EPA III certified
and has a recoil start motor uses 87+ high-octane unleaded gas for its fuel source. Priced at $364.99, it comes with a 25-foot rubber hose and weighs  in at 77 pounds. It measures
a little more than 36 inches high and 21 inches long with 12 inch tires, making it compact for easy storage in your shed, garage, or elsewhere.
in at 77 pounds. It measures
a little more than 36 inches high and 21 inches long with 12 inch tires, making it compact for easy storage in your shed, garage, or elsewhere.
This pressure washer from Predator is designed for heavy duty outdoor cleaning jobs and can be used to wash down the side of a house or spray off a driveway. However, it comes with five easy to connect nozzles that also allow it to gently spray down smaller surfaces like a patio or mats used outside your door or inside the car.
I really like that this pressure washer comes with a commercial-grade axial pump that is designed for tough jobs like rinsing out a garage floor or spraying down brick masonry. I also like that its chemical/detergent injector is located on the pump.
The pressure washer gets mainly five-star reviews on Harbor Freight's website. The reviews say it is fast to assemble and has a powerful spray for fast cleaning. The lower one and two-star reviews say that the hose handle is prone to leaking or that the hose split. This could be more from misuse or user error, however.
Portland 1750-PSI 1.3 GPM Electric Pressure Washer Model #63254 is built for heavy duty jobs like cleaning walls, yard equipment, and vehicles. It comes with a 20-foot long rubber hose and has wheels  that are four inches in diameter. Its compact size combined with its weight of just 21 pounds make it easy to carry from job to job in and outside of the house.
I really like that this pressure washer has a long electrical cord that is 35 inches in length. I also like that it has an automatic stop for its motor when the trigger is released. This feature makes it economical to use and spares the longevity of the motor. It comes with a number of accessories like a spray gun, soap dispenser, and extension nozzle for fast and easy cleaning.
Priced at $99.99, this pressure washer can be the ideal pick for anyone who wants powerful high-pressure washing without spending a lot of money. It has mainly four and five-star reviews on Harbor Freight's website. The four and five-star reviews from customers say that it is ideal for cleaning surfaces like vinyl decks and fencing. They also say that it delivers on its promise to give a powerful spray and long-lasting performance.
The lower one and two-star ratings, which are relatively few compared to the higher ratings, say that the nozzle is difficult to adjust and that the hose leaks. These lower ratings could be from user error, however.
Portland 1750 PSI 1.3 GPM Electric Pressure Washer Model #63255 is priced at $99.99 and comes with accessories like a spray gun, extension nozzle, soap dispenser, and a 20-foot high-pressure rubber  hose. It weighs 21 pounds and has wheels that are four inches in diameter, making it lightweight to carry and simple to store.
I like that this pressure washer from Portland comes with its sturdy handle and has compartments on its sides where you can store the nozzle, spray gun, and other components. I also like that it can stand upright on its own without it having to be contained within a rolling cage.
This pressure washer may be compact and somewhat unassuming in appearance. However, it delivers a powerful spray, making it perfect to use on surfaces like a garage floor or concrete driveway. It can also be used to spray down vehicles like your car, an RV, and a fishing boat.
Most of the reviews for this pressure washer are generally favorable with most customers giving it a four or five-star rating. The people who give it favorable ratings say that it is great to use for surfaces like wooden fencing that are being primed for painting. They also appreciate its economical value. However, it does have a few one and two-star ratings in which people say that the nozzle is not long enough or the spray does not reach as far as they would prefer. These reviews reflect individual preferences and do not reflect the actual specifications of the washer.
The Truth About 1 & 2 Star Ratings for Most Pressure Washers
After reading a ton of reviews to create this article, I was a bit hesitant to purchase a machine. However after getting my pressure washer, I quickly realized that the 1 & 2 star ratings at least on my machine and others like it are from people who DIDN'T READ THE INSTRUCTIONS! Yes about 95% of the problems I read about would have been avoided by actually reading the manual and quick start guide. I ran into some of the issues these people talked about, but knew what to do thanks to the information you'll find right here.
Quick Tips That Will Prevent You From Breaking Your New Pressure Washer!
1. Make sure you have oil and the correct amount before you start your pressure washer every single time! Yes I read reviews from people who have actually broken their brand new machine then complained that it's a piece of crap.
2.Do not run the pressure washer without connecting your water supply , making sure there are no kinks in your supply hose, and that your supply is turned on all the way. A lot of negative reviews were from people who blew out their high pressure seals because they ran their pressure washer without having their engine supplied with water. There's a popular YouTube Tool reviewer who even ran this pressure washer without water, just never do it.
3. After you just used your pressure washer the machine won't start if you put it back into choke mode, simply slide it back to run and then pull start it. This happened to me, and a bunch of reviewers who ended up returning the machine even though in the intructions it specifically states this procedure.
4. Buy pump protector and use it to extend the life of your pressure washer pump. This will clean the pump, lubricate the o-rinngs, and protect it from freezing. Amazon sells the Briggs & Stratton Pump Saver which I'm going to buy next, for the time being I bought the Power Care Pump Protector from Home Depot but it has worse reviews.
DISCLAIMER:
I bought the Ryobi RY802800 after doing all this research and considering what I need it for. Originally I was going to purchase the Sun Joe SPX3000 electric pressure washer from Amazon, until my washing machine sprayed water out of the drain during the spin cycle.This happend once before, a clogged drain so I tried to snake it which worked last time. This time I was out of luck, so I did some research and bought the famous Instant Power Main Line Cleaner from Home Depot and it helped to clear the drain a bit, but a medium load in the washer still caused chaos.
So my research uncovered that the best way to clean your homes sewer line is to use a gas pressure washer with a sewer jetter kit like this 100 foot kit I just ordered. Sadly electric pressure washers don't have enough power to perform this task, and I'm SO GLAD that my drain clogged now before I bought an electric unit, because I would be pretty bummed out if it happened 1 day after the return period expires and I'd be forced to hire a plumber for $500.
]]>
 On 1/20/2018 I have contacted the Silver Miller Law Firm to join the class action lawsuit against Bitconnect and its founders (scam artists). I hate to admit it for my ego’s sake, I fell into the marketing trap orchestrated by Bitconnect and its members.
On 12/27/2017 I invested $480 into the Bitconnect Lending Platform. Bitconnect closed its lending platform on 1/16/2018 and said that it’s members were going to be able to get their money back once they reopen the exchange. Unfortunately for us, when they reopened the exchange our money was worth roughly 1/10th of our initial investment. Bitconnect did not honor their commitment once again, and they have roughly 1.5 million very angry world citizens wanting justice. I’m certainly one of them. The old ‘Voitek’ would like to kick the #$% out of the founders, but luckily I’m a bit more older and wiser now.
Today I looked around for law firms who are starting a class action lawsuit against Bitconnect and its founders. I’ve contacted them and when I get a response, I’ll update this post for all the people who fell into the Bitconnect trap like I did.
Obviously after the fact, I found numerous videos and articles that would have possibly deterred me from trying their lending program. I’m keeping this article on my site for reference because I know that there’s plenty of other lending platforms like the DavorCoin Lending Platform, which I don’t know much about. But hopefully people interested in DavorCoin can read this post and scrutinize their judgement of the theoretical opportunity.
Crypto currency is a new high tech method for scumbags to defraud people out of money. Some will be incredible investments that will make millions of world citizens wealthy, while others will go to ZERO. Let this article be a warning to anyone who found a too good to be true crypto currency investment opportunity. ALWAYS check their website and see how easy it is to find the founders on there. If the founders are missing, that should be a gigantic red flag!
Bitconnect received BTC Bitcoin when it was valued at $1,000 per coin!. They (Bitconnect Founders the scam artists) made a killing on the rise of Bitcoin value alone that they were holding from us (the investors). Now they orchestrated an exit scam leaving millions of people frustrated and angry because they returned to us practically worthless BCC Bitconnect Tokens. This my friends is NOT ethical, this is why they are scumbags, and they need to be punished properly.
If you want updates on what’s going on with the class action lawsuit against Bitconnect, or if you want to see what information I’ll uncover about the founders of Bitconnect, stay tuned. Just bookmark this page and follow me on Twitter as well.
I’m 100% invested into day trading, a world where people routinely invest money into horrible worthless companies and MAKE MONEY. I knew that trading bots are real, and that Bitcoin was going up in value. I also knew that a company with all the money Bitconnect stole, could have easily created an actual trading algorithm to make money from the volatility of crypto currency . Hell, you can create your own trading robot. But unfortunately I didn’t dig deep enough into the history of Bitconnect because my plan was always to pull out my lending profits every month (which I didn’t get a chance to), and only risk the money I would actually make on Bitconnect.
Stay tuned, I already know who all the Bitconnect founders are, and will update this post for all fellow investors who are holding practically worthless BCC tokens.
| Date | Description(of the document filed at Companies House) |
| 3-Oct-17 | Confirmation statement made on 3 October 2017 with updates |
| 26-Sep-17 | Appointment of Mr John Bigatton as a director on 26 September 2017 |
| 26-Sep-17 | Appointment of Mr Jean Simon Labreche as a director on 26 September 2017 |
| 26-Sep-17 | Appointment of Mr Jonas Dumalin as a director on 26 September 2017 |
| 18-Sep-17 | Appointment of Mr Nontokozo Mamfengu as a director on 18 September 2017 |
| 18-Sep-17 | Appointment of Mr Glenn Arcaro as a director on 18 September 2017 |
| Part Rectified The address details of the director were removed from the AP01 on the 16/01/2018 as the information was forged | |
| 18 Sep 2017 | Appointment of Mr Javellana Jonel as a director on 18 September 2017 |
| 18-Sep-17 | Appointment of Mr Binyeegob Muhammad as a director on 18 September 2017 |
| 18-Sep-17 | Appointment of Mr Wolf Jorgen as a director on 18 September 2017 |
| 18-Sep-17 | Appointment of Mr Kim Jongkeun as a director on 18 September 2017 |
| 18-Sep-17 | Appointment of Mr Darji Divyesh Dhansukhlal as a director on 18 September 2017 |
| 18-Sep-17 | Appointment of Mr Nguyen Ngoc Thuong as a director on 18 September 2017 |
| 6-Sep-17 | Incorporation |
I found these names by watching Bitconnect Class Action Lawsuit YouTube video by Badisse David Mehmet. He inspired me to contact the Silver Miller Law Firm. I know my loss is small compared to the losses I read about, but nevertheless these scumbags got under my skin. And after researching Ponzi Schemes, I know that usually all the orchestrators are sent to prison. So I'm not sure why people take the risk to be wealthy momentarily when the odds are very good that they'll be spending most if not a good portion of their life in prison.
9AM 1/17/2018 BITCONNECT HAS SHUTDOWN!!! SCAM ALERT!
Did I loose my original $480? Luckily not even 1 person signed up under my account.

MORE to come once I find out more information! Leaving this post to remind myself of how silly I was, even though I knew the odds. I was hoping that Bitconnect would survive at least 2 more years. More info What Makes A Ponzi Scheme?
Recently I discovered my life’s’ hidden passion for day trading stocks, thanks to YouTube videos by Tim Sykes. Two months and hundreds of hours later in my day trading education, I accidentally came across a crypto currency called Bitconnect. What really intrigued me was how easily people were making money from doing Bitconnect Loans.
How Bitconnect Lending Convinced The Skeptic In Me To Dive In
As a selfmade 39 year old entrepreneur, I’ve been around the block a few times. My life experiences made me a bit skeptical especially about opportunities and Bitconnect triggered my BS radar instantly. First let me tell you how I accidentally learned about it.
YouTube My Refuge From Nerve Pain & A Blessing in Disguise?
When I was younger I did a lot of stupid things, some of those involved crashing cars over 100mph. Later on in life a freak moderate car accident left me with a lot to deal with. Anyways, on my bad days I lounge around on YouTube to distract myself as much as I can from my physical pain.
One of these days I was watching a car video of a young black guy in New York City racing around on the highway in his Dodge Challenger against a Mercedes C63 AMG and a BMW M3. He made the video interesting because of his commentary, you could tell he was really enjoying himself.
Anyways, at some point in the video he mentioned how he wouldn’t even have this car or his other cars if it wasn’t for Bitconnect. Now I’ve heard that term before, but because there’s dozens of crypto currency coins out there, I didn’t really pay any attention to it, until that day.
Digging through this guys YouTube channel I confirmed that in fact he did just buy some fancy sports cars and he is young, so that led me to look a litter deeper into Bitconnect. After all he made it sound so easy, so too good to be true.
{loadposition responsiveads}
What You Should Know About Bitconnect That Others Won’t Tell You
There’s a ton of ways and cryptocurrency coins you can invest into. A lot of them are in a bubble and experts are saying that you should be very careful. Hearing all these warnings, even from my day trading teacher Tim Sykes, I had no intention in learning yet another market. I have my hands full trying to learn the ins and outs of day trading, but that New York speed racer stayed on my mind for days.
Days later, someone in the day trading chatroom mentioned that they have $10,010 in Bitconnect Loans and that they’re making more money with Bitconnect then they are day trading lately. That settled it, even my day trading crew is talking about this, I had to finally learn more about it.
Anyways, I wanted to find out what the NYC speed racer guy does, and that’s when I found out about the Bitconnect Lending program. It works the same way bank loans work, except this time you are the bank and the customer is Bitconnect. Now why would Bitconnect need a loan from you? They will use your loan to earn money day trading in the crypto currency stock market. But those odds don’t sound that great once you know how well a typical human investor does day trading, roughly 80% fail.
Well Bitconnect eliminates the human from the equation and uses a trading robot, otherwise known as a trading algo or trading algorithm. And if you’re into trading stocks, you’re probably well aware of trading algo’s and big companies using them to make money in the market. It’s actually nothing new, except this is the first time that I heard of crypto currency being involved and normal people instead of big billion dollar companies.
How Does Bitconnect Lending Actually Make You Money Everyday?
The Bitconnect Trading Algorithm uses your loan and its term to trade crypto currencies like Bitcoin every single day, until they have to release the capital back to you. The robot probably makes a killing but only pays the Lenders (us) a small fraction of the profits. However, since it began a little over 1 year ago, Bitconnect has been paying daily interest payments to everyone without fail. That’s what put me over the edge, well that and seeing a bunch of people on Youtube buying cars and paying off their mortgages thanks to their Bitconnect Lending Profits.
Once you hear and see how much money people are making by participating in the Bitconnect Lending Platform, you’ll probably start dreaming of the possibilities just like I did. And like clockwork, Bitconnect issues your daily loan interest into your lending wallet, it all seemed to good to be true, so is it?
{loadposition responsiveads}
The Bad Part About Bitconnect Lending, It WAS A Ponzi Scheme?
Before I invested into Bitconnect, I did some digging on the internet to see what I can find. I was determined to prove that it’s a scam, so I could end this pursuit and get back to my endless studying of the day trading game.
I did find YouTube videos and posts on the internet claiming Bitconnect is a scam and that it’s probably a Ponzi Scheme. That news did worry me quite a bit, however, I couldn’t find 1 person on the internet who could prove they invested into the Bitconnect Lending Platform and they lost money. In fact, all I found was more proof that people who invested into the platform, were actually making daily interest on their crypto currency investment every single day.
What Is The Interest Rate That Bitconnect Loans Pay?
It’s not a specific number, it based on what they call their Software Volatility Interest. That interest fluctuates from a measly .05% to over 2% per day. On average you’ll be making somewhere around .80% on your original loan amount per day, and I can validate those numbers, because on 12/27/2017 I started a $480 loan with Bitconnect.
Bitconnect Loan Interest Payment Transparency
Anyone can look up how much Bitconnect has been paying out to their lenders every single day. There’s interactive charts online, as well as Projected Earnings Calculators to help you figure out how much money you can earn based on the historical interest of the last 30 days, the last 6 months, and the last 7 days of interest payments.

What Is The Average Daily Interest Payment On A Bitconnect Loan?
Bitconnect offers 4 tiers of loan amounts
| Lending amount | Interest (Accrued daily) | Capital release |
| $100 - $1000 | Volatility software interest | After 299 days |
| $1010 - $5000 | Volatility software interest + 0.10 % daily | After 239 days |
| $5010 - $10,000 | Volatility software interest + 0.20 % daily | After 179 days |
| $10,010 - $100,000 | Volatility software interest + 0.25 % daily | After 120 days |
My $480 loan falls into the first tier which means that I have to wait a whole 299 days until my capital is released. And the first tier is the only tier that doesn’t guarantee ANY daily interest. However, if you look at the Bitconnect Lending Interest History Chart, you’ll get the warm and fuzzies back when you notice that you’ll earn about 1% of interest on average over the course of your loan, no matter what amount you put it in. However as seen by the chart above, once you step up to a $5010 loan amount, you’ll receive an additional .20% with your Volatility Software Interest daily and that will add up very quickly.
{loadposition responsive-LU}
If Bitconnect Is So Great Why Did I Invest Only $480?
Well any investment is a risk! And I don’t have money to be throwing around like some people. Also this is a side play for me because I’m investing 90% of my time into learning how to be the best day trader. But at the same token, I have to mention that the second I took a hard look at Bitconnect Lending, I wrote a goal on the top of my list that said I will invest $10,000 from my day trading profits into Bitconnect Lending.
The $480 was originally $525 dollars, Coinbase charged me $20.14 to buy Bitcoin aka BTC. Because to do Bitconnect Lending 1st you have to buy Bitcoin (BTC) then you send that to Bitconnect.co and exchange it into Bitconnect Coin (BCC). So let me walk you through how my original $525 turned into a loan of only $480!
The Most Annoying Part Of Bitconnect Lending, The Fees!
Like most people I hate fees, so the day I pushed myself over the 50% edge on whether I should give Bitconnect a try, I was a bit annoyed once I had to pay those annoying transaction fees that you can’t get away from. It’s the cost of doing business, and as an entrepreneur, I’m no stranger to that element. Although as a person who values money, I hate to part with my money unless something of benefit is going to out weigh the cost of spending my money.
The Simplest & Fastest Way To Get Started With Bitconnect Lending (Print This Page)
The first time you send your money from your account to Coinbase where you will have to buy Bitcoin, and then back to Bitconnect is a lot to take in. There’s plenty of guides out there, but hell, I didn’t win 2 Excellence In Business Consumer Education Awards from the Better Business Bureau for nothing. I happen to be pretty good at creating tutorials, at least I make a living from doing so and I’ve been working for myself since 2010. Anyways let’s get on with it.
Again print this page or put it on your phone or tablet while you follow the step by step procedure.
Step 1: DON'T Create a Bitconnect Account or any Crypto Lending Account for That Matter
- Click on Register and fill out all the standard information.
- Just like any other internet sign up, they’ll send you an email with a confirmation link so you can confirm the account.
Step 2: DONT Create an Account on Coinbase to Buy Bitcoin (BTC)
- Again fill out your information to create and confirm your account through the standard email validation process.
- Next you have to fund your Coinbase account by depositing money either through a Credit/Debit Card or Bank Account.
- I used my Debit Card and Coinbase made 2 tiny transactions that I had to confirm in order to move forward. At first when I logged onto my bank app, I didn’t see the transactions, but a few minutes later they showed up.
- Once you confirm your account and confirm the transactions, you’re finally ready to buy Bitcoin with your confirmed account.
- I wanted to do a $500 Bitconnect Loan but since it was my first time, I wasn’t aware of all the fees that would take place. So I chose $525 which bought me .0316 BTC or $504.86 of Bitcoin with a $20.14 fee from Coinbase. Cost of doing business in the Crypto Currency World.
Step 3: Getting Ready to Send Bitcoin BTC to your Bitconnect Account
- Log on to your Bitconnect account
- And in the top right corner, click on the Bitcoin Wallet link.
- Now on the left hand side you’ll see your Bitcoin Wallet with Receive Bitcoin (BTC) in orange letters. Click the green Deposit Bitcoin (BTC) button.
- Now you’ll have a QR code which you can use with your smartphone or simply copy the Receive BTC address underneath it like I did, you'll be pasting it in the next step.
Step 4: Sending Bitcoin (BTC) to your Receive BTC Address
- Go to your Coinbase Accounts section https://www.coinbase.com/accounts/
- If you are new to Coinbase like I was, you should only have money in your Coinbase BTC Wallet.
- Click on Send and then paste the Receive BTC Address you copied from the Bitconnect site in step 3.
- This process took about 20 – 30 minutes for me, before I was finally able to confirm receiving the money into my Bitconnect account.
Step 5: Exchanging your Bitcoin (BTC) into Bitconnect Coin (BCC)
- Now that you transferred your Bitcoin over and it finally appears on the top right corner of the Bitconnect site, you’re ready to convert it into the Bitconnect Coins that you will be lending.
- On the Bitconnect site click on the blue <<Exchange >> button in the top right corner, right next to your Bitcoin Wallet total.
- Now you’ll see a chart of the value of Bitconnect Coin (BCC), don’t worry about that because what you’re interested in is making money on the loan, not on holding the actual coins.
- Simply scroll down to mid page where it says BUY/SELL BCC
- Under the BUY BCC section click the blue ALL button select your Bitcoin to be exchanged.
- Now simply click the green +Buy BITCONNECT COIN button. That’s it!
- Your order can now be seen under My Open Orders, as long as you followed these steps, your order should fill fairly soon. I made the mistake of trying to get the best BID price and that caused my order not to go trough for an hour. So I had to cancel my first order, and simply use the default settings (Last Bid Price) and then my order was finally filled!
Step 6: FINALLY The Last Step, Starting a Bitconnect Loan!
- This is why I told you to print the instructions, because your first time you’ll need some guidance to get it done right. Hopefully my award winning instructions have helped you get this far, now let’s create that money maker loan.
- Go to your Bitconnect Dashboard which is your Bitconnect homepage once you log in.
- Write down your Bitconnect Wallet amount, you’ll need it soon to confirm.
- Now under the heading LEND BITCONNECT / REINVEST simply click on Lend BitConnect button.
- Now enter the money in USD that you have transferred to Bitconnect after all your fees have been taken out, and simply confirm that the Amount in BitConnect Coin reflects what you actually have in your BitConnect Wallet or slightly less. That’s It!
FINALLY YOU’VE MADE IT!
{loadposition responsive-LU}
More About My Loan Progress

I started my initial Bitconnet Loan on 12/27/2017 at 8am. Every morning I log onto my Bitconnect.co account and see how much money I accumulated. Obviously what they’re paying me is far batter than any bank and in a few days it’s going to be far better than some of the best performing mutual funds. That’s why I took the risk/gamble myself. I simply had to see it for myself.
Most people start with tiny $100 investments, but doing the calculations, $100 was not that exciting in terms of daily interest. Honestly $500 is not that much in daily interest, but this was my experiment as being the first from my friends and family to try this crypto currency investment strategy. It’s been going so well that I will put more money in soon and reinvest my Lending Profits to keep growing my daily interest earnings.
DISCLAIMER:
I’m not an investment guru or a financial advisor. Just a retired builder, retired Microsoft Systems Engineer, entrepreneur, and now day trader or I should say aspiring day trader, since I’m spending most of my time learning for now.
Why I Did This Other Than For Myself?
Well, I’d love to help my family, but I’m not rich, at least not yet. This is the only thing that I could tell them about that could possibly help them in the future. My last investment advice was to buy Facebook. My sister and brother in-law did back when Facebook was an IPO and we both did very well on that investment. This is something different, crypto currency is here to stay but there will be dramatic changes to the world because of it. No one knows what truly will happen, but it’s a safe bet we are in the beginning of the crypto currency revolution and that early investors will get rich. There’s no saying which ICO will be the next Bitcoin, and which ICO will be the best investment overtime. This crypto investment strategy is based on loan interest, except instead of the greedy banks making money on our money, this time we can make money by being the lender.
Do your research and PLEASE don’t invest your life savings into Bitconnect Loans or any other Crypto, that would be very foolish and risky. Take what you could live without and see what happens. For some that’s $100, for others that could be $100,000. All I can tell you is that despite if Bitconnect turns out to be a scam a few years from now, which I don’t think it will, you can still make some money now. The fact is no one really knows what's going to happen with Bitconnect, there's just a lot of guesses. Try to make some money from it while it’s still working for every single person, then slowly withdrawal your original capital investment from your loan interest payments and simply make Bitconnect Loans with only the money you made with them. That’s my strategy.
Some say the safest way is to play the $100 to $1000 loan with Bitconnect, well look at the loan terms. With anything under $1000 you have to wait for 299 days to get your original capital back. While on the other hand a $10,010 loan will release in 120 days and make you a ton of profit along the way. Somewhere in the neighborhood of $13,000 to $14,000 in profit for a 120 day loan term. Add your original captial investment on top of that, and in 4 months you can withdrawal $23,000! If I were richer, that's what I'd be doing, but only after recognizing the risk. Frankly the more money you invest, the more research you should do.
{loadposition responsive-LU}
Planning a Risk / Reward Ratio with Your 1st Bitconnect Investment
The $10,010 loan is the most popular Bitconnect Loan because it provides over $120 in interest payments per day or somewhere in the neighborhood of $3,000 per month of loan interest that you can withdrawal and reduce your risk by 30% every month. You can continue withdrawals in loan interest payments for approximately 3 month,s until you have withdrawn your $10,000 in about 90 days. The smaller amounts are technically riskier because you are locked in for a longer period of time. But hey, look at all the facts, including the fact that there's plenty of haters who are saying it's a scam. Use these facts to figure out how much you're willing to risk.
In stock trading you always play with a good Risk / Reward Ratio. For example you'll risk $100 to make $300. Maybe you should think of this opportunity in the same way. And if you're not in the stock trading world, you're probably not aware of how many hundreds and possibly thousands of scam business operate in the stock market world. If you read their balance sheet or cash flow statements, you wouldn't understand how they could run up 40 to 400% in a single day! It's trully a crazy world out here, but that doesn't mean you shouldn't take calculated risks along the way.
Good Luck and look forward to updates on my Twitter and other social media accounts with what’s happening with my Bitconnect Loan. I will be posting future blog posts on day trading for sure, once I have a proven consistently profitable system in place. But when it comes to day trading, you have to invest into your education like you probably never did in your life. I know I never studied this hard and for this long. But I know that everyday I'm getting a lot smarter in the game, and eventually I will be great at it.
Bitconnect on the other hand is a gamble, only because the haters are making it so right now. The same thing happened when Bitcoin was introduced and now it's trading for $16,000 for 1 BTC coin! Do your due dilligence and if you have some money to risk, I would try it out, in fact I already did!
Best Wishes,
Voitek Lex Klimczyk
]]>
 |
Customer Reviews 2,626 |
|
Rating Average 3.9 of 5 stars |
|
|
Today's Price |
Pros
- easy set up
- mobile app is user-friendly
- no monthly subscription required to use
- high-quality audio and visual playback
- night vision capable
- good customer support
- comes with a micro SD card
- allows for creation of video clips
Cons
- cannot erase passwords, browsing history, or other sensitive data
- software updates have glitches
- questionable privacy policies
- is not compatible with laptops
- app not available with some smartphones
- poor company return policy
- drops WiFi signal
- alerts may not be sent in time
Summary
For the price you pay for Yi's home camera wireless IP security surveillance system, you get impressive technology not found with even some of the higher priced surveillance systems. This system offers clear recording capabilities that let you monitor and save surveillance videos. Still, you may find it concerning that the company's privacy policy states that the company can record you and your family at home. You may choose another security surveillance system if you are concerned about safeguarding your family's privacy at home.
 |
Customer Reviews 941 |
|
Rating Average 4.3 of 5 stars |
|
|
Today's Price |
Kamtron's HD WiFi surveillance IP camera and home monitor system has a 62 degree wide angle lens and and a field of view that spans 350 by 100 degrees. It features a 1080 x 720p recording capability and a 90fps face to face effect for high-quality full HD video. You can also download the system's MIPC View app to your smartphone or mobile device to view your home in realtime. The system comes with intelligent motion detection and two-way audio.
Pros
- easy installation
- supports a 32GB SD micro card
- good customer support
- ethernet connection
- reliable notifications
- can be mounted on walls
- smooth camera movement
- good night vision recording
Cons
- not weatherproof
- difficult to insert and remove SD card
- lag in image and audio recording
- glitchy software updates
- difficult pairing with Apple devices
- mobile app crashes
- drops connection and WiFi signal
- fragile camera design
Summary
The Kamtron HD WiFi surveillance IP camera and home monitor system is a good investment if you want one that captures clear images and is quick and easy to install. It is capable of recording wide angles, giving you a clear view of what is going on inside and outside of you home. However, it also has noted connectivity challenges and can be useless if the camera falls or is dropped and breaks. It may be more of a burden than an asset to your home.
Yi 1080p Home Camera Wireless IP Security Surveillance System
 |
Customer Reviews 1,202 |
|
Rating Average 4.3 |
|
|
Today's Price |
The Yi 1080p home camera wireless IP security surveillance system captures clear images with its 1080p recording capabilities. It is compatible with the Yi cloud to save space on its 32 GB FAT32 SD card. It has built-in support for a 2.4Ghz WiFi band. Along with detection and activity alerts, the system has a baby cry alert so you can use it in your baby's nursery.
- affordable price
- good recording even in inclement weather
- easy to install
- user-friendly mobile app
- reliable notifications
- video clip creation
- capable of livestreaming to mobile devices and smartphones
- can send alerts to desktop or laptop
Cons
- not weatherproof
- limited night vision recording capabilities
- alerts limited to six seconds of recording
- SD card dislodges easily
- drops WiFi signal
- mobile app prone to glitches
- subscription to the company's cloud requires payment from PayPal
- does not pair easily to iPhones
Summary
Yi 1080p home camera wireless IP security surveillance system is one of the more affordable home surveillance systems that offers some of the most user-friendly technology on the market. If you want one that captures good images even when it is overcast or dark outside, you may find this system to your liking. However, it is prone to glitches that can interrupt its recording. If you want a system that has fewer glitches and more daily reliability, you may consider another surveillance system for your home.
 |
Customer Reviews 198 |
|
Rating Average 4.2 |
|
|
Today's Price
|
Pannovo's wireless IP security camera and home monitoring system has 1920 x 1080p HD video recording capabilities and a 30fps face to face effect. Its night vision recording can capture clear images up to 49 feet. It can support a 64GB local micro SD card and comes with two-way audio through your smartphone or mobile device. The system likewise has a 350 degree recording angle and can be customized to send out mobile detection alerts. You can control your system through its MIPC View mobile app.
Pros
- easy setup
- has both daytime and nighttime modes
- camera customization through mobile app
- camera can be mounted on walls
- can double as a nursery monitor
- affordable price
- ethernet capable
- lots of space on memory card
Cons
- drops WiFi signal easily
- no written instructions included
- fragile camera design
- poor company customer support
- pairing challenges with some smartphones
- glitchy software updates
- delayed notifications
- prone to recording interruptions
Summary
Pannovo's wireless IP security camera and home monitoring system is a good investment if you want an easy-to-use device and system that you can control and monitor at home or anywhere with your mobile device. It captures wide angles when recording and monitoring, letting you see even the most remote corners inside and outside of your home. However, it also can be difficult to set up because it does not come with instructions included in its packaging.
 |
Customer Reviews 1,645 |
|
Rating Average 3.8 |
|
|
Today's Price |
Pros
- three year warranty
- can support multiple cameras at one time
- simple and fast setup
- can be paired with Zmodo's cloud
- affordable price
- powerful mobile app
- reliable alerts
- weatherproof
Cons
- recording capabilities require monthly subscription to cloud
- frequent disconnections
- poor company customer service
- difficult to pair with smartphones
- only takes five snapshots at a time
- delayed recording triggers
- narrow field of view
- drops WiFi signal
Summary
The Zmodo outdoor wireless IP security surveillance camera system is moderately priced and offers a fair amount of technology for your investment. Its user-friendly, weatherproof design make it appealing to people who want a reliable camera while shopping on a tight budget. However, you may find the technical glitches make this system more of a headache than an asset. You also may not like the fact that you have to subscribe to the cloud service to get access to some of the system's best technology features.
Uokoo Wireless IP HP Camera and Home Security Surveillance System
 |
Customer Reviews 485 |
|
Rating Average 4.2 |
|
|
Today's Price
|
The Uokoo wireless IP HP camera and home security surveillance system captures video and images with its 720p HD camera. It has a 120 degree wide viewing angle and can record up to 16 feet with its night vision capabilities. The system can be remotely controlled via the mobile app on your Apple or Android smartphone or mobile device and has remote pan and tilt function as well as a complete 355 degree coverage.
Pros
- easy to set up and connect
- easy to understand instructions
- reliable mobile app
- talk back audio feature
- good customer service
- easy to pair with phones
- tilt lens provides generous viewing
- timely mobile alerts and power options
Cons
- prone to freezing
- drops WiFi signal easily
- low image and recording quality
- cannot be used with desktop or laptop
- poor motion detection features
- no micro SD slot
- static-filled audio
- audio and video delays
Summary
The Uokoo wireless IP HP camera and home security surveillance system is low priced and easy to use. It offers a lot of basic features that you may prefer if you are not familiar with home surveillance systems or mobile home security technology. However, you should take note of the glitches and poor quality features reported by users who have purchased this system.
Netgear Arlo Two Camera Security System $219.99 Best Seller
Netgear's Arlo two camera security system has a 100 percent wireless operation and as its name denotes comes with two HD security cameras. It can send you mobile alerts 24 hours a day to notify you of break-ins and other risks to your property. You can place the HD cameras anywhere inside your house and get clear night vision recording. The system is weatherproof and can also be used outdoors if you prefer. You can also control the system with Amazon Alexa services.
Pros
- high-quality recording
- easy set up
- easy to follow online instructions
- compatible with desktop and laptop computers
- video playback
- livestreaming on your smartphone or mobile device
- easy to use mobile app
- compact size for convenience
Cons
- short battery life
- frequently disconnects
- poor motion detection
- modest cloud storage options
- limited view at nighttime
- poor outdoor audio and video image recording
- poor customer support
- higher priced than comparable models
Summary
The Netgear Arlo two camera security system is innovative with its ability to connect to Alexa and function wirelessly. It also beats out competitors with its waterproof design and ability to be used outdoors. However, for the price you pay, you may want better customer support and fewer glitches connecting to the WiFi. You may not be satisfied with the limited night vision range, poor lens quality, and limited life of the batteries before they need replacing.
EZVIZ HD Outdoor Surveillance System $199.99 Includes DVR & 4 Cameras!
The EZVIZ HD outdoor surveillance system is weatherproof and designed specifically for using outside of your house. It comes with four cameras and four channels as well as one TB of DVD storage. This surveillance system has digital zooming and can capture images up to 100 feet at nighttime and has customizable night vision functions. You can pair the system with your smartphone or mobile device to view and control your cameras from anywhere.
Pros
- easy installation and setup
- reliable notifications to your phone or tablet
- easy to follow instructions
- good customer service
- good lens and image quality
- ethernet capable
- reliable app
- good battery life
Cons
- sends false notifications for flying insects
- not compatible with desktops or laptops
- cloud storage by subscription only
- does not pair well with iPhones
- poor replacement and return policies
- prone to blackouts and dropped signals
- software update glitches
- higher priced than comparable WiFi surveillance systems
Summary
The EZVIZ HD outdoor surveillance system offers you the durable design and ease of use you may look for in a good security camera setup. It has the sensitive detection that you want to rely on and timely notifications so you can act quickly in your home's defense. However, it is pricey and prone to glitches that can make it a headache to use. For the price, you may want a system that performs better and can also be used indoors if needed.
Zmodo High Definition WiFi Smart Home Video Security System $219.95
Zmodo's high definition WiFi smart home video security system captures clear images with its 720p HD video function. It has 1 TB of storage that can support up to eight cameras and can store videos for up to 90 days. It also has an intelligent recording mode and automatic zoom so you can record clear videos and pictures both inside and outside of your home. Its night vision function can capture images up to 65 feet. The cameras are weatherproof, and the entire system can send instant notifications to your smartphone or mobile device.
Pros
- high lens quality
- easy set up
- wireless function
- compact size
- affordable price
- durable
- livestreaming capable
- easy-to-use mobile app
Cons
- sends out false alerts for flying insects and debris
- drops WiFi signal outdoors
- video prone to freezing
- no DVR function
- delayed time stamping
- delayed notifications
- no in-depth written instructions
- lenses scratch easily
Summary
The Zmodo high definition WiFi smart home video security system is an affordable indoor/outdoor surveillance setup that will give you the reliable recording and picture qualities you want in a basic home monitoring system. It is relatively easy to use and quick to install, which might appeal to tech novices. However, it can be prone to glitches like freezing up or sending out false mobile app notifications. You may not get the 100 percent peace of mind you want with this system.
The Kamtron wireless IP HD security surveillance home monitor system comes with built-in motion detection and night vision capabilities as well as two-way audio. It records clear images with its 1080p ultra HD video function and has a 30fps face to face effect. This system also supports a 64GB local micro SD card and has a 62 degree wide lens and a field of view that spans 350 by 1000 degrees. It has a built-in microphone and speaker and can send app alerts directly to your smartphone or mobile device.
Pros
- clear video recording
- easy setup
- powerful LED infrared
- livestreaming to your mobile device
- user-friendly app
- ethernet capable
- customized on and off scheduling
- wired or wireless function
Cons
- slight livestream and recording delay
- drops WiFi signal
- lens scratches easily
- syncing challenges
- poorly translated instructions
- does not use universal memory cards
- poor customer support
- mobile app prone to glitches
Summary
The Kamtron wireless IP HD security surveillance home monitor system is overall user-friendly and somewhat reliable in its ability to capture and record images and videos. It comes with an array of customization features that let you schedule how and when the system is used. Still, for the money that you pay, you should expect fewer glitches and better customer support. If you value better performance and support over basic and user-friendly functions, you may not be satisfied with this system.
Smonet's wireless security camera system can be used both indoors and outdoors and is a four channel, 720p recording setup. It comes with a ¼ inch color CMOS image sensor as well as four cameras, each with a four millimeter lens. The cameras are weatherproof and feature 0 lux minimal illumination. The night vision function can capture images up to 65 feet. The system can record and store videos for up to 40 days.
Pros
- low price
- easy set up
- good picture and video quality
- accurate email and mobile alerts
- durable
- easy to pair with Android devices
- livestreaming capable
- compatible with desktop and laptop computers
Cons
- no hard drive included with purchase
- drops WiFi signal outdoors
- picture freezing
- video playback glitches
- factory reset may not resolve recording issues
- poor tech support from company
- lenses prone to scratching
- motion detection sensitive to debris and flying insects
Summary
The Smonet wireless security camera system provides basic monitoring and recording inside and outside of your home. It is relatively self-explanatory to use and does not require a lot of tech know-how to set up and use on a daily basis. However, you may experience difficulties trying to store and view videos and pictures. You also may not get a reliable performance with the outdoor cameras due to poor connectivity and signal dropping. If your priority centers on outdoor surveillance, you may need to choose another monitoring system.
Funlux Wireless Smart Home Security Camera System $79.99
Funlux's wireless smart home security camera system has a 115 degree viewing angle that lets you capture images and videos without having to pan or tilt the lenses. It records in 720p HD and comes with two-way audio via your smartphone or mobile device. The system also automatic motion detection and zooming capabilities and supports 3G, 4G, and 5G networks. You can customize your alerts using the Funlux mobile app and share recorded images from your device with friends and family.
Pros
- night vision recording up to 50 feet
- easy installation
- user-friendly design
- low cost
- comes with all required hardware for setup
- pairs with MeShare mobile app
- clear night mode images
- can support up to 12 cameras
Cons
- cameras cannot rotate horizontally
- poor WiFi connectivity outdoors
- software updates are glitchy
- does not display single screen multi-images
- cloud storage only by subscription
- false notifications
- fragile camera design
- lenses can get scratched from flying debris
Summary
The Funlux wireless smart home security camera system essentially delivers on all of its promised performance and services for monitoring inside and outside of your home. Based on reviews, it is one of the simplest systems to setup and use without experiencing a lot of hardware issues. However, it is not one of the most technologically advanced systems available and does not offer some of the perks like multi-image viewing that you can find with other monitoring options.
Blink Home Security Camera System $229.99
The Blink home security camera system is a basic monitoring system that comes with built-in motion detection and motion sensor alarms. It is wireless and sends notifications to your smartphone or mobile device. It also offers free cloud storage and can be used both indoors or outdoors. The cameras require two AA batteries to operate. It offers live view mode and records images in HD low light illumination. You can control the cameras and monitoring system using the mobile app or Amazon Alexa.
Pros
- simple to set up and use
- can be customized to record when and where needed
- excellent picture and video quality
- weatherproof
- good connectivity
- realtime livestreaming capable
- no lagging issues
- compatible with desktop and laptop computers
Cons
- cameras require batteries to operate
- pricey
- can be difficult to sync with iPhones
- software updates prone to glitches
- can drop WiFi signal outdoors
- no alerts when batteries die
- poor customer and tech support
- cameras can blackout without warning
Summary
Although simple in design, the Blink home security camera system delivers on its promise to capture clear images inside and outside of your home. It is easy for tech novices to use. If you want a basic yet reliable home monitoring system, you may be satisfied with this setup from Blink. If you want one that can function without having to change out the batteries in the camera routinely, you may consider another surveillance system.
Canary Flex Indoor/Outdoor HD Security Camera System $199.00 Popular!
The Canary Flex indoor/outdoor HD security camera system offers precise positioning with its 360 degree swivel base. It records and captures images in high definition and can record up to 25 feet at nighttime. The system's mobile app offers one-touch emergency services notification and can be customized to send out motion detection and other alerts. The system has both wired and wireless function capabilities and is weatherproof.
Pros
- can be mounted and angled on walls
- long battery life
- can be moved vertically
- comes with own extra long power cord
- reliable motion detection
- timely mobile alerts
- auto switching modes
- can store and share images and videos from mobile devices
Cons
- sends out false notifications for insects, animals, etc
- extra storage requires subscription
- five minute delay in sending motion detection notifications
- outdoor cameras drop WiFi signal
- no standalone automation options
- no power backup options
- glitchy mobile app
- no downtime notifications
Summary
Canary Flex indoor/outdoor HD security camera system could be a solid choice for people who want a setup that primarily captures pictures inside and outside of their home. The cameras are easy to manipulate and move so you can see most angles of your property. This setup may not be ideal if you want one that will send out reliable notifications for motion detection or scheduled downtime. You may be notified too late that someone has broken into your home.
Amcrest Wireless WiFi IP Security Camera $79.99 Ridiculously Popular!
The Amcrest wireless WiFi IP security camera captures images in full HD 1080p video and can record and playback videos via its local micro SD card. It has a 90 degree wide angle lens, remote pan and tilt, intelligent enhanced digital zoom, and LED night vision up to 32 feet. The camera also has two-way talk, intelligent motion alerts, and supports 2.4 Ghz networks. You can customize and control the camera and set up notifications using the Amcrest View App on your iPhone or Android device.
Pros
- easy to use
- CD user guide and written instructions included
- excellent picture quality
- compatible with desktops and laptops
- good connectivity
- good night vision quality
- livestreaming to mobile devices
- reliable mobile app
Cons
- not compatible with Google Chrome
- can drop signal unexpectedly
- does not support 5 Ghz network
- outdoor images can be grainy
- can skip recording
- not ethernet capable
- poor tech support
- camera lenses scratch easily
Summary
The Amcrest wireless WiFi IP security camera is an easy-to-use albeit basic monitoring setup that gives you the picture and video quality you may want to keep tabs on the inside and outside of your home. It offers most of the base services found with comparable monitoring systems but at a price that is lower than others on the market. The biggest drawback is its incompatibility with Google Chrome. It also cannot be used on a faster 5 Ghz network.
Uokoo Mini IP Home WiFi Wireless Security Surveillance Camera System $29.99
The Uokoo mini IP home WiFi wireless security surveillance camera system records in 720p video and can be accessed remotely. It has 4x digital zoom and a ¼ inch CMOS sensor. It supports ONVIF as well as one-key WiFi configuration. It is compatible with Android and Apple devices and has motion detection sensors. It also sends out motion detection emails and push notifications to your mobile device. It is designed for indoor use and is not weatherproof. It also does not come with night vision function.
Pros
- low price
- comes with a power adapter
- simple to use
- easy set up
- good picture and video quality
- compact size
- wall mountable
- durable
Cons
- does not support 3G, 4G, or 5G data connections
- only supports 2.4 Ghz networks
- no night vision recording
- frequent mobile app crashes
- motion detection recording prone to freezing
- delayed push notifications
- drops WiFi signal
- does not recognize universal SD cards
Summary
The Uokoo mini IP home WiFi wireless security surveillance camera system serves best as a nursery or pet monitoring system than it does a home security setup. It captures images with the clear quality you want. However, the lag in push notifications to your device as well as the frequent crashes of both the mobile app and cameras themselves impedes its ability to offer you the home monitoring you want to safeguard against break-ins and other threats.
Well I hope you enjoyed this thorough look at the best wireless security cameras for the home. I know which one I'm going to buy already, follow me on Facebook,Twitter, and YouTube to see which one of these I purchase. Oh, by the way, I'm posting vlogs about my project cars and photos from things I'm working on all over social media, including Instagram.
]]>

Looking for a new home to buy can be more of a project and risk than most of us think it is. I can honestly say that the process can feel grueling and never-ending, because buying a house is much like getting married. You have to lock in all the qualities you really can't live without and figure out which qualities you're willing to overlook, because a house much like a spouse will never be perfect and neither will be the process of finding them. In the end you still have to hunker down with faith and put your money on the one you think is the one and hope for the best. There are no guarantees in life, just educated guesses, ancient wisdom like Feng Shui and statistics.
{loadposition responseblog}
Will This House Make Me Happy?
Do you need quick answers on how much typical home improvement projects cost, because your buying a home this year? If you are in the market to buy a new home this year, you're probably driving around town with your Samsung Galaxy, iPhone or iPad with Zillow or another mobile app, scouring the neighborhoods for good deals.
Maybe you've gone to the next step and signed a contract with a Realtor like we did. I say we because my wife and I have been looking for a 3 bedroom home for the past couple of months now, but almost every home we visit, we find ourselves asking things like "How much will it cost to remodel the bathroom", or "Do you think we can do the windows, roof, and kitchen remodel and stay within budget?". Yes folks, even a former general contractor does the same thing you do, when they shop for a home.
From siding replacement, to bedroom additions, and even adding on a garage, all of us are driving around town or searching for houses feverishly on our mobile phones, tablets and computers, thinking "Can I afford to make this home into the home I really want?". (Browse my typical home improvement costs chart; includes job costs for 35 projects.)
I'm a retired general contractor but the retired part is not so much by personal choice. The recession thanks to good old George Bush junior and a few other circumstances beyond my control, forced me to close down a business that I poured every single dollar and a whole lot of energy into. It really was a catastrophic life experience, complete with a financial disaster and an infamous health problem that could have easily snuffed me out during the last few stressful months I held that company with my Kung Fu Grip, while I desperately tried everything to save it.
Important Lessons Learned from a Catastrophic Life Experience
Lesson One: Don't put your personal life on hold while you're trying to build a nest-egg, because there's a chance you will run out of time like I did. I practically put off dating for 6 years while I was working my butt off on my business, and when my business forced me to go bankrupt, I realized that choosing to focus purely on the business was a big waste of time.
One month after I closed the doors to my business for good, I was dating again! Several months after that, I married an amazing girl from Sri Lanka, who also went through her own catastrophe, which I believe molded her into the amazing person she is today. I actually believe based on my personal experiences and by the experiences of others that huge catastrophes in life force a person to mature past their age. I'm happy to report that I'm truly happily married to my wife Kawshi, but maybe I paid the price for this happiness. What do you think? (Actually keep reading, it get's really interesting ahead)
Lesson Two: Sometimes our biggest failure leads us to the beginning of our biggest victory, as long as we focus on the positive in the midst and aftermath of a disaster. Closing down a business you spent countless hours on is exactly how you would imagine it to be, painful and depressing, and for me it was extra painful.
I have birth defect that produces superhuman levels of pain called pancreatitis. The sickness is caused by stress even though modern medicine has not confirmed this. I've written a lot about that on my other websites, because I've made remarkable progress in controlling it in my life. However when my business was drowning in debt, my pancreatitis flare-ups were torturing me every week instead of every month and that started to worry me. I manifested some highly unusual experiences fighting this health condition and on several occasions I completely bewildered my doctors. After that, I became a huge supporter of mind over matter development, which is also known as using the power of your subconscious mind. To most this type of power is fictional but when your life depends on it and you causephysiological changes within your body that doctors can't explain, you tend to develop a faith in these types of things. However fighting through a crushing defeat like a business closure that you poured your heart and soul into was far more challenging for me to keep my mental composure on and towards the end there, I found my faith wavering in my ability to get through the situation unscathed, or even alive.
Eventually I realized that because of circumstances beyond my control, I could stick around and watch a business that I've worked hard to make amazing and award winning go down in ruins or I could admit defeat and move on with my life. The fact that you're reading this right now, is a clear example of the path I chose. Right at the 11th hour I decided that my life was more important than fighting the inevitable, because it's not like I could make the banks grant $100,000 renovation loans to my customers who couldn't get approved after lending practices were changed. It was time for a reinventing of myself once again, something that I've done more than a few times in my 35 years of life!
{loadposition responseblog}
Did the Feng Shui Dead End Street Curse Kill My Business?
Did I mention that my business office was located on a cul-de-sac, often refereed to as a dead end street? I acquired the office back in 2007 and I already knew about the dead end street significance in Feng Shui texts that says that the energy can be chaotic, stagnant, or low because it's divided among all the other properties on the cul-de-sac. We got a great deal on the rent from my business partners dad who owned the building with his partner, and we thought it would be okay. However I lost my business and my business partners dad was victimized by his business partner who stole over $100,000 from the company account. Sure it may all be a giant coincidence, or maybe there maybe something to this Feng Shui wisdom.
")
Putting the Nail in the Coffin
When we were furnishing the office, we went to a going out of business sale at a large office building and picked up several desks for the office, 2 old and 1 new. Turns out that Feng Shui texts also talk about the possibilities of facing the same faith as the previous business, if you acquire their place or belongings. Strike 2 indeed!
Because I did know a bit about Feng Shui, I employed several cures just in-case there was something to this mysterious 6,000 year old wisdom. Look at this picture of my old office. In the upper left corner I setup a Feng Shui water fountain and a lush plant filled green space in what's considered the wealth area. Our business always wasn't doomed you know, we grossed 1 million dollars in a little over a 14 month period right before the recession hit. And I've won so many awards for the business from the Better Business Bureau year after year that they actually asked me not to apply for next years award because it wouldn't be fair and others would think the contest is rigged. LOL, true story!
My Phoenix Like Resurrection
So I put the past behind me, decided to start fresh and rebuild my life from a financial disaster that might have been caused or helped by the dead end street Feng Shui Curse. I once again find myself in the market to buy a new home.
Now I'm saying a new home, but the fact of the matter is that I'm a newbie in the field of purely working from home by writing articles and producing Youtube videos out of all things. So the house my wife and I are looking for will be relatively new instead. Good ole Google and YouTube have to bless me with a few extra thousand bucks in my monthly paychecks, before we can buy or build that shiny new house we really want, but I digress.
Oprah Went To School Here
We are currently looking for a newer home. Just today we had our hopes shattered once again, when we set them so high to look at a very promising 3 bedroom raised ranch in a very appealing neighborhood. The house was just listed and no photos were provided on Zillow, Trulia, or anything else; just one measly Google Streetview photo. But what was provided was the fact that this particular home was right on the town line, between a town that's A-okay, and another town that is just plain great, but generally above our current price range.
By great town, I mean low taxes and some of the absolute best quality schools in Connecticut (Have you ever heard of Oprah? I thought you might, she actually went to one of these schools!) . We were excited beyond reason for the showing and I even drove down there while my wife was at work, to text her a few photos because she couldn't wait to go see it herself.
That's one of the benefits of working from home, I can leave the house whenever I please you know, but to be honest I find myself constantly working on my business because my goals are larger than life and my thirst for fancy cars is never going to be quenched in entirety like Jay Lenos. Speaking about making money from home, have you seen this lovely ad before :)
{loadposition responseblog}
Giving a Dead End Street A Second Look
So long story short, we let ourselves get excited once again, and today at 9am we met with our Realtor at the house that was said to be in need of a little TLC . Now mind you we are not morning people, so to meet our Realtor on the weekend at 9am, was a slight exertion of effort on our part. Anyways, we get to the house and pull into the crackled driveway. Then the nit picking begins, as we wait for our real-estate agent to pull up.
"Look at the siding, it's dirty, look at the garage door, the paint is peeling", "Why are all the bushes dying?". As we waited, we just kept noticing small imperfections with the house on the quiet cul-de-sac and then our real- estate agent pulled up in her slick and silver Mercedes. Now the inspection of the house we were ready to put a full price offer on, because of the location and taxes, begins.
Oh my God! WTF! Were my first thoughts. Pardon my acronyms, but this guy was the biggest pig ever! I say guy because I did a little Google espionage the day before on the house and found out that the owner is in his mid 40's, and he's been living there for about 11 years. First the carpet was so far beyond the original color, we had no idea what the original color was. Then we saw his ugly black fireplace surround! I mean who paints their outdated fireplace surround bricks gloss black! And I'm not talking about someone who made a contemporary looking fireplace surround, nope. We're talking about someone who drank a 12 pack of Miller Light and thought he's a Picasso with a black spray paint can, type of fireplace.
So besides the dirtiest ceilings we ever saw, soot on the walls and ceiling form the pellet stove. There was massive spiderwebs on the ceiling corners, 45 electric guitars in every room, and 8 cases of Miller Light beer in the bathroom. This house was in need of everything. We're talking about all new flooring, paint everywhere,new kitchen, new bathrooms, new windows, new doors, new HVAC system, pretty much a complete new interior. Yeah, our heart sank within seconds of the showing. This house is the definition of what can go wrong while living on a dead end street. He's in his forties, the house is dirty and broken everywhere, and he doesn't seem to be married, because what women would dare to eat or sleep in a cold, dark, dingy, dungeon?.
Rock & Roll Should be on the Radio
Can you imagine setting yourself up thinking this house might be the one, then walking into Ozzy Osborne's bachelor pad from hell? Yeah, within 30 seconds of viewing this dead end street house, we knew right away there's no way in hell we'll put in a full price offer on it, EVER. Hell, the house probably needs at least $30,000 in repairs alone (It had a roof leak too), not to mention things we would want to upgrade there like the heating system, kitchen, and bathrooms. Plus, how much is an exorcism anyway? We don't think it's haunted, but it sure doesn't look like it's not haunted, and it is located on a Dead End Street!
Is A House on a Dead End Street Bad Feng Shui? YES!!!
 I can't say that I'm a Feng Shui Guru, but ever since I read a few books about it, I cannot help but notice that I see similarities between what the books say,
and what actually happens in real life, either to me or other people I know. I'm not superstitious, but if something seems to be happening to the occupant of a house and the Feng Shui principals I memorized pretty much spell out the persons circumstances,
it may be a good idea to learn what not to do at the very minimum, right?
I can't say that I'm a Feng Shui Guru, but ever since I read a few books about it, I cannot help but notice that I see similarities between what the books say,
and what actually happens in real life, either to me or other people I know. I'm not superstitious, but if something seems to be happening to the occupant of a house and the Feng Shui principals I memorized pretty much spell out the persons circumstances,
it may be a good idea to learn what not to do at the very minimum, right?
You're not going to catch me hanging wooden flutes above a doorway, but you may find me not facing my bed towards the bedroom door, which is considered the Feng Shui death position!
Hey we live in an amazing universe and no one exists that really knows all the rules. Many have tried to explain how the universe works in entirety like Albert Einstein, and some are still trying to create the theory of everything like Mr. Steven Hawking. All I know is that I tend to follow the wisdom of whatever worked in my life so far, and what seems to work in the lives of others on average. On that note, please visualize me being the first trillionaire who dedicates mas fortunes to improving all of our lives :) Hey, it was worth as shot wasn't it?
Subscribe to my blog, I'm just getting started here, but this was one of my first real blog posts and I hope you enjoyed it. And if you don't mind, share it this on your Facebook, Twitter, or any other place where you think someone might enjoy it too.
Take Care of yourself and prepare yourself for some unique blog posts in the future, because as you will learn in my future blogs, I'm a pretty unique individual. Afterall, how many people you know have their own Google Commercial?
Voitek
]]>
Cast iron tubs can weigh over 300lbs easily depending on the size, shape, and wall thickness, which makes them very difficult to remove. Depending on what your plans are for the tub, you have several different methods you can use to remove one. I've tried both methods in the past so I can help you prepare for what you're in store for.
Plumbing Preparation Prior to the Tub Removal
 No matter what method you choose from below, you will need to makes sure that you disconnect any plumbing running to the tub. Usually this entails disconnecting the drain waste and overflow pipes from the tub itself. Sometimes these are the only things keeping the tub in place due to the tubs weight alone.
You may also need to cut caulking around the tub using a utility knife, if the tub is located next to one or more tiled walls.
Sometimes a special tool called the "Tub Drain Remover" is required to unscrew the bottom drain from the tub's plumbing below. I typically used a massive screwdriver and wedged it into the slot in the upper portion of the tub drain, then unscrewed that drain strainer counterclockwise if my memory serves me right. The tub drain remover tool just makes it easier, you can pick one up for $10.
The tub overflow piece that's located inside the tub can usually be unscrewed with two Phillips head screws.
Okay, now that you properly disconnected the plumbing from the tub itself, as a safety precaution, you can turn off your water supply, just in case you accidentally damage a water pipe during the actual bathtub removal process.
Skip to the method that pertains to your actual needs, one is for people who plan to keep the tub in one piece, and the other is for people who rather remove the tub in smaller chunks.
{loadposition responseblog}
Method 1
Remove a Cast Iron Tub in 1 Piece
You should have everything disconnected from the tub at this point, now you have to break loose the tub from the walls if that's how it's installed. You're going to have to do whatever it takes to remove it, this can entail removing wall tile, and other obstacles that can be holding the tub in place.
If you cut the silicone bead and still can't get the tub to budge, you may have to break the walls that hold the tub there. I would personally break as little of the all as possible if, you're plan is to retrofit a new tub in that area. If you're planning a major remodel, it may be a lot easier to remove the surrounding tile and cut the wall board off 6" above the tub, so that you can give yourself plenty of wiggle room to wedge the tub out of its cavity.
Sometimes people want to relocate or reuse an old cast iron tub and it is doable, but you're going to need some man power because of the sheer weight of the tub. I remember one of our first whole house remodels back in 2005, we removed a cast iron tub and had to carefully navigate it through the hallway and kitchen and then down the 2 flights of stairs. I remember that removal clearly because it was a bit of a nightmare. If you have to walk your tub down a flight of stairs, I recommend at least 2 strong guys at the bottom of the tub, because the weight is too much for one guy to bare all on his own. With this method you are going to risk damaging the stairs and any flooring you can possibly drop or drag the tub on. Also you may scrape or bump into walls, doors, and other obstacles on your way out of the house, so plan ahead and be careful.
Method 2
Break the Cast Iron Tub Into Pieces
I've used this method 3 times, 2 on the job for previous customers and once for myself. First make sure you've done the work mentioned previous regarding the plumbing disconnect . You can stuff some crumpled up newspapers into the exposed tub drain to prevent debris from clogging your drain pipes, that's what I did.
For this method I recommend the following materials:
1. Old comforter
2. 10 lb sledgehammer
3. Safety Glasses
4. Thick work gloves
5. Ear protection, because it's going to be very loud.
I removed both cast iron tubs by placing a blanket or old comforter over the areas I was planning to strike with the sledgehammer. Why use the blanket? The porcelain coating is going to shatter into tiny sharp pieces and they can cause injury if they hit your body. The comforter will prevent them or pieces of cast iron from flying at you or somebody else. I wouldn't even think of using a sledgehammer on a cast iron tub or sink without taking the right safety precautions.
Once you have yourself protected and ready for work, simply strike covered areas of the tub with the sledgehammer, paying attention to how much force you actually need to break pieces off. My particular tub took a ton of force, watch the YouTube Clip below to see me in action, I even show footage of what my new bathroom looks like after I converted the old outdated bathrooms into one larger bathroom instead. I think you're going to like what I did with it.
{loadposition tubvideo}
One last thing I want to point out is that the corner walls of the tub might require more force to strike but they are also great starting points in my opinion. Once you break the top corner of the tub, you can continue whacking pieces off the tub wall. Remove all the pieces that area easy to handle out of your way and keep working at it until the whole tub has been obliterated and removed from your bathroom.
For cleanup, I suggest a good shop vac, because you'll have hundreds if not thousands of porcelain shards and small pieces of cast iron as well to clean out from the floor.
Good luck, and please be careful. If you don't trust yourself doing a job like this, hire somebody how has experience.
]]>
 Did you know that about 50% of all the money we spend on heating and cooling is due to inefficiencies in the way these systems are installed?
It's a sad but true fact. A whopping 25% of your hard earned money is literally leaking out of the duct work. The other 25% comes from other installation problems with the units themselves.
{loadposition responsiveads}
The biggest problem according to John Proctor of Proctor Engineering Group is that the vast majority of heating and cooling systems are improperly installed to being with. A poor installation leads to wasted energy, future reliability problems with the units themselves, and of course a whole lot of wasted money.
The good news is that there are several things that any homeowner can do to begin the auditing process of their HVAC system. Just keep in mind that for some of these steps, you are better off printing out the article and discussing it with a licensed heating and air conditioning contractor. You can find a HVAC contractor using the form below, or using trusted sources like the Better Business Bureau.
Have a licensed professional check your HVAC system for energy efficiency by verifying the original installation. John Proctor has found that items like the compressor, coil, and capacitor will last much longer when compared to exactly the same HVAC systems that were installed by a lazy or incompetent HVAC contractors.
Did you know that about 50% of the money you spend on cooling your home is being wasted because of a improper installation?
Standard Installation - Not Good Enough
- setting the outside unit
- bringing the set of lines out
- brazing it together
- opening the valves
- turning it on
- and testing for cold air operation
- this doesn't cut it
Proper A/C Installation
- Match outside unit and inside coil
- Braise the lines using nitrogen. So when you flow nitrogen through it you won't get little carbon pieces of carbon; they will end up clogging the unit and making it not work right.
- Evacuate inside coil & line before refrigerant. You need to use a vacuum pump, a micron gauge, you have to pull all the moisture and air out of those lines and the inside coil before you put the refrigerant in.
- Release the refrigerant into the inside coil & the lines, and then you have to check and make sure you have the right amount. Because it comes with a certain amount but it is not the right amount necessarily for your inside coil and the length of lines you actually have. You usually have to add enough refrigerant to get it up to the right amount of refrigerant in order to have the unit run at its top efficiency.
- When you don't evacuate the system, because what you end up with is air and moisture in the system. Decreases durability because the excess moisture will turn into acid and corrode the system.
- When you don't have the right amount of refrigerant in the system. You will have too much super heat which means the compressor will overheat and burnout. If you have too much refrigerant it's going to slug liquid back to the compressor and ruin the compressor that way.
- When you have low airflow accross the inside coil.
{loadposition responsiveads}
Duct Work
Having leaky duct work system with a seer 14 AC unit will easily drop it down to a seer 10 efficiency. Then if you add the wrong amount of refrigerant in, the efficiency will drop to a seer 8. And lastly if you get the wrong amount of airflow, you're going to drop it down to a seer 7.
Air Flow
The amount of air flow across the inside coil.
4 ton air handler on a tiny duct system equals not enough air flow.
You really need to test it.
Test Method 1: Temperature Split Method
Title 24 Airflow Test in California has a temperature split method which is a common method that is easy to do. What you do is measure the wet bulb and dry bulb temperatures which tells you what the humidity is as well as the temperature on the return side. And also what the temperature is on the supply side. So you see how much the temperatures drop between the return and the supply. Based on the temperature drop you can tell whether or not you got too little air flow or not.
You can compare your results with a table you get from the CDC website www.energyu.ca.gov. It's good for all the states, east coast, Saudi Arabia. If your temperature split is too high, you got too little airflow.
Test Method 2: Using a Flow Grid
This is the best way to measure the airflow. Its a device that you put in where the filter would normally be and you take a few pressure readings, and from that you can get real accurate measurements of how much airflow is flowing through the inside coil.
How do you know if you have the proper amount of airflow. Manufacturers give different specs for different regions to get air flow numbers. 450 cfm per ton across the coil in California. Georgia where it's hot and humid needs 350 cfm across the coil per ton.
What About The Size Of The Line Set Itself
As the line set gets longer you have to change the diameter of the line set. It's something that the manufacturers specify but it's most often ignored. Most often mistakes found coming from the back of the unit they will actually use a smaller line set which the machine was designed for. People actually take clamps and squeeze down the unit not put a fitting in there and braze the gap. The efficiency drops significantly using that method because there's a good pressure drop there andnothing is working right at that point.
Top Efficiency Hits
The Durability of a system depends on doing it right. If you don't do it right the first time, it's going to keep coming back and bite you.
Checking Contractors
- Make sure they know what the specifications are. Then you need someway to have that information verified by a third-party. The CDC has a way The CheckMe System. www.proctoreng.com
- While the technician is still on the site they gather the information and pickup the cell phone and call a toll free number, the numbers are read over the phone. It goes into a computer program that checks everything and makes sure its a good test. And since the technician is on the site, they verify that the airflow is right and that the charge is right. Also if there is a problem, the technician can address it right away. This system helps everybody.
This helps out the builder, state, and HVAC contractor. Good trade schools and manufacturers have training.
]]>
 As someone who's been figuring out computers and all the trouble they get into for more than 20 years now, people constantly ask me questions. This time a person contacted me on my Proven Helper Facebook page regarding a virus he got by downloading torrents from the internet. Below you will find his question and my response. I hope that it helps other people out there who downloaded a virus somehow, or opened up an attachment in an email that later infected their PC.
And don't be fooled by the media, all computers including Mac's, Smartphones, and even your car computer can get viruses. Just remember that a virus is simply a program written by a prankster, hacker, or enemy who wants to fool with you, ruin your day, or extort money from you. It doesn't matter what computer you use, there's a techie out there that knows, tested, and continues to create new viruses for it. That's the unfortunate truth, now lets get to what was asked, and my email back to the fan of the SelfMade Life YouTube Channel.
{loadposition responseblog}
QUESTION: Hello. I read the information you've put in your videos and I'm glad to know that you're welcome to answer the questions. I've got this problem 2 days ago. Everything began with downloading IDM by torrent. after that lots of viruses occupied my system. I think they are rstray.exe and ravmon.exe Chinese programs. Before I downloaded the torrent everything was ok. Whatever I try to do something on my computer, It just doesn't work. If I want to change permissions, I get access denied. If I want to end a process by using task manager, it doesn't work. Even if I want to delete a file, it won’t let me delete.
I'm totally confused about how to get rid of this virus and get my computer to work like it used to. I’d like some advice on what to do about this horrible virus. Thank you!
Top 10 Tips on How To Remove a Computer Virus
- First I want you to know that every computer geek out there knows that if a virus is really bad, nothing is safe unless you reinstall your Windows operating system from scratch. But you can leave this as a last resort option for now.
- When a computer virus prevents you from deleting files, changing permission, and ending a process, you can try to bypass its activation by booting into Windows safe mode. Simply restart your computer and press F6 before the Windows logo pops up. You might have to try this process repeatedly until Windows asks you if you want to boot into safe mode.
- However, these hackers don't make it easy to removal a virus. Sometimes the virus renames itself as a known process. If that happens you would have to get the file size and date of the affected file, and compare it with the one on your computer. This can get complicated because there could be many known legitimate revisions of that file program, so you would have to know exactly which version you have before you start suspecting. Sometimes the file size is different by a huge margin, making it easy to find the suspicious program. But other times these hackers can even get the file size down to the bit, so even this method is not full proof.
- The bottom line is that if you really want to beat this virus you're going to need another computer to Google your questions while you keep looking for signs of the virus. Google strange activities your computer is doing, Google strange processes in your Windows Task Manager, and Googling error messages are just some of the things I’ve done in the past to figure out what computer virus I have and what can be done to remove it. Chances are someone else out there already caught the virus and wrote how they removed it somewhere.
- {loadposition responseblog}
- Also newer virus's change names, so you can delete one, and then another one would spawn in a different name in its place. You can track your active processes and see what happens when you kill a process. If something is respawning a process either as the same name or a completely different name every time, you have to find the Windows Process or Service that is running which is therefore allowing this entire process to happen. Check Msconfig in older versions of Windows by running the command Msconfig. Shortcut is Window Key + R this will bring up the Run prompt, then type Msconfig. In Windows 10, the startup section has been moved to Task Manager but you can still execute this procedure, then click the blue link that says open task manager. Alternatively, right click the Windows Icon, then Task Manager, then Startup. The Services Tab in Windows 10 is where you can examine Windows Services that can be running and turning on your virus every time you boot into Windows.
- Many antivirus programs have rootkit removal tools or virus scanners that can be installed on a USB stick that you can run to help you catch the virus. This of course assumes that this is a known virus and not something new which won't be caught. You can also download Rootkit Removal Tools from trusted websites. Also sometimes specific virus removal tools are created for specific viruses. In this case, you will have to figure out exactly what virus you have by doing some of the work noted above.
- Sometimes a computer virus just ruins one user profile on the machine. In this scenario simply create another user profile, then transfer over just the documents or photos you need. Then delete the corrupted or infected profile.
- I’ve seen viruses disable and imitate antivirus software before. Remember, the people creating these things are just human, so sometimes you can almost predict what they might do, to fool you into thinking that everything is okay. Think outside the box or meditate on what to do for 15 minutes and see if your subconscious can drop some hints on what to do next. You’d be surprised how helpful meditation can be for solving any type of problem.
- This is another technique out of left field, but I have been using it to my advantage for more than 20 years. It’s the set your mind on that you’re going to solve this problem and that’s that solution. Our brains our powerful tools that sometimes we don’t exercise enough. I learned about this power of setting my mind on solving a problem long ago, when computers used to cost $2,500 and if something broke it was going to be an arm and a leg. So when things went wrong, which they also do with computers, the first thing I said to myself was that somehow, someway, I was going to figure out this problem. And interestingly enough I became so good at it, that I worked in IT for more than 10 years once I grew up and even in my IT days I used the advice I wrote on this post to solve 99% of my computer problems, no matter if it was a virus, worm, bad hardware, or bad software. These techniques will work, but you have to have the patience and will to make them work for you. Sometimes you can beat the problem quickly, while other times it can take forever. Which brings me to my final tip.
- If you don’t want to reinstall Windows, try any of these steps, or simply don’t have the time to find and remove this virus on your own, despite how awesome you will feel afterwards. You can always bring it to BestBuy Geek Squad or some other shop and have them use these techniques for you in exchange for a fee. Sometimes they just choose the easiest method, because no one is going to spend hours when you’re only paying them $50. You get what you pay for,
Well I hope you enjoyed learning about how I removed my computer viruses in the past and even used these principals to build a career in IT. I still use these principals to this day and believe in them 100%. A computer Virus is written by humans and every human has a weakness. You simply have to find out where this person was lazy and remove their electronic prank from your computer.
17 Million Views Strong
Subscribe to YouTube & Follow on Twitter to see what How-to videos & Tips I just posted. I’m happy to say that my content has generated 17 million views between SimplyAdditions.com and my YouTube channel.
|
|
Follow @Lex SelfMade Life |